QImage 图片分割、保存
【摘要】 QImage 图片分割、保存
简介
之前一直只用Qt做图片显示,这次突发奇想想用Qt做做图像相关的,就尝试了一下图片切割,保存。
QImage介绍
QImage类为Qt提供的一个支持图像算法处理的类库,可以精确到像素及单位。在我理解不是提供了什么算法,而是为图像计算提供了基础。
构造函数
QImage()
QImage(const QSize &s...
QImage 图片分割、保存
简介
之前一直只用Qt做图片显示,这次突发奇想想用Qt做做图像相关的,就尝试了一下图片切割,保存。
QImage介绍
QImage类为Qt提供的一个支持图像算法处理的类库,可以精确到像素及单位。在我理解不是提供了什么算法,而是为图像计算提供了基础。
构造函数
QImage()
QImage(const QSize &size, QImage::Format format)
QImage(int width, int height, QImage::Format format)
QImage(uchar *data, int width, int height, QImage::Format format, QImageCleanupFunction cleanupFunction = nullptr, void *cleanupInfo = nullptr)
QImage(const uchar *data, int width, int height, QImage::Format format, QImageCleanupFunction cleanupFunction = nullptr, void *cleanupInfo = nullptr)
QImage(uchar *data, int width, int height, int bytesPerLine, QImage::Format format, QImageCleanupFunction cleanupFunction = nullptr, void *cleanupInfo = nullptr)
QImage(const uchar *data, int width, int height, int bytesPerLine, QImage::Format format, QImageCleanupFunction cleanupFunction = nullptr, void *cleanupInfo = nullptr)
QImage(const char *const [] xpm)
QImage(const QString &fileName, const char *format = nullptr)
QImage(const QImage &image)
QImage(QImage &&other)
- 1
- 2
- 3
- 4
- 5
- 6
- 7
- 8
- 9
- 10
- 11
提供了以上构造方法,支持 uchar* ,const uchar*,filename 等元素的构造。
Format
| Format | Description | Qt’s support |
|---|---|---|
| BMP | Windows Bitmap | Read/write |
| GIF | Graphic Interchange Format (optional) | Read |
| JPG | Joint Photographic Experts Group | Read/write |
| JPEG | Joint Photographic Experts Group | Read/write |
| PNG | Portable Network Graphics | Read/write |
| PBM | Portable Bitmap | Read |
| PGM | Portable Graymap | Read |
| PPM | Portable Pixmap | Read/write |
| XBM | X11 Bitmap | Read/write |
| XPM | X11 Pixmap | Read/write |
QImage 支持的图片格式如上表所示,部分支持读写特性。
相关方法:
QImage::Format format() const
QImage convertToFormat(QImage::Format format, Qt::ImageConversionFlags flags = Qt::AutoColor) const &
QImage convertToFormat(QImage::Format format, Qt::ImageConversionFlags flags = Qt::AutoColor) &&
QImage convertToFormat(QImage::Format format, const QVector<QRgb> &colorTable, Qt::ImageConversionFlags flags = Qt::AutoColor) const
- 1
- 2
- 3
- 4
图像操作:像素、RGB、位深度、color、size
图像载入:
bool load(const QString &fileName, const char *format = nullptr)
bool load(QIODevice *device, const char *format)
bool loadFromData(const uchar *data, int len, const char *format = nullptr)
bool loadFromData(const QByteArray &data, const char *format = nullptr)
- 1
- 2
- 3
- 4
图像数据:
uchar *bits()
const uchar *bits() const
int bytesPerLine() const
const uchar *constBits() const
const uchar *constScanLine(int i) const
- 1
- 2
- 3
- 4
- 5
RGB:
QRgb color(int i) const
QVector<QRgb> colorTable() const
QRgb pixel(const QPoint &position) const
QRgb pixel(int x, int y) const
- 1
- 2
- 3
- 4
思路介绍
图像切割思路如下:
1.载入图片
2.切割图片
->2.1 设置切割属性:将图片切割为 n*m 个图片
->2.2 计算每个图片的rect,保存为rect列表
->2.3 利用copy(Rect)函数将指定区域图片copy出来,存储到切割列表中
3.显示图片
-> 按照rect列表显示切割后的图片
4.保存图片
-> 将切割后的图片存储到指定位置
- 1
- 2
- 3
- 4
- 5
- 6
- 7
- 8
- 9
程序部分
类图
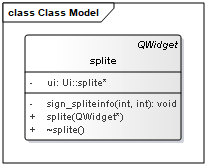
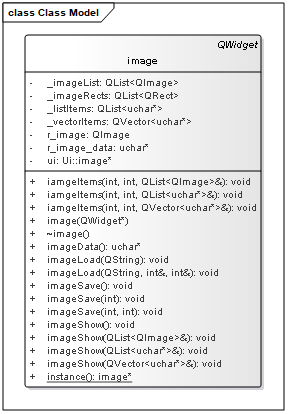
主要由三个类组成:Image类,负责图像操作部分。MainWindow,主线调度类,负责功能性调度,或者说逻辑模块,业务部分。splite类。图片剪切设置框


Image类
image.cpp
image.h
image.ui
- 1
- 2
- 3
class image : public QWidget
{ Q_OBJECT

public: explicit image(QWidget *parent = nullptr); ~image(); //图片载入 void imageLoad(const QString path); void imageLoad(const QString path, int &_width, int &_height); uchar* imageData();
	//图像切割 void iamgeItems(int x, int y, QList<QImage> &imageList); void iamgeItems(int x, int y, QList<uchar*> &list);//uchar* 方便像素级的图像算法或者其他图像操作 void iamgeItems(int x, int y, QVector<uchar*> & vector);
	//图像保存 void imageSave(); void imageSave(int index); void imageSave(int start,int end);
	//图像显示 void imageShow(); void imageShow(QList<QImage> &listImage); void imageShow(QList<uchar*> &listItems); void imageShow(QVector<uchar*> &VectorItems); static image* instance();
private: Ui::image *ui; QImage r_image; uchar * r_image_data; QList<QRect> _imageRects; QList<QImage> _imageList; QList<uchar*> _listItems; QVector<uchar*> _vectorItems;
};
- 1
- 2
- 3
- 4
- 5
- 6
- 7
- 8
- 9
- 10
- 11
- 12
- 13
- 14
- 15
- 16
- 17
- 18
- 19
- 20
- 21
- 22
- 23
- 24
- 25
- 26
- 27
- 28
- 29
- 30
- 31
- 32
- 33
- 34
- 35
图像载入
//利用load方法载入图像
void image::imageLoad(const QString path)
{ r_image.load(path);
}

void image::imageLoad(const QString path, int &_width, int &_height)
{ r_image.load(path); _width = r_image.width(); _height = r_image.height();
}
- 1
- 2
- 3
- 4
- 5
- 6
- 7
- 8
- 9
- 10
- 11
- 12
图像切割
void image::iamgeItems(int x, int y, QList<QImage> &imageList)
{ int r_width = r_image.width(); int r_height =  r_image.height(); int cellWidth = r_width / x; int cellHeight = r_height / y; qDebug() << r_width << " " <<  r_height << " " << cellWidth << " " << cellHeight; for(int i = 0 ;i < x; i++ ) { for (int j = 0; j < y; j++) { QRect rect(i * cellWidth,j * cellHeight, cellWidth,cellHeight); qDebug() << rect.x() << " " <<  rect.y() << " " << rect.width() << " " << rect.height(); _imageRects.push_back(rect); imageList.push_back(r_image.copy(rect)); } } _imageList = imageList;
}
- 1
- 2
- 3
- 4
- 5
- 6
- 7
- 8
- 9
- 10
- 11
- 12
- 13
- 14
- 15
- 16
- 17
- 18
图像保存
void image::imageSave()
{ int i = 0; for(auto it : _imageList) { QString imageName = QString("image/%1.jpg").arg(i); it.save(imageName); i++; } qDebug() << "iamge save ok";
}

void image::imageSave(int index)
{ _imageList.at(index).save(QString("image/%1.jpg").arg(index));
}
- 1
- 2
- 3
- 4
- 5
- 6
- 7
- 8
- 9
- 10
- 11
- 12
- 13
- 14
- 15
- 16
图像显示
void image::imageShow()
{ for(int i = 0 ;i < _imageList.size() ; i++) { QLabel * label = new QLabel(this); label->setGeometry(_imageRects.at(i)); QPixmap pixmap(QPixmap::fromImage(_imageList.at(i))); label->setPixmap(pixmap); label->show(); }
}
- 1
- 2
- 3
- 4
- 5
- 6
- 7
- 8
- 9
- 10
- 11
MainWindow
负责全部的业务逻辑部分,也就是通俗所说的调度。
mainwindow.cpp
mainwindow.h
mainwindow.ui
- 1
- 2
- 3
class MainWindow : public QMainWindow
{ Q_OBJECT

public: explicit MainWindow(QWidget *parent = nullptr); ~MainWindow(); void menuInit();
private: Ui::MainWindow *ui; void sltImportImage(); void sltSpliteImage(); void sltSaveImage(); void sltcalcImage();
};
- 1
- 2
- 3
- 4
- 5
- 6
- 7
- 8
- 9
- 10
- 11
- 12
- 13
- 14
- 15
菜单初始化
void MainWindow::menuInit()
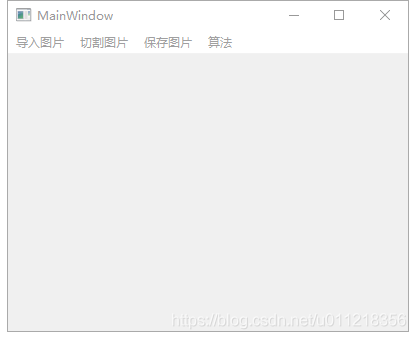
{ QAction* importImage = ui->menuBar->addAction(QString("导入图片")); QAction* spliteImage = ui->menuBar->addAction(QString("切割图片")); QAction* saveImage = ui->menuBar->addAction(QString("保存图片")); QAction* calcImage = ui->menuBar->addAction(QString("算法")); connect(importImage,&QAction::triggered,this,&MainWindow::sltImportImage); connect(spliteImage,&QAction::triggered,this,&MainWindow::sltSpliteImage); connect(saveImage,&QAction::triggered,this,&MainWindow::sltSaveImage); connect(calcImage,&QAction::triggered,this,&MainWindow::sltcalcImage);
}
- 1
- 2
- 3
- 4
- 5
- 6
- 7
- 8
- 9
- 10
- 11
导入图片
void MainWindow::sltImportImage()
{ QString imagePath = QFileDialog::getOpenFileName(this,"导入图片","./","*png *jpg"); int imageWidth = 0,imageHeight = 0; ui->iamge->imageLoad(imagePath,imageWidth,imageHeight); ui->iamge->imageData(); this->resize(imageWidth,imageHeight);
}
- 1
- 2
- 3
- 4
- 5
- 6
- 7
- 8
图片切割
void MainWindow::sltSpliteImage()
{ splite *_splite = new splite(); _splite->show(); connect(_splite,&splite::sign_spliteinfo,[=](int x,int y) { QList<QImage> imageItems; ui->iamge->iamgeItems(x,y,imageItems); ui->iamge->imageShow(); });
}
- 1
- 2
- 3
- 4
- 5
- 6
- 7
- 8
- 9
- 10
- 11
图像保存
void MainWindow::sltSaveImage()
{ ui->iamge->imageSave();
}
- 1
- 2
- 3
- 4
图像算法选择
void MainWindow::sltcalcImage()
{
	//设计中选择图像算法,注册对应图像算法,选择实现对应的图像算法 //算法模块中,特意提供了将图像数据列表,方便算法操作。 //近期会找一两个比较简单的图像算法来实现
}
- 1
- 2
- 3
- 4
- 5
- 6
其他函数说明
主函数
int main(int argc, char *argv[])
{ QApplication a(argc, argv); MainWindow w; w.show(); return a.exec();
}
- 1
- 2
- 3
- 4
- 5
- 6
- 7
- 8
splite构造函数
splite::splite(QWidget *parent) : QWidget(parent), ui(new Ui::splite)
{ ui->setupUi(this); connect(ui->pushButton_right,&QPushButton::clicked,[=]() { emit sign_spliteinfo(ui->lineEdit_x->text().toInt(),ui->lineEdit_y->text().toInt()); this->close(); }); connect(ui->pushButton_cancel,&QPushButton::clicked,[=]() { this->close(); });
}
- 1
- 2
- 3
- 4
- 5
- 6
- 7
- 8
- 9
- 10
- 11
- 12
- 13
- 14
- 15
运行效果
主程序界面

图像载入

图像切割

图像保存
文章来源: blog.csdn.net,作者:何其不顾四月天,版权归原作者所有,如需转载,请联系作者。
原文链接:blog.csdn.net/u011218356/article/details/108506196
【版权声明】本文为华为云社区用户转载文章,如果您发现本社区中有涉嫌抄袭的内容,欢迎发送邮件进行举报,并提供相关证据,一经查实,本社区将立刻删除涉嫌侵权内容,举报邮箱:
cloudbbs@huaweicloud.com
- 点赞
- 收藏
- 关注作者


评论(0)