自定义ViewGroup——自定义布局

自定义ViewGroup和自定义View的区别:
| 类型 | onMeasure | onLayout | onDraw |
|---|---|---|---|
| 自定义View | 测量控件本身的大小 | 一般不用重写此方法 | 在父布局指定的区域绘制图形 |
| 自定义ViewGroup | 一定要测量子控件及本身的大小 | 必须重写此方法,在布局中摆放子控件 | 一般不重写此方法 |
自定义ViewGroup的步骤:
- 继承ViewGroup;
- 重写onMeasure方法测量子控件和自身宽高;
- 实现onLayout方法完成子控件的摆放。
自定义属性
如果要像LinearLayout布局那样有自己的属性,如orientation属性,那么我们还要定义一些布局属性,步骤如下:
- 首先在app/src/main/res/values/attrs.xml里定义布局属性;
- 继承LayoutParams,也可以继承MarginLayoutParams,定义布局参数类,用于记录布局属性的;
- 重写generateLayoutParams(),如generateLayoutParams(AttributeSet attrs)在布局文件被填充为对象的时调用,会获得AttributeSet对象,里面有布局属性。可以在这里初始化LayoutParams或其子类;
- 在onMeasure和onLayout中使用布局参数。
示例
自定义ViewGroup:
package com.wong.layout;

import android.content.Context;
import android.util.AttributeSet;
import android.util.Log;
import android.view.View;
import android.view.ViewGroup;
/*第一步:继承ViewGroup*/
public class MyLayout extends ViewGroup { public MyLayout(Context context) { super(context); } public MyLayout(Context context, AttributeSet attrs) { super(context, attrs); } public MyLayout(Context context, AttributeSet attrs, int defStyleAttr) { super(context, attrs, defStyleAttr); } public MyLayout(Context context, AttributeSet attrs, int defStyleAttr, int defStyleRes) { super(context, attrs, defStyleAttr, defStyleRes); } /** * 第二步: 重写onMeasure方法测量子控件和自身宽高; * 在onMeasure方法里进行子控件测量及ViewGroup自身的测量 * * @param widthMeasureSpec * @param heightMeasureSpec */ @Override protected void onMeasure(int widthMeasureSpec, int heightMeasureSpec) { super.onMeasure(widthMeasureSpec, heightMeasureSpec); /*测量子控件的大小,计算出所有的childView的宽和高,如果不进行测量,那么子控件就会不显示*/ measureChildren(widthMeasureSpec, heightMeasureSpec); } /** * 第三步:实现onLayout方法完成子控件的摆放 */ @Override protected void onLayout(boolean changed, int l, int t, int r, int b) { /*用于记录子控件添加到同一行后的累计宽度,以此作为是否换行的依据*/ int cumulateLayoutWidth = 0; /*累计每行最大的高度值,以此作为下一行与父容器的顶边距的值*/ int cumulateLayoutHeight = 0; /*用于定位每个子控件的位置时用的临时变量*/ int left, top, right, bottom; /*记录每行的最大高度的临时变量,在换行时使用*/ int maxLineHeight = 0; /*ViewGroup容器里的子控件数*/ int count = getChildCount(); /*摆放ViewGroup容器里的子控件*/ for (int i = 0; i < count; i++) { View child = getChildAt(i); /*子控件的测量宽度和高度,不要使用child.getWidth()和child.getHeight()*/ int childWidth = child.getMeasuredWidth(); int childHeight = child.getMeasuredHeight(); /*getWidth()是ViewGroup的宽度,如果累计的宽度再加一个子控件的宽度超过了父容器的宽度getWidth(),那么就要另起一行了*/ if (cumulateLayoutWidth + childWidth < getWidth()) { left = cumulateLayoutWidth; top = cumulateLayoutHeight; right = left + childWidth; bottom = top + childHeight; } else { cumulateLayoutWidth = 0; cumulateLayoutHeight = cumulateLayoutHeight + maxLineHeight; maxLineHeight = 0; left = cumulateLayoutWidth; top = cumulateLayoutHeight; right = left + childWidth; bottom = top + childHeight; } /*累加宽度*/ cumulateLayoutWidth = cumulateLayoutWidth + childWidth; /*选出行高*/ maxLineHeight = Math.max(maxLineHeight, childHeight); child.layout(left, top, right, bottom); } }
}
- 1
- 2
- 3
- 4
- 5
- 6
- 7
- 8
- 9
- 10
- 11
- 12
- 13
- 14
- 15
- 16
- 17
- 18
- 19
- 20
- 21
- 22
- 23
- 24
- 25
- 26
- 27
- 28
- 29
- 30
- 31
- 32
- 33
- 34
- 35
- 36
- 37
- 38
- 39
- 40
- 41
- 42
- 43
- 44
- 45
- 46
- 47
- 48
- 49
- 50
- 51
- 52
- 53
- 54
- 55
- 56
- 57
- 58
- 59
- 60
- 61
- 62
- 63
- 64
- 65
- 66
- 67
- 68
- 69
- 70
- 71
- 72
- 73
- 74
- 75
- 76
- 77
- 78
- 79
- 80
- 81
- 82
- 83
- 84
应用MyLayout.java:
<?xml version="1.0" encoding="utf-8"?>
<com.wong.layout.MyLayout xmlns:android="http://schemas.android.com/apk/res/android" xmlns:tools="http://schemas.android.com/tools" android:layout_width="wrap_content" android:layout_height="wrap_content" android:background="@android:color/holo_red_dark" tools:context=".MainActivity"> <Button android:layout_width= "200dp" android:layout_height= "200dp" android:layout_margin="20dp" android:text="按钮1" /> <Button android:layout_width= "wrap_content" android:layout_height= "wrap_content" android:text="按钮2" /> <Button android:layout_width= "wrap_content" android:layout_height= "wrap_content" android:text="按钮3" /> <Button android:layout_width= "wrap_content" android:layout_height= "wrap_content" android:text="按钮4" /> <Button android:layout_width= "wrap_content" android:layout_height= "wrap_content" android:text="按钮5" /> <Button android:layout_width= "wrap_content" android:layout_height= "wrap_content" android:text="按钮6" />
</com.wong.layout.MyLayout>
- 1
- 2
- 3
- 4
- 5
- 6
- 7
- 8
- 9
- 10
- 11
- 12
- 13
- 14
- 15
- 16
- 17
- 18
- 19
- 20
- 21
- 22
- 23
- 24
- 25
- 26
- 27
- 28
- 29
- 30
- 31
- 32
- 33
效果如图:
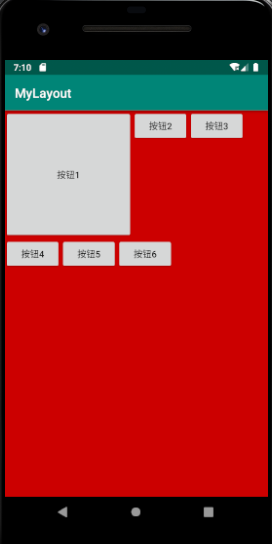
哈哈哈!可以自动换行!
注意事项:
1、要在onMeasure调用measureChildren(int, int)测量子控件
@Override protected void onMeasure(int widthMeasureSpec, int heightMeasureSpec) { super.onMeasure(widthMeasureSpec, heightMeasureSpec); /*测量子控件的大小,计算出所有的childView的宽和高,如果不进行测量,那么子控件就会不显示*/ measureChildren(widthMeasureSpec, heightMeasureSpec); }
- 1
- 2
- 3
- 4
- 5
- 6
在重写onMeasure方法时,一定要用measureChildren(int, int)测量子控件。如果不测量的话,子控件将不会显示,因为不知道其大小。ViewGroup或View的子类都应该重写这个方法,以提供更准确且有效的测量值。重写onMeasure方法,必须调用setMeasuredDimension(int, int)方法来保存测量的宽度和高度。
measureChildren(int, int)最后也会调用setMeasuredDimensionRaw(int,int)保存测量的宽度和高度,setMeasuredDimension(int,int)最终也是调这个方法来保存的。
2、在onLayout方法要用child.getMeasureWidth()和child.getMeasuredHeight()获取子控件的宽高:
@Override protected void onLayout(boolean changed, int l, int t, int r, int b) { ... /*用于定位每个子控件的位置时用的临时变量*/ int left, top, right, bottom; int count = getChildCount(); /*摆放ViewGroup容器里的子控件*/ for (int i = 0; i < count; i++) { View child = getChildAt(i); /*子控件的测量宽度和高度,不要使用child.getWidth()和child.getHeight()*/ int childWidth = child.getMeasuredWidth(); int childHeight = child.getMeasuredHeight(); ... } child.layout(left, top, right, bottom); } }
- 1
- 2
- 3
- 4
- 5
- 6
- 7
- 8
- 9
- 10
- 11
- 12
- 13
- 14
- 15
- 16
- 17
child.getMeasureWidth()和child.getMeasuredHeight()才能获得子控件的宽高,而通过child.getWidth()和child.getHeight()获得的值都是0。为什么呢?首先,我们先来搞清楚getMeasureWidth和getMeasureHeight为什么会有值。
自定义View/ViewGroup的初始过程所调用的方法的顺序:
 这些方法都主要在View类里,以getMeasuredWidth()为例:
public final int getMeasuredWidth() { return mMeasuredWidth & MEASURED_SIZE_MASK; }
- 1
- 2
- 3
从上面的代码来看,只要mMeasuredWidth的初始化是在onLayout之前完成的,那么我们就能够在onLayout方法里通过getMeasuredWidth方法获得它的值,反之,则不能。
mMeasuredWidth变量是在setMeasuredDimensionRaw方法中完成初始化的:
private void setMeasuredDimensionRaw(int measuredWidth, int measuredHeight) { mMeasuredWidth = measuredWidth; mMeasuredHeight = measuredHeight; mPrivateFlags |= PFLAG_MEASURED_DIMENSION_SET; }
  public final void measure(int widthMeasureSpec, int heightMeasureSpec) { ... setMeasuredDimensionRaw((int) (value >> 32), (int) value);
		... }
- 1
- 2
- 3
- 4
- 5
- 6
- 7
- 8
- 9
- 10
- 11
- 12
setMeasuredDimension在onMeasure方法里被调用来保存测量的宽高,而它最终也会调setMeasuredDimensionRaw方法来做保存:
 protected final void setMeasuredDimension(int measuredWidth, int measuredHeight) { ... setMeasuredDimensionRaw(measuredWidth, measuredHeight); }
 protected void onMeasure(int widthMeasureSpec, int heightMeasureSpec) { setMeasuredDimension(getDefaultSize(getSuggestedMinimumWidth(), widthMeasureSpec), getDefaultSize(getSuggestedMinimumHeight(), heightMeasureSpec)); }
- 1
- 2
- 3
- 4
- 5
- 6
- 7
- 8
因此,mMeasuredWidth的初始化是在onLayout被执行之前完成的。getMeasuredHeight()同理的。
接下来我们看看在onLayout方法里child.getWidth()或child.getHeight()为什么都为0。以getWidth()为例:
/*视图左边离父视图左边的距离*/ protected int mLeft; /*视图的右边离父视图左边的距离*/ protected int mRight; public final int getWidth() { return mRight - mLeft; }
- 1
- 2
- 3
- 4
- 5
- 6
- 7
- 8
由上面的代码来看,如果mRight,mLeft在onLayout方法之前没有初始化的话,那么child.getWidth()就得到0。我们看看mRight,mLeft是在哪里被初始化的:
mRight,mLeft最终是在setFrame方法里被初始化的:
protected boolean setFrame(int left, int top, int right, int bottom) { ... mLeft = left; mTop = top; mRight = right; mBottom = bottom; ... } private boolean setOpticalFrame(int left, int top, int right, int bottom) { Insets parentInsets = mParent instanceof View ? ((View) mParent).getOpticalInsets() : Insets.NONE; Insets childInsets = getOpticalInsets(); return setFrame( left + parentInsets.left - childInsets.left, top + parentInsets.top - childInsets.top, right + parentInsets.left + childInsets.right, bottom + parentInsets.top + childInsets.bottom); }
- 1
- 2
- 3
- 4
- 5
- 6
- 7
- 8
- 9
- 10
- 11
- 12
- 13
- 14
- 15
- 16
- 17
- 18
- 19
- 20
上面的方法是在layout方法里被调用的:
public void layout(int l, int t, int r, int b) { ... boolean changed = isLayoutModeOptical(mParent) ? setOpticalFrame(l, t, r, b) : setFrame(l, t, r, b);
		...
}
- 1
- 2
- 3
- 4
- 5
- 6
而子控件的layout方法,在我们onLayout方法里刚要被执行:
child.layout(left, top, right, bottom);
- 1
所以,结合上面那张图可知我们通过child.getWidth()和child.getHeight()都在子控件自己的onLayout方法之前被调用了,那么获得的值当然是0了。
不完美之处
我们已成功实现了自定义ViewGroup,但是细心的你,可能已经发现了,在MyLayout布局里第一个Button的外边距没有效果:
<?xml version="1.0" encoding="utf-8"?>
<com.wong.layout.MyLayout xmlns:android="http://schemas.android.com/apk/res/android" xmlns:tools="http://schemas.android.com/tools" android:layout_width="wrap_content" android:layout_height="wrap_content" android:background="@android:color/holo_red_dark" tools:context=".MainActivity"> <Button android:layout_width= "200dp" android:layout_height= "200dp" android:layout_margin="20dp" android:text="按钮1" /> ...
</com.wong.layout.MyLayout>
- 1
- 2
- 3
- 4
- 5
- 6
- 7
- 8
- 9
- 10
- 11
- 12
- 13
- 14
为什么呢?其实layout_margin不属于MyLayout的布局属性。那么我们就要进行自定义布局属性了。自定义布局的属性的四个步骤里,前两个不用做:
 1. 首先在app/src/main/res/values/attrs.xml里定义布局属性;
 2. 继承LayoutParams,也可以继承MarginLayoutParams,定义布局参数类,用于记录布局属性的;
 3. 重写generateLayoutParams(),如generateLayoutParams(AttributeSet attrs)在布局文件被填充为对象的时调用,会获得AttributeSet对象,里面有布局属性。可以在这里初始化LayoutParams或其子类;
 4. 在onMeasure和onLayout中使用布局参数。
- 1
- 2
- 3
- 4
因为布局参数类MarginLayoutParams是可以直接拿来用的,它可以用来记录外边距,而android系统的attrs.xml文件里已定义了layout_margin等外边距属性了。所以这两步我们都不用做,只需要实现后两步。
在ViewGroup里有两个类:LayoutParams、MarginLayoutParams,它们是专门用来告诉父布局它们想如何显示的,区别:
- LayoutParams:仅描述了宽高
- MarginLayoutParams:继承了LayoutParams,增加了记录外边距属性。
那么android系统是如何把布局属性初始化到MarginLayoutParams中的呢?**原来ViewGroup里有个方法generateLayoutParams (AttributeSet attrs),它是在布局文件被填充为对象的时候调用的。这样我们就可以在这个方法里初始化我们的布局参数类中去了。**如果不重写它,那么布局文件中设置的布局参数都不能拿到,除了宽高,因为这个方法在ViewGroup里的默认实现是返回LayoutParams对象的。还有几个方法,最好也能重写一下:
@Override protected LayoutParams generateDefaultLayoutParams() { return new MarginLayoutParams(LayoutParams.WRAP_CONTENT, LayoutParams.WRAP_CONTENT); } @Override protected LayoutParams generateLayoutParams(LayoutParams p) { return p; } @Override public LayoutParams generateLayoutParams(AttributeSet attrs) { return new MarginLayoutParams(getContext(), attrs); } @Override protected boolean checkLayoutParams(LayoutParams p) { return p instanceof MarginLayoutParams; }
- 1
- 2
- 3
- 4
- 5
- 6
- 7
- 8
- 9
- 10
- 11
- 12
- 13
- 14
- 15
- 16
- 17
- 18
- 19
- 20
修改后的MyLayout.java:
package com.wong.layout;

import android.content.Context;
import android.util.AttributeSet;
import android.util.Log;
import android.view.View;
import android.view.ViewGroup;

public class MyLayout extends ViewGroup { public MyLayout(Context context) { super(context); } public MyLayout(Context context, AttributeSet attrs) { super(context, attrs); } public MyLayout(Context context, AttributeSet attrs, int defStyleAttr) { super(context, attrs, defStyleAttr); } public MyLayout(Context context, AttributeSet attrs, int defStyleAttr, int defStyleRes) { super(context, attrs, defStyleAttr, defStyleRes); } @Override protected LayoutParams generateDefaultLayoutParams() { return new MarginLayoutParams(LayoutParams.WRAP_CONTENT, LayoutParams.WRAP_CONTENT); } @Override protected LayoutParams generateLayoutParams(LayoutParams p) { return p; } @Override public LayoutParams generateLayoutParams(AttributeSet attrs) { return new MarginLayoutParams(getContext(), attrs); } @Override protected boolean checkLayoutParams(LayoutParams p) { return p instanceof MarginLayoutParams; } /** * * 在onMeasure方法里进行子控件测量及ViewGroup自身的测量 * * @param widthMeasureSpec * @param heightMeasureSpec */ @Override protected void onMeasure(int widthMeasureSpec, int heightMeasureSpec) { super.onMeasure(widthMeasureSpec, heightMeasureSpec); /*测量子控件的大小,计算出所有的childView的宽和高,如果不进行测量,那么子控件就会不显示*/ measureChildren(widthMeasureSpec, heightMeasureSpec); } /** * 对子控件进行摆放 */ @Override protected void onLayout(boolean changed, int l, int t, int r, int b) { /*用于记录子控件添加到同一行后的累计宽度,以此作为是否换行的依据*/ int cumulateLayoutWidth = 0; /*累计每行最大的高度值,以此作为下一行与父容器的顶边距的值*/ int cumulateLayoutHeight = 0; /*用于定位每个子控件的位置时用的临时变量*/ int left, top, right, bottom; /*记录每行的最大高度的临时变量,在换行时使用*/ int maxLineHeight = 0; /*ViewGroup容器里的子控件数*/ int count = getChildCount(); /*摆放ViewGroup容器里的子控件*/ for (int i = 0; i < count; i++) { View child = getChildAt(i); /*子控件的测量宽度和高度,不要使用child.getWidth()和child.getHeight()*/ int childWidth = child.getMeasuredWidth(); int childHeight = child.getMeasuredHeight(); ViewGroup.MarginLayoutParams lp = (ViewGroup.MarginLayoutParams)child.getLayoutParams(); Log.i("YYY",lp.leftMargin+"#"+lp.topMargin+"#"+lp.rightMargin+"#"+lp.bottomMargin); /*getWidth()是ViewGroup的宽度,如果累计的宽度再加一个子控件的宽度超过了父容器的宽度getWidth(),那么就要另起一行了*/ if (cumulateLayoutWidth + lp.leftMargin+childWidth+lp.rightMargin < getWidth()) { left = cumulateLayoutWidth+lp.leftMargin; top = cumulateLayoutHeight+lp.topMargin; right = left + childWidth; bottom = top + childHeight; } else { cumulateLayoutWidth = 0; cumulateLayoutHeight = cumulateLayoutHeight + maxLineHeight; maxLineHeight = 0; left = cumulateLayoutWidth+lp.leftMargin; top = cumulateLayoutHeight+lp.topMargin; right = left + childWidth; bottom = top + childHeight; } /*累加宽度*/ cumulateLayoutWidth = cumulateLayoutWidth + lp.leftMargin+childWidth+lp.rightMargin ; /*选出行高*/ maxLineHeight = Math.max(maxLineHeight, lp.topMargin+childHeight+lp.bottomMargin); child.layout(left, top, right, bottom); } }
}
- 1
- 2
- 3
- 4
- 5
- 6
- 7
- 8
- 9
- 10
- 11
- 12
- 13
- 14
- 15
- 16
- 17
- 18
- 19
- 20
- 21
- 22
- 23
- 24
- 25
- 26
- 27
- 28
- 29
- 30
- 31
- 32
- 33
- 34
- 35
- 36
- 37
- 38
- 39
- 40
- 41
- 42
- 43
- 44
- 45
- 46
- 47
- 48
- 49
- 50
- 51
- 52
- 53
- 54
- 55
- 56
- 57
- 58
- 59
- 60
- 61
- 62
- 63
- 64
- 65
- 66
- 67
- 68
- 69
- 70
- 71
- 72
- 73
- 74
- 75
- 76
- 77
- 78
- 79
- 80
- 81
- 82
- 83
- 84
- 85
- 86
- 87
- 88
- 89
- 90
- 91
- 92
- 93
- 94
- 95
- 96
- 97
- 98
- 99
- 100
- 101
- 102
- 103
- 104
- 105
- 106
- 107
MyLayout布局的使用:
<?xml version="1.0" encoding="utf-8"?>
<com.wong.layout.MyLayout xmlns:android="http://schemas.android.com/apk/res/android" xmlns:tools="http://schemas.android.com/tools" android:layout_width="wrap_content" android:layout_height="wrap_content" android:background="@android:color/holo_red_dark" tools:context=".MainActivity"> <Button android:layout_width= "200dp" android:layout_height= "200dp" android:layout_margin="20dp" android:text="按钮1" /> <Button android:layout_width= "wrap_content" android:layout_height= "wrap_content" android:text="按钮2" /> <Button android:layout_width= "wrap_content" android:layout_height= "wrap_content" android:text="按钮3" /> <Button android:layout_width= "wrap_content" android:layout_height= "wrap_content" android:text="按钮4" /> <Button android:layout_width= "wrap_content" android:layout_height= "wrap_content" android:text="按钮5" /> <Button android:layout_width= "wrap_content" android:layout_height= "wrap_content" android:text="按钮6" />
</com.wong.layout.MyLayout>
- 1
- 2
- 3
- 4
- 5
- 6
- 7
- 8
- 9
- 10
- 11
- 12
- 13
- 14
- 15
- 16
- 17
- 18
- 19
- 20
- 21
- 22
- 23
- 24
- 25
- 26
- 27
- 28
- 29
- 30
- 31
- 32
- 33
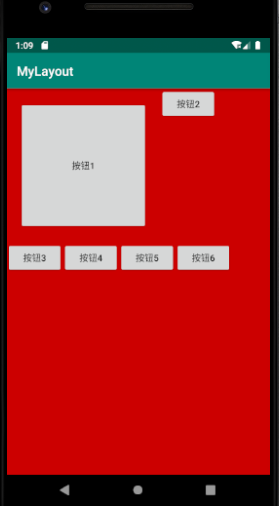
效果:
接下来我们用一个完整的例子说明自定义布局属性
1、首先在app/src/main/res/values/attrs.xml里定义布局属性
2、继承LayoutParams,也可以继承MarginLayoutParams,定义布局参数类
3、重写generateLayoutParams()
4、在onMeasure和onLayout中使用布局参数
我们来一步一步实现:
第一步:在app/src/main/res/values/attrs.xml里定义布局属性
<?xml version="1.0" encoding="utf-8"?>
<resources> <declare-styleable name="MySecondLayout"> <attr name="layout_position"> <enum name ="center" value="0" /> <enum name ="left" value="1" /> <enum name ="right" value="2" /> <enum name ="bottom" value="3" /> <enum name ="rightAndBottom" value="4" /> </attr> </declare-styleable>
</resources>
- 1
- 2
- 3
- 4
- 5
- 6
- 7
- 8
- 9
- 10
- 11
- 12
- 13
第二步:继承LayoutParams,也可以继承MarginLayoutParams(顺便可以获得外边距),定义布局参数类:
public static class MySecondLayoutParams extends ViewGroup.MarginLayoutParams { public static final int POSITION_MIDDLE = 0; // 中间 public static final int POSITION_LEFT = 1; // 左上方 public static final int POSITION_RIGHT = 2; // 右上方 public static final int POSITION_BOTTOM = 3; // 左下角 public static final int POSITION_RIGHTANDBOTTOM = 4; // 右下角 public int position = POSITION_LEFT; // 默认我们的位置就是左上角 public MySecondLayoutParams(Context c, AttributeSet attrs) { super(c, attrs); TypedArray a = c.obtainStyledAttributes(attrs, R.styleable.MySecondLayout_Layout); //获取设置在子控件上的位置属性 position = a.getInt(R.styleable.MySecondLayout_Layout_layout_position, position); a.recycle(); } public MySecondLayoutParams(int width, int height) { super(width, height); } public MySecondLayoutParams(MarginLayoutParams source) { super(source); } public MySecondLayoutParams(LayoutParams source) { super(source); } }
- 1
- 2
- 3
- 4
- 5
- 6
- 7
- 8
- 9
- 10
- 11
- 12
- 13
- 14
- 15
- 16
- 17
- 18
- 19
- 20
- 21
- 22
- 23
- 24
- 25
- 26
- 27
- 28
- 29
- 30
- 31
- 32
第三步:重写generateLayoutParams():
@Override public LayoutParams generateLayoutParams(AttributeSet attrs) { return new MySecondLayoutParams(getContext(), attrs); } @Override protected LayoutParams generateDefaultLayoutParams() { return new MySecondLayoutParams(LayoutParams.WRAP_CONTENT, LayoutParams.WRAP_CONTENT); } @Override protected ViewGroup.LayoutParams generateLayoutParams(ViewGroup.LayoutParams p) { return p; } @Override protected boolean checkLayoutParams(ViewGroup.LayoutParams p) { return super.checkLayoutParams(p); }
- 1
- 2
- 3
- 4
- 5
- 6
- 7
- 8
- 9
- 10
- 11
- 12
- 13
- 14
- 15
- 16
- 17
- 18
- 19
- 20
第四步:在onMeasure和onLayout中使用布局参数:
/** * 在onMeasure方法里进行子控件测量及ViewGroup自身的测量 * * @param widthMeasureSpec * @param heightMeasureSpec */ @Override protected void onMeasure(int widthMeasureSpec, int heightMeasureSpec) { super.onMeasure(widthMeasureSpec, heightMeasureSpec); //获得此ViewGroup上级容器为其推荐的宽和高,以及计算模式 int widthMode = MeasureSpec.getMode(widthMeasureSpec); int heightMode = MeasureSpec.getMode(heightMeasureSpec); int sizeWidth = MeasureSpec.getSize(widthMeasureSpec); int sizeHeight = MeasureSpec.getSize(heightMeasureSpec); int layoutWidth = 0; int layoutHeight = 0; // 计算出所有的childView的宽和高 /*测量子控件的大小,计算出所有的childView的宽和高,如果不进行测量,那么子控件就会不显示*/ measureChildren(widthMeasureSpec, heightMeasureSpec); int cWidth = 0; int cHeight = 0; int count = getChildCount(); if (widthMode == MeasureSpec.EXACTLY) { //如果布局容器的宽度模式是确定的(具体的size或者match_parent),直接使用父窗体建议的宽度 layoutWidth = sizeWidth; } else { //如果是未指定或者wrap_content,我们都按照包裹内容做,宽度方向上只需要拿到所有子控件中宽度做大的作为布局宽度 for (int i = 0; i < count; i++) { View child = getChildAt(i); cWidth = child.getMeasuredWidth(); //获取子控件最大宽度 layoutWidth = cWidth > layoutWidth ? cWidth : layoutWidth; } } //高度很宽度处理思想一样 if (heightMode == MeasureSpec.EXACTLY) { layoutHeight = sizeHeight; } else { for (int i = 0; i < count; i++) { View child = getChildAt(i); cHeight = child.getMeasuredHeight(); layoutHeight = cHeight > layoutHeight ? cHeight : layoutHeight; } } // 测量并保存layout的宽高 setMeasuredDimension(layoutWidth, layoutHeight); } /** * 对子控件进行摆放 * * @param changed * @param l 距父容器的左边距 * @param t 距父容器的顶边距 * @param r 距父容器的右边距 * @param b 距父容器的底边距 */ @Override protected void onLayout(boolean changed, int l, int t, int r, int b) { /*用于定位每个子控件的位置时用的临时变量*/ int left = 0; int top = 0; /*ViewGroup容器里的子控件数*/ int count = getChildCount(); /*子控件的测量宽度和高度,不要使用child.getWidth()和child.getHeight()*/ int childMeasureWidth = 0; int childMeasureHeight = 0; MySecondLayoutParams params = null; /*摆放ViewGroup容器里的子控件*/ for (int i = 0; i < count; i++) { View child = getChildAt(i); // 注意此处不能使用getWidth和getHeight,这两个方法必须在onLayout执行完,才能正确获取宽高 childMeasureWidth = child.getMeasuredWidth(); childMeasureHeight = child.getMeasuredHeight(); params = (MySecondLayoutParams) child.getLayoutParams(); switch (params.position) { case MySecondLayoutParams.POSITION_MIDDLE: // 中间 left = (getWidth() - childMeasureWidth) / 2; top = (getHeight() - childMeasureHeight) / 2; break; case MySecondLayoutParams.POSITION_LEFT: // 左上方 left = 0; top = 0; break; case MySecondLayoutParams.POSITION_RIGHT: // 右上方 left = getWidth() - childMeasureWidth; top = 0; break; case MySecondLayoutParams.POSITION_BOTTOM: // 左下角 left = 0; top = getHeight() - childMeasureHeight; break; case MySecondLayoutParams.POSITION_RIGHTANDBOTTOM:// 右下角 left = getWidth() - childMeasureWidth; top = getHeight() - childMeasureHeight; break; default: break; } // 确定子控件的位置,四个参数分别代表(左上右下)点的坐标值 child.layout(left, top, left + childMeasureWidth, top + childMeasureHeight); } }
- 1
- 2
- 3
- 4
- 5
- 6
- 7
- 8
- 9
- 10
- 11
- 12
- 13
- 14
- 15
- 16
- 17
- 18
- 19
- 20
- 21
- 22
- 23
- 24
- 25
- 26
- 27
- 28
- 29
- 30
- 31
- 32
- 33
- 34
- 35
- 36
- 37
- 38
- 39
- 40
- 41
- 42
- 43
- 44
- 45
- 46
- 47
- 48
- 49
- 50
- 51
- 52
- 53
- 54
- 55
- 56
- 57
- 58
- 59
- 60
- 61
- 62
- 63
- 64
- 65
- 66
- 67
- 68
- 69
- 70
- 71
- 72
- 73
- 74
- 75
- 76
- 77
- 78
- 79
- 80
- 81
- 82
- 83
- 84
- 85
- 86
- 87
- 88
- 89
- 90
- 91
- 92
- 93
- 94
- 95
- 96
- 97
- 98
- 99
- 100
- 101
- 102
- 103
- 104
- 105
- 106
- 107
- 108
- 109
MySecondLayout完整的代码:
package com.wong.layout;

import android.content.Context;
import android.content.res.TypedArray;
import android.util.AttributeSet;
import android.util.Log;
import android.view.View;
import android.view.ViewGroup;

public class MySecondLayout extends ViewGroup { public MySecondLayout(Context context) { super(context); } public MySecondLayout(Context context, AttributeSet attrs) { super(context, attrs); } public MySecondLayout(Context context, AttributeSet attrs, int defStyleAttr) { super(context, attrs, defStyleAttr); } public MySecondLayout(Context context, AttributeSet attrs, int defStyleAttr, int defStyleRes) { super(context, attrs, defStyleAttr, defStyleRes); } @Override public LayoutParams generateLayoutParams(AttributeSet attrs) { return new MySecondLayoutParams(getContext(), attrs); } @Override protected LayoutParams generateDefaultLayoutParams() { return new MySecondLayoutParams(LayoutParams.WRAP_CONTENT, LayoutParams.WRAP_CONTENT); } @Override protected ViewGroup.LayoutParams generateLayoutParams(ViewGroup.LayoutParams p) { return p; } @Override protected boolean checkLayoutParams(ViewGroup.LayoutParams p) { return super.checkLayoutParams(p); } /** * 在onMeasure方法里进行子控件测量及ViewGroup自身的测量 * * @param widthMeasureSpec * @param heightMeasureSpec */ @Override protected void onMeasure(int widthMeasureSpec, int heightMeasureSpec) { super.onMeasure(widthMeasureSpec, heightMeasureSpec); //获得此ViewGroup上级容器为其推荐的宽和高,以及计算模式 int widthMode = MeasureSpec.getMode(widthMeasureSpec); int heightMode = MeasureSpec.getMode(heightMeasureSpec); int sizeWidth = MeasureSpec.getSize(widthMeasureSpec); int sizeHeight = MeasureSpec.getSize(heightMeasureSpec); int layoutWidth = 0; int layoutHeight = 0; // 计算出所有的childView的宽和高 /*测量子控件的大小,计算出所有的childView的宽和高,如果不进行测量,那么子控件就会不显示*/ measureChildren(widthMeasureSpec, heightMeasureSpec); int cWidth = 0; int cHeight = 0; int count = getChildCount(); if (widthMode == MeasureSpec.EXACTLY) { //如果布局容器的宽度模式是确定的(具体的size或者match_parent),直接使用父窗体建议的宽度 layoutWidth = sizeWidth; } else { //如果是未指定或者wrap_content,我们都按照包裹内容做,宽度方向上只需要拿到所有子控件中宽度做大的作为布局宽度 for (int i = 0; i < count; i++) { View child = getChildAt(i); cWidth = child.getMeasuredWidth(); //获取子控件最大宽度 layoutWidth = cWidth > layoutWidth ? cWidth : layoutWidth; } } //高度很宽度处理思想一样 if (heightMode == MeasureSpec.EXACTLY) { layoutHeight = sizeHeight; } else { for (int i = 0; i < count; i++) { View child = getChildAt(i); cHeight = child.getMeasuredHeight(); layoutHeight = cHeight > layoutHeight ? cHeight : layoutHeight; } } // 测量并保存layout的宽高 setMeasuredDimension(layoutWidth, layoutHeight); } /** * 对子控件进行摆放 */ @Override protected void onLayout(boolean changed, int l, int t, int r, int b) { /*用于定位每个子控件的位置时用的临时变量*/ int left = 0; int top = 0; /*ViewGroup容器里的子控件数*/ int count = getChildCount(); /*子控件的测量宽度和高度,不要使用child.getWidth()和child.getHeight()*/ int childMeasureWidth = 0; int childMeasureHeight = 0; MySecondLayoutParams params = null; /*摆放ViewGroup容器里的子控件*/ for (int i = 0; i < count; i++) { View child = getChildAt(i); // 注意此处不能使用getWidth和getHeight,这两个方法必须在onLayout执行完,才能正确获取宽高 childMeasureWidth = child.getMeasuredWidth(); childMeasureHeight = child.getMeasuredHeight(); params = (MySecondLayoutParams) child.getLayoutParams(); switch (params.position) { case MySecondLayoutParams.POSITION_MIDDLE: // 中间 left = (getWidth() - childMeasureWidth) / 2; top = (getHeight() - childMeasureHeight) / 2; break; case MySecondLayoutParams.POSITION_LEFT: // 左上方 left = 0; top = 0; break; case MySecondLayoutParams.POSITION_RIGHT: // 右上方 left = getWidth() - childMeasureWidth; top = 0; break; case MySecondLayoutParams.POSITION_BOTTOM: // 左下角 left = 0; top = getHeight() - childMeasureHeight; break; case MySecondLayoutParams.POSITION_RIGHTANDBOTTOM:// 右下角 left = getWidth() - childMeasureWidth; top = getHeight() - childMeasureHeight; break; default: break; } // 确定子控件的位置,四个参数分别代表(左上右下)点的坐标值 child.layout(left, top, left + childMeasureWidth, top + childMeasureHeight); } } public static class MySecondLayoutParams extends ViewGroup.MarginLayoutParams { public static final int POSITION_MIDDLE = 0; // 中间 public static final int POSITION_LEFT = 1; // 左上方 public static final int POSITION_RIGHT = 2; // 右上方 public static final int POSITION_BOTTOM = 3; // 左下角 public static final int POSITION_RIGHTANDBOTTOM = 4; // 右下角 public int position = POSITION_LEFT;  // 默认我们的位置就是左上角 public MySecondLayoutParams(Context c, AttributeSet attrs) { super(c, attrs); TypedArray a = c.obtainStyledAttributes(attrs, R.styleable.MySecondLayout_Layout); //获取设置在子控件上的位置属性 position = a.getInt(R.styleable.MySecondLayout_Layout_layout_position, position); a.recycle(); } public MySecondLayoutParams(int width, int height) { super(width, height); } public MySecondLayoutParams(MarginLayoutParams source) { super(source); } public MySecondLayoutParams(LayoutParams source) { super(source); } }

}
- 1
- 2
- 3
- 4
- 5
- 6
- 7
- 8
- 9
- 10
- 11
- 12
- 13
- 14
- 15
- 16
- 17
- 18
- 19
- 20
- 21
- 22
- 23
- 24
- 25
- 26
- 27
- 28
- 29
- 30
- 31
- 32
- 33
- 34
- 35
- 36
- 37
- 38
- 39
- 40
- 41
- 42
- 43
- 44
- 45
- 46
- 47
- 48
- 49
- 50
- 51
- 52
- 53
- 54
- 55
- 56
- 57
- 58
- 59
- 60
- 61
- 62
- 63
- 64
- 65
- 66
- 67
- 68
- 69
- 70
- 71
- 72
- 73
- 74
- 75
- 76
- 77
- 78
- 79
- 80
- 81
- 82
- 83
- 84
- 85
- 86
- 87
- 88
- 89
- 90
- 91
- 92
- 93
- 94
- 95
- 96
- 97
- 98
- 99
- 100
- 101
- 102
- 103
- 104
- 105
- 106
- 107
- 108
- 109
- 110
- 111
- 112
- 113
- 114
- 115
- 116
- 117
- 118
- 119
- 120
- 121
- 122
- 123
- 124
- 125
- 126
- 127
- 128
- 129
- 130
- 131
- 132
- 133
- 134
- 135
- 136
- 137
- 138
- 139
- 140
- 141
- 142
- 143
- 144
- 145
- 146
- 147
- 148
- 149
- 150
- 151
- 152
- 153
- 154
- 155
- 156
- 157
- 158
- 159
- 160
- 161
- 162
- 163
- 164
- 165
- 166
- 167
- 168
- 169
- 170
- 171
- 172
- 173
- 174
- 175
- 176
- 177
- 178
- 179
- 180
- 181
- 182
- 183
- 184
- 185
- 186
应用MySecondLayout:
<?xml version="1.0" encoding="utf-8"?>
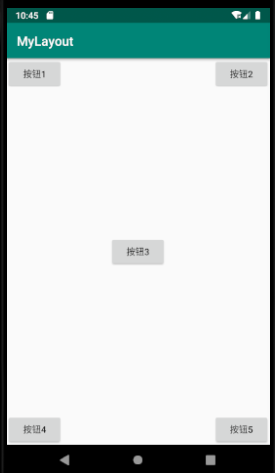
<com.wong.layout.MySecondLayout xmlns:android="http://schemas.android.com/apk/res/android" xmlns:app="http://schemas.android.com/apk/res-auto" xmlns:tools="http://schemas.android.com/tools" android:layout_width="match_parent" android:layout_height="match_parent" tools:context="com.wong.layout.MainMySecondLayoutActivity"> <Button android:layout_width= "wrap_content" android:layout_height= "wrap_content" app:layout_position="left" android:text="按钮1" /> <Button android:layout_width= "wrap_content" android:layout_height= "wrap_content" app:layout_position="right" android:text="按钮2" /> <Button android:layout_width= "wrap_content" android:layout_height= "wrap_content" app:layout_position="center" android:text="按钮3" /> <Button android:layout_width= "wrap_content" android:layout_height= "wrap_content" app:layout_position="bottom" android:text="按钮4" /> <Button android:layout_width= "wrap_content" android:layout_height= "wrap_content" app:layout_position="rightAndBottom" android:text="按钮5" />
</com.wong.layout.MySecondLayout>
- 1
- 2
- 3
- 4
- 5
- 6
- 7
- 8
- 9
- 10
- 11
- 12
- 13
- 14
- 15
- 16
- 17
- 18
- 19
- 20
- 21
- 22
- 23
- 24
- 25
- 26
- 27
- 28
- 29
- 30
- 31
- 32
- 33
- 34
- 35
- 36
效果:
具体代码请参考:demo
谢谢阅读!
文章来源: blog.csdn.net,作者:WongKyunban,版权归原作者所有,如需转载,请联系作者。
原文链接:blog.csdn.net/weixin_40763897/article/details/103983534

- 点赞
- 收藏
- 关注作者
评论(0)