Vue、Vuex、MintUi、ElementUi 基础
一、搭建vue的开发环境
(1)安装node.js
(2) 安装脚手架工具,官方命令行工具
npm install --global vue-cli / cnpm install --global vue-cli
(3) 创建项目
vue init webpack vue-demo01
创建过程 看到 ESlint 字样,输入n ,不开启代码检查,否则代码多少空格都会报错
cd vue-demo01
安装依赖
cnpm install / npm install
npm run dev / cnpm run dev
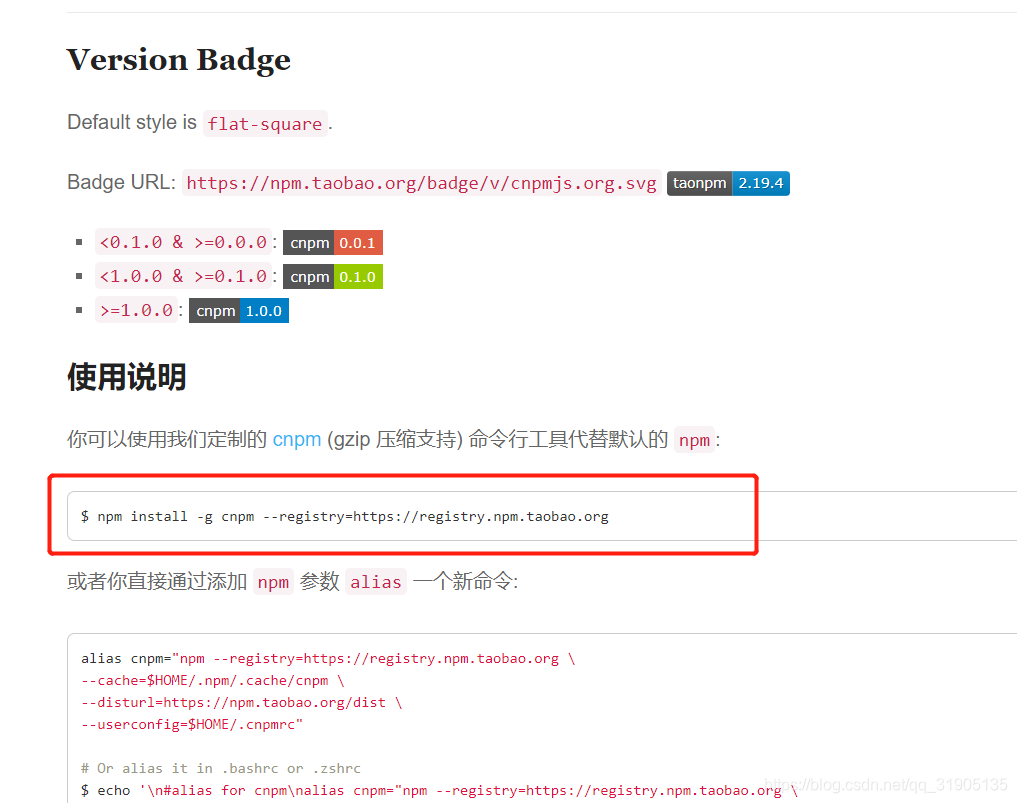
安装 cnpm

另一种创建项目的方法
vue init webpack-simple vuedemo02
可以省去繁琐的步骤,并且没有Eslint 语法检查
vs code 安装 vue2.0 插件

(4)vue-cli 3.0
如果想使用vue-cli 3.0 创建项目可以先删除 原来的vue-cli 2.0
cnpm uninstall -g vue-cli
npm install -g @vue/cli
创建项目
vue create hello-world
运行:cnpm run serve
编译 :cnpm run build
图形创建工具
vue ui
二、使用vue-resource请求数据
vue官方数据请求工具
(1)安装 vue-resource 注意: 要加--save ,这样package.json中就会加上依赖
cnpm install vue-resource --save
(2)main.js 中导入
import VueResource from 'vue-resource'
Vue.use(VueResource)
(3)在组件中直接使用
-
var api = 'https://www.baidu.com/'
-
-
this.$http.get(api).then((response)=>{
-
-
alert(response)
-
-
this.list = response.body.result
-
-
},function(error){
-
-
-
})
三、使用axios请求数据
安装 axios
cnpm install axios --save
axios 是第三方的依赖,所以不需要使用Vue.use()方法
直接在想使用axios 的组件中导入使用即可
import Axios from 'axios'
-
var api = 'https://www.baidu.com/';
-
Axios.get(api).then(function(response){
-
alert(response)
-
}).catch(function(error){
-
alert(error)
-
})
-
Axios.get(api).then((response)=>{
-
this.list = response.body.result
-
}).catch((error)=>{
-
alert(error)
-
})
-
建议function 改成箭头函数,免得this的指向有问题
四、fetch-jsonp 请求数据
五、父子组件
父组件传值到子组件
(1)父组件调用子组件的时候,绑定动态属性
<v-header :title="title" :run="run"></v-header>
(2)子组件中通过 props 接收父组件传来的值
父组件主动获取子组件的属性
(1)调用子组件的时候定义一个ref
<v-header :title="title" :run="run" ref="header"></v-header>
<button @click="getSubMsg()">主动获取子组件属性或者方法</button>
(2)在父组件里面通过
this.$ref.header.属性
this.$ref.header.方法
子组件主动获取父组件的属性
(1) 直接在子组件中使用
<button @click="getParent()">获取父组件的属性或者方法</button>

六、非父子组件传值
(1)新建一个js文件,然后引入vue,实例化vue,最后暴露出这个实例
-
import Vue from 'vue'
-
var VueEvent = new Vue()
-
export default VueEvent
(2)在要广播的地方引入刚才定义的实例
-
import VueEvent from '../modal/VueEvent'
-
-
<button @click="sendMq()">首页广播事件</button>
(3)通过VueEvent.$emit('名称','数据')
-
<button @click="sendMq()">首页广播事件</button>
-
-
sendMq(){
-
-
VueEvent.$emit('to-news',this.title)
-
-
}
-
(4)在接收数据的地方通过VueEvent.$on('')
-
import VueEvent from '../modal/VueEvent'
-
-
mounted() {
-
-
VueEvent.$on('to-news',function(data){
-
-
console.log(data)
-
-
})
-
-
},
七、Vue-Router的使用
1.安装
cnpm install vue-router --save
2.引入并使用
Vue.use(VueRouter)
3.配置路由
(1)创建组件 引入组件
(2)定义路由
-
const routes = [
-
-
{
-
-
path: '/',
-
-
name: 'HelloWorld',
-
-
component: HelloWorld
-
-
},
-
-
{
-
-
path: '/Home',
-
-
name: 'Home',
-
-
component: Home
-
-
}
-
-
]
(3) 实例化 VueRouter
-
const router = new VueRouter(
-
-
{
-
-
routes // 缩写 相当于 routes : routes
-
-
}
-
-
)
(4)挂载
-
new Vue({
-
-
el: '#app',
-
-
router,
-
-
components: { App },
-
-
template: '<App/>'
-
-
})
(5)根组件的模板里面放上这句话
<router-view></router-view>
八、动态路由
1.配置动态路由
routes:[
// 动态路径参数 以冒号开头
{parh:'/user/:id',component: User}
]
2. 在对应的页面
this.$route.params 获取 动态路由的值
3.编程式导航

4. history 模式

九、路由嵌套
1.配置路由
-
{
-
-
path: '/user',
-
-
component: User,
-
-
children: [
-
-
{path: 'useradd',component: UserAdd}
-
-
{path: 'userlist',component: UserList}
-
-
]
-
-
}
2.父路由里面配置子路由显示的地方
<router-view></router-view>
十、MintUi 和 Element Ui
MintUi 基于 vue 的 移动端 ui 框架
cnpm install mint-ui --save
import MintUI from 'mint-ui'
import 'mint-ui/lib/style.css'
Vue.use(MintUI)
Element Ui 基于 vue 的 pc 端 ui 框架
cnpm i element-ui -S
import ElementUI from 'element-ui';
import 'element-ui/lib/theme-chalk/index.css';
Vue.use(ElementUI)
其他更多用法参照 官方文档
十一 、vuex
vuex 是一个专为 vue.js 应用程序开发 的 状态管理模式
1.vuex 解决了组件之间同一状态的共享问题,(解决了不同组件之间的数据共享)
2.组件里面数据的持久化
小型项目不建议用vuex,而使用 localstroage 和 sessionstroage
state 单一状态树 用来存放数据‘
getter 相当于计算属性
Mutation 用来改变 state 里面的 数据
Action 用来触发 mutation 来改变state的数据,提交的是 mutation,而不是直接变更
状态,可以包含任意的异步操作
3. 安装vuex
cnpm install vuex --save
4. vuex 的使用
(1)src 目录下面创建一个 vuex 的文件夹
(2)vuex文件夹里面创建一个store.js
(3)在store.js引入 vue 及 vuex,并且 Vue.use(Vuex)
(4)定义数据
-
/**
-
* 1.state在vuex中用于存储数据
-
*/
-
var state ={
-
count: 1
-
}
(5)定义方法
-
/**
-
* 2.mutation里面放的是方法,方法主要用于改变state的数据
-
*/
-
var mutations={
-
-
incCount(){
-
++state.count;
-
}
-
-
}
(6)实例化vuex.store 并 暴露
-
/**
-
* 3.vuex 实例化 Vuex.store
-
*/
-
const store = new Vuex.Store({
-
state:state,
-
mutations:mutations
-
})
-
-
export default store;
(7)组件里面使用vuex
1.引入 store
import store from ’../vuex/store.js‘
2.注册
-
export default {
-
-
data(){
-
-
return {
-
-
msg:'aaa',
-
-
value: null,
-
-
}
-
-
},
-
-
store,
-
-
methods:{
-
-
incCount(){
-
-
// 触发 前面定义的 mutation 里面定义的方法,改变 state的数据
-
-
this.$store.commit('incCount');
-
-
}
-
-
}
-
-
}
3.获取 state 里面的数据
this.$store.state.数据
4. 触发 前面定义的 mutation 里面定义的方法,改变 state的数据
this.$store.commit('incCount');
5.getter 的用法
-
-
/**
-
* getter 有点类似计算属性,改变state里count数据的时候会触发getters里面的方法获取新的值
-
*/
-
-
-
var getters = {
-
computedCount:(state) => {
-
return state.count*2
-
}
-
}
在组件里面使用的时候,首先引入并注册,
然后 使用 this.$store.getters.computedCount
6.action 的用法
-
var actions={
-
-
incMutationsCount(context){
-
-
context.commit('incCount')
-
-
}
-
-
}
在组件里面使用action的时候使用
this.$store.dispatch('incMutationsCount')
注意: 使用的时候都要暴露
-
const store = new Vuex.Store({
-
state:state,
-
mutations:mutations,
-
getters:getters,
-
actions:actions
-
})
7.注意事项:
-
var mutations={
-
-
incCount(){
-
++state.count;
-
},
-
// this.$store.commit('addList',list) 当需要传值的时候,这里定义的方法必须加上state参数
-
addList(state,data){
-
state.list = data;
-
}
-
}
文章来源: blog.csdn.net,作者:血煞风雨城2018,版权归原作者所有,如需转载,请联系作者。
原文链接:blog.csdn.net/qq_31905135/article/details/104537350
- 点赞
- 收藏
- 关注作者


评论(0)