Android自定义View/ViewGroup

一、基本步骤
- 自定义属性;
- 重写onMeasure()方法;
- 重写onDraw()方法;
- 重写onLayout()方法;
- 选择和设置构造方法;
- 重写其他事件的方法(滑动监听等)
二、常用到的View方法
View方法
实现一个自定义视图,通常要提供框架在所有视图上都会调用的标准方法的重写,这些标准方法有:
| 分类 | 方法 | 描述 |
|---|---|---|
| 创建 | 构造器 | 有一种构造器形式是当视图是从代码创建时调用的;还有另一种构造器形式是当视图是通过布局文件来创建时调用的。第二种形式要解析和应用定义在布局文件中的属性。 |
| 创建 | onFinishInflate() | 当一个视图及其所有孩子都从XML文件创建完成时调用。可以做些初始化子控件的操作 |
| 布局 | onMeasure(int, int) | 调用这个方法决定视图及其所有孩子的大小要求,当覆盖这个方法时,我们应该调用setMeasuredDimension(int,int)存储测量好的视图的宽度和高度。如果这个方法被重写,那么这个子类要确保测量的高度和宽度至少是视图的最小高度和宽度。 |
| 布局 | onLayout(boolean, int, int, int, int) | 当这个视图要给它的孩子分配大小和位置时调用 |
| 布局 | onSizeChanged(int, int, int, int) | 当视图的大小发生改变时调用 |
| 绘图 | onDraw(android.graphics.Canvas) | 当视图要渲染它的内容时调用。我们要在这里实现我们的绘图 |
| 事件处理 | onKeyDown(int, KeyEvent) | 当一个新的按键事件发生时调用 |
| 事件处理 | onKeyUp(int, KeyEvent) | 当一个键弹起事件发生时调用 |
| 事件处理 | onTouchEvent(MotionEvent) | 当一个触屏动作发生时调用 |
| 焦点 | onFocusChanged(boolean, int, android.graphics.Rect) | 当视图获得或失去焦点时调用 |
| 焦点 | onWindowFocusChanged(boolean) | 当包含视图的window获得或失去焦点时调用 |
| 附属 | onAttachedToWindow() | 当视图依附到一个window上时调用 |
| 附属 | onDetachedFromWindow | 当视图从它的window上脱离时调用 |
| 附属 | onWindowVisibilityChanged(int) | 当包含视图的window的可见性发生改变时调用 |
| invalidate() | 请求View树进行重绘,即draw()方法,如果视图的大小发生了变化,还会调用layout()方法 | |
| postInvalidate() | 功能与invalidate()方法相同,但它是异步请求重绘视图。postInvalidate()内部调用的是postInvalidateDelayed(),可以用于控件的定时刷新。 | |
| requestLayout() | 只是对View树进行重新布局layout过程(包括measure()过程和layout()过程),不会调用draw()过程,即不会重新绘制任何视图,包括该调用者本身。 | |
| requestFocus() | 请求View树的draw()过程,但只会绘制需要重绘的视图,即哪个View或ViewGroup调用了这个方法,就重绘哪个视图。 |
上面这么多方法,不一定要全部实现,如有时我们只需要实现onDraw()方法。
ViewGroup方法
ViewGroup是一个特殊的View,继承了View。它可以包含其他View。ViewGroup是布局容器和视图容器的基类。它也定义了 LayoutParams类,这个类作为布局参数来使用。
| 方法 | 描述 |
|---|---|
| onLayout(boolean, int, int, int, int) | 决定子视图的大小及位置,要在子类中实现此方法 |
Paint方法
在自定义View中,我们还要使用Paint类的方法。Paint类是设置样式和颜色信息的,将会用于绘制几何图形、文本、位图,Paint类方法:
| 方法 | 描述 |
|---|---|
| reset() | 将paint对象恢复到默认设置。 |
| setAntiAlias(boolean) | 设置是否使用抗锯齿功能,抗锯齿功能会消耗较大资源,绘制图形的速度会减慢。 |
| setColor(int)、setARGB(int, int, int, int) | 设置绘制颜色 |
| setAlpha(int) | 设置颜色的透明度,取值0~255 |
| setDither(boolean) | 设置是否使用图像抖动处理,会使图像颜色更加平滑饱满,更加清晰。 |
| setFileterBitmap(Boolean b) | 设置是否在动画中滤掉Bitmap的优化,可以加快显示速度。 |
| setStrokeWidth(float) | 当画笔样式为STROKE或FILL_OR_STROKE时,设置笔刷的粗细度 |
| setStrokeMiter(float) | 设置笔画斜接角度 |
| setStrokeCap(Cap) | 当设置画笔样式为STROKE或FILL_OR_STROKE时,设置笔刷的图形样式 |
| setStrokeJoin(Join) | 设置绘制时各图形的结合方式 |
| setStyle(Paint.Style s) | 设置画笔的样式:FILL实心;STROKE空 |
| setShader(Shader) | 设置Shader绘制各种渐变效果 |
| setColorFilter(ColorFilter) | 设置颜色过滤器,可以在绘制颜色时实现不同颜色的变换效果 |
| setXfermode(Xfermode) | 设置图形重叠时的处理方式 |
| setBlendMode(BlendMode) | 设置或清除Blend模式,Blend模式定义了绘制命令产生的源像素如何与渲染目标内容的像素复合。 |
| setPathEffect(PathEffect) | 设置绘制的路径的效果 |
| setMaskFilter(MaskFilter maskfilter) | 设置MaskFilter来实现滤镜的效果 |
| setTypeface(Typeface) | 设置字体 |
| setRasterizer(Rasterizer) | 设置光栅化器。这个光栅化器控制/改变路径/文本变化到到透明遮罩 |
| setShadowLayer(float, float, float,int) | 设置阴影 |
| clearShadowLayer() | 清除阴影 |
| setTextAlign(Align) | 设置文本的对齐方式 |
| setTextSize(float) | 设置文本大小 |
| setTextScaleX(float) | 设置文本水平缩放因子,可以实现文字的拉伸效果 |
| setTextSkewX(float) | 设置斜体文字 |
| setUnderlineText(boolean) | 设置绘制的文本是否带有下划线效果 |
| setStrikeThruText(boolean) | 设置绘制的文本是否带有删除线效果 |
| setFakeBoldText(boolean) | 模拟实现粗体文字,如果设置在小字体上效果会非常差 |
| setSubpixelText(boolean) | 如果设置为true则有助于文本在LCD屏幕上显示效果 |
| setLetterSpacing(float) | 设置字母间距 |
| setWordSpacing(float) | 设置字母间距 |
| setFontFeatureSettings(String) | 设置字体特性设置,可参考https://www.w3.org/TR/css-fonts-3/#font-feature-settings-prop |
| setFontVariationSettings(String) | 通过字体变量来设置字体,如:设置字体宽度为150,Paint paint = new Paint();paint.setFontVariationSettings("‘wdth’ 150"); |
| setStartHyphenEdit(int) | 设置连字符,如Paint paint = new Paint();paint.setStartHyphenEdit(Paint.START_HYPHEN_EDIT_INSERT_HYPHEN);paint.measureText(“abc”, 0, 3); Canvas.drawText(“abc”, 0, 3, 0f, 0f, paint); |
| measureText(char[], int, int) | 返回文本的宽度 |
Canvas方法
| 方法 | 描述 |
|---|---|
| drawArc():绘制圆弧 | |
| drawBitmap() | 绘制Bitmap图像 |
| drawCircle() | 绘制圆圈 |
| drawLine() | 绘制线条 |
| drawOval() | 绘制椭圆 |
| drawPath() | 绘制Path路径 |
| drawPicture() | 绘制Picture图片 |
| drawRect() | 绘制矩形 |
| drawRoundRect() | 绘制圆角矩形 |
| drawText() | 绘制文本 |
| drawVertices() | 绘制顶点 |
| save() | 把当前绘制的图像保存起来,让后续的操作相当于是在一个新图层上绘制 |
| restore() | 把当前画布调整到上一个save()之前的状态 |
| translate(dx, dy) | 把当前画布的原点移到(dx, dy)点,后续操作都以(dx, dy)点作为参照 |
| scale(x, y) | 将当前画布在水平方向上缩放x倍,竖直方向上缩放y倍 |
| rotate(angle) | 将当前画布顺时针旋转angle度 |
| setDensity(int density) | 设置后端位图的密度 |
自定义View / ViewGroup时调用的各种函数的顺序
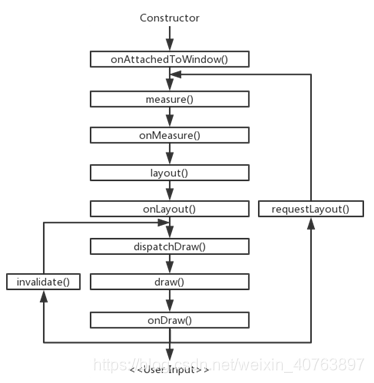
这些方法中有三个很重要的方法,也是我们最有可能要去修改的:
- onMeasure():主要负责测量,决定控件本身或其子控件所占的宽高。可以通过onMeasure()方法提供的参数widthMeasureSpec和heightMeasureSpec来分别获取控件宽度和高度的测量模式和测量值(测量 = 测量模式 + 测量值)。其中widthMeasureSpec和heightMeasureSpec是int类型的值,它们是通过MeasureSpec类进行了编码处理的,其中封装了测量模式和测量值,因此可以分别通过MeasureSpec.getMode(xMeasureSpec)和MeasureSpec. getSize(xMeasureSpec)来获取到控件或其子View的测量模式和测量值。
测量模式分为三种情况:
(1)EXACTLY:当宽高值设置为具体值时使用,如100dip、match_parent等,此时取出的size是精确的尺寸;
(2)AT_MOST:当宽高值设置为wrap_content时使用,此时取出的size是控件最大可获得的空间;
(3) UNSPECIFIED:当没有指定宽高值时使用,一般自定义View用不到。
如果我们的自定义控件在布局文件中,只设置了指定的具体宽高,或者MATCH_PARENT,那么我们就可以不用重写onMeasure方法。但是,如果自定义控件设置了WRAP_CONTENT ,那么我们就需要重写onMeasure方法,为控件设置需要的尺寸;因为WRAP_CONTENT 默认情况下将填充整个父控件。onMeasure方法最后需要调用setMeasuredDimension方法来保存测量的宽高值。
在有些情况下,需要多次测量(measure)才能够最终确定View的宽高(比如父视图MeasureSpec使用UNSPECIFIED模式等),在这种情况下,通过onMeasure方法获得的宽高很可能是不准确的,因此,建议在onLayout方法中去获取View的最终宽高。

- onLayout(): 负责布局,大多数情况是在自定义ViewGroup中才会重写,主要用来确定子View在这个布局空间中的摆放位置。 onLayout(boolean changed, int left, int top, int right, int bottom)方法有5个参数,其中changed表示这个控件是否有了新的尺寸或位置;left、top、right、bottom分别表示这个View相对于父布局的左/上/右/下方的位置。
- onDraw(): 负责绘制。如果Android原生控件中没有现在的支持,那么就需要自己绘制自定义控件的显示效果。在onDraw()方法中使用最多的两个类:Paint和Canvas。注意:每次自定义View/ViewGroup时都会调用onDraw()方法。

三、onMeasure、onLayout、onDraw方法中常用到的其他方法
onMeasure方法中常用的方法:
- getChildCount():获取子View的数量(必须继承ViewGroup或它的子类);
- getChildAt(i):获取第i个子控件(必须继承ViewGroup或它的子类);
- subView.getLayoutParams().width/height:设置或获取子控件的宽或高;
- measureChild(child, widthMeasureSpec, heightMeasureSpec):测量子View的宽高;
- child.getMeasuredHeight/Width():执行完measureChild()方法后就可以通过这种方式获取子View的宽高值;
- getPaddingLeft/Right/Top/Bottom():获取控件的四周内边距;
- setMeasuredDimension(width, height):重新设置控件的宽高。如果写了这句代码,就需要删除“super. onMeasure(widthMeasureSpec, heightMeasureSpec);”这行代码。
onLayout方法中常用的方法:
- getChildCount():获取子View的数量;
- getChildAt(i):获取第i个子View
- getWidth/Height():获取onMeasure()中返回的宽度和高度的测量值;
- child.getLayoutParams():获取到子View的LayoutParams对象;
- child.getMeasuredWidth/Height():获取onMeasure()方法中测量的子View的宽度和高度值;
- getPaddingLeft/Right/Top/Bottom():获取控件的四周内边距;
- child.layout(l, t, r, b):设置子View布局的左、上、右、下的坐标。
onDraw方法中常用的方法:
在onDraw()方法中使用最多的两个类:Paint和Canvas,它们的方法请参考文章前面部分。
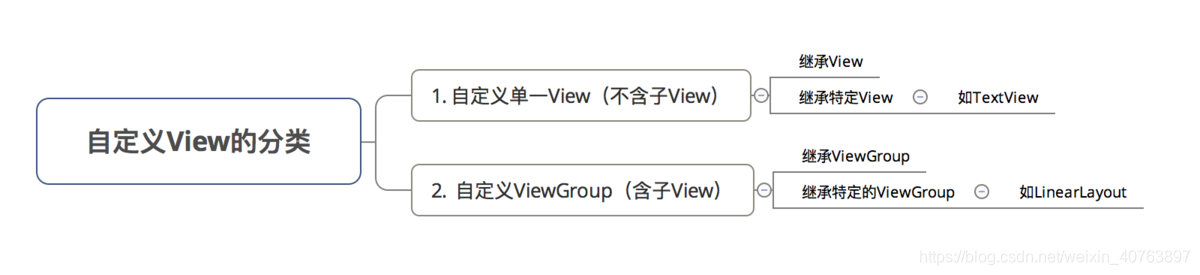
四、自定义View的分类
各自的应用场景
自定义单一View
| 继承 | 应用场景 | 实现方式 | 特别注意 | demo |
|---|---|---|---|---|
| 继承View | 自定义控件,如:圆形 | 需要自己绘制,即需要重写onDraw() | 要自定义一些属性来控制 | demo |
| 继承特定View | 扩展已有View的功能(如:TextView) | 在原有View的基础上扩展功能 | 无须使用自定义属性 | demo |
自定义ViewGroup
| 继承 | 应用场景 | 实现方式 | 特别注意 | 例子 |
|---|---|---|---|---|
| 继承ViewGroup | 自定义布局,如自定义标题栏 | ViewGroup&子View的measure、layout过程 | 复杂,需要自定义属性 | demo1、demo2 |
| 继承特定ViewGroup | 扩展已有的布局,如下雨效果 | 在原有ViewGroup上进行组合 | 简单,但自由度不高 | demo |
五、实例
(1)实例一:自定义View
第一步:自定义属性
我们平时在编写xml布局时,看到的所有的系统定义的属性都定义在各自平台下一个叫attrs.xml的文件中,路径为:Sdk/platforms/android-28/data/res/values/attrs.xml。我们继承的View现有的属性不足以实现我们的功能,因此我们需要自定义一些属性,我们在app/src/main/res/values/attrs.xml加入:
<declare-styleable name="CustomCircleView"> <!-- 半径 --> <attr name="radius" format="integer"/> <!-- 边的颜色 --> <attr name="stroke_color" format="color"/> <!-- 边的宽度 --> <attr name="stroke_width" format="dimension"/> <!-- 填充的颜色 --> <attr name="fill_color" format="color"/> <!-- 文本 --> <attr name="text" format="string"/> <!-- 文本大小 --> <attr name="text_size" format="integer"/> <!-- 文本的颜色 --> <attr name="text_color" format="color"/> </declare-styleable>
- 1
- 2
- 3
- 4
- 5
- 6
- 7
- 8
- 9
- 10
- 11
- 12
- 13
- 14
- 15
- 16
format的属性值:
- string:字符串类型;
- integer:整数类型;
- float:浮点型;
- dimension:尺寸,后面必须跟dp、dip、px、sp等单位;
- boolean:布尔值;
- reference:引用类型,传入的是某一资源的ID,必须以“@”符号开头;
- color:颜色,必须是“#”符号开头;
- fraction:百分比,必须是“%”符号结尾;
- enum:枚举类
- flags:位或运算
第二步:写一个继承View的子类
重写onDraw()方法。
package com.wong.view;

import android.content.Context;
import android.content.res.TypedArray;
import android.graphics.Bitmap;
import android.graphics.Canvas;
import android.graphics.Color;
import android.graphics.Matrix;
import android.graphics.Paint;
import android.graphics.Path;
import android.graphics.Picture;
import android.graphics.Rect;
import android.graphics.RectF;
import android.text.TextUtils;
import android.util.AttributeSet;
import android.view.View;

import androidx.annotation.Nullable;

import com.wong.view.utils.FontUtils;

public class CustomCircleView extends View { /*边的颜色*/ private int strokeColor = Color.BLACK; /*边的宽度*/ private float strokeWidth = 1; /*填充颜色*/ private int fillColor = Color.WHITE; /*文本*/ private String text=""; /*文本大小*/ private float textSize = 16; /*文本的颜色*/ private int textColor = Color.BLACK; private Paint mPaintText = new Paint(); private Paint mPaintCircle = new Paint(); private Paint mPaintCircleSide = new Paint(); public CustomCircleView(Context context) { super(context); } public CustomCircleView(Context context, @Nullable AttributeSet attrs) { super(context, attrs); init(context,attrs); } private void init(Context context,AttributeSet attrs){ /** * 加载自定义属性集合CircleView * 要在styles.xml中添加配置: * <declare-styleable name="CustomCircleView"> * <!-- 边的颜色 --> * <attr name="stroke_color" format="color"/> * <!-- 边的宽度 --> * <attr name="stroke_width" format="dimension"/> * <!-- 填充的颜色 --> * <attr name="fill_color" format="color"/> * <!-- 文本 --> * <attr name="text" format="string"/> * <!-- 文本大小 --> * <attr name="text_size" format="integer"/> * <!-- 文本的颜色 --> * <attr name="text_color" format="color"/> * </declare-styleable> * */ TypedArray typedArray = context.obtainStyledAttributes(attrs,R.styleable.CustomCircleView); strokeColor = typedArray.getColor(R.styleable.CustomCircleView_stroke_color, strokeColor); strokeWidth = typedArray.getDimension(R.styleable.CustomCircleView_stroke_width,strokeWidth); fillColor = typedArray.getColor(R.styleable.CustomCircleView_fill_color,fillColor); text = typedArray.getString(R.styleable.CustomCircleView_text); textSize = typedArray.getDimension(R.styleable.CustomCircleView_text_size,textSize); textColor = typedArray.getColor(R.styleable.CustomCircleView_text_color,textColor); typedArray.recycle(); } /** * 1)  {@link Canvas#save()}:把当前绘制的图像保存起来,让后续的操作相当于是在一个新图层上绘制; * 2)  {@link Canvas#restore()}:把当前画布调整到上一个save()之前的状态; * 3)  {@link Canvas#translate(float, float)}:把当前画布的原点移到(dx, dy)点,后续操作都以(dx, dy)点作为参照; * 4)  {@link Canvas#scale(float, float)}:将当前画布在水平方向上缩放x倍,竖直方向上缩放y倍; * 5)  {@link Canvas#rotate(float)}:将当前画布顺时针旋转angle度. * * 6)  {@link Canvas#drawArc(RectF, float, float, boolean, Paint)}:绘制圆弧; * 7)  {@link Canvas#drawBitmap(Bitmap, Matrix, Paint)}:绘制Bitmap图像; * 8)  {@link Canvas#drawCircle(float, float, float, Paint)}:绘制圆圈; * 9)  {@link Canvas#drawLine(float, float, float, float, Paint)}:绘制线条; * 10) {@link Canvas#drawOval(RectF, Paint)}:绘制椭圆; * 11) {@link Canvas#drawPath(Path, Paint)}:绘制Path路径; * 12) {@link Canvas#drawPicture(Picture)}:绘制Picture图片; * 13) {@link Canvas#drawRect(Rect, Paint)}:绘制矩形; * 14) {@link Canvas#drawRoundRect(RectF, float, float, Paint)}:绘制圆角矩形; * 15) {@link Canvas#drawText(String, float, float, Paint)}:绘制文本; * 16) {@link Canvas#drawVertices(Canvas.VertexMode, int, float[], int, float[], int, int[], int, short[], int, int, Paint)}:绘制顶点。 * @param canvas */ @Override protected void onDraw(Canvas canvas) { super.onDraw(canvas); // 设置画布的颜色,否则会出现黑色的背景 canvas.drawRGB(255,255,255); mPaintCircle.setColor(fillColor); mPaintCircle.setAntiAlias(true); mPaintCircle.setStyle(Paint.Style.FILL); mPaintText.setTextSize(textSize); mPaintText.setColor(textColor); mPaintText.setTextAlign(Paint.Align.CENTER); mPaintCircleSide.setColor(strokeColor); mPaintCircleSide.setStrokeWidth(strokeWidth); mPaintCircleSide.setStyle(Paint.Style.STROKE); // 获取控件的高度和宽度 int width = getWidth(); int height = getHeight(); // 设置圆的半径 = 宽,高最小值的2分之1 int r = Math.min(width, height)/2-(int)strokeWidth; // 画出圆 // 圆心 = 控件的中央,半径 = 宽,高最小值的2分之1 canvas.drawCircle(width/2,height/2,r,mPaintCircle); // 画出圈 canvas.drawCircle(width/2,height/2,r,mPaintCircleSide); // 文字 if(!TextUtils.isEmpty(text)) { // TODO 换行,日后再添加  float textH = FontUtils.getFontHeight(mPaintText)/2; canvas.drawText(text, width / 2, height / 2 + (int)textH, mPaintText); } }
}
- 1
- 2
- 3
- 4
- 5
- 6
- 7
- 8
- 9
- 10
- 11
- 12
- 13
- 14
- 15
- 16
- 17
- 18
- 19
- 20
- 21
- 22
- 23
- 24
- 25
- 26
- 27
- 28
- 29
- 30
- 31
- 32
- 33
- 34
- 35
- 36
- 37
- 38
- 39
- 40
- 41
- 42
- 43
- 44
- 45
- 46
- 47
- 48
- 49
- 50
- 51
- 52
- 53
- 54
- 55
- 56
- 57
- 58
- 59
- 60
- 61
- 62
- 63
- 64
- 65
- 66
- 67
- 68
- 69
- 70
- 71
- 72
- 73
- 74
- 75
- 76
- 77
- 78
- 79
- 80
- 81
- 82
- 83
- 84
- 85
- 86
- 87
- 88
- 89
- 90
- 91
- 92
- 93
- 94
- 95
- 96
- 97
- 98
- 99
- 100
- 101
- 102
- 103
- 104
- 105
- 106
- 107
- 108
- 109
- 110
- 111
- 112
- 113
- 114
- 115
- 116
- 117
- 118
- 119
- 120
- 121
- 122
- 123
- 124
- 125
- 126
- 127
- 128
- 129
- 130
- 131
- 132
- 133
- 134
- 135
- 136
- 137
第三步:在布局文件中使用
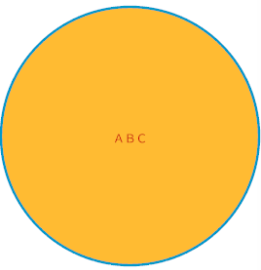
<com.wong.view.CustomCircleView android:layout_width="wrap_content" android:layout_height="wrap_content" android:background="@color/colorPrimaryDark" app:text="ABC" app:text_size="18sp" app:text_color="@android:color/holo_red_dark" app:stroke_color="@android:color/holo_blue_dark" app:stroke_width="4dp" app:fill_color="@android:color/holo_orange_light"/>
- 1
- 2
- 3
- 4
- 5
- 6
- 7
- 8
- 9
- 10
- 11
效果图:
demo
(2)自定义ViewGroup
自定义ViewGroup和自定义View的步骤差不多,区别在于ViewGroup是容器,用来包含其他控件,而View是控件看得见的。ViewGroup需要重写onMeasure方法测量子控件的宽高和自己的宽高,然后实现onLayout方法摆放子控件。而 View则是需要重写onMeasure根据测量模式和父控件给出的建议的宽高值计算自己的宽高,然后在父控件为其指定的区域绘制自己的图形。
具体参考:
《自定义ViewGroup—实现自定义ViewPager》
《自定义ViewGroup——自定义布局》
文章来源: blog.csdn.net,作者:WongKyunban,版权归原作者所有,如需转载,请联系作者。
原文链接:blog.csdn.net/weixin_40763897/article/details/103945636

- 点赞
- 收藏
- 关注作者
评论(0)