spring boot整合Mybatis3.5.4使用XML定义SQL

1.概述
SQL声明可以定义在XML文件或注解中。注解方式可以参考:《SpringBoot整合MyBatis》。
MyBatis强大在映射声明这里。同时映射器文件也很简单。与等价的JDBC代码对比,你会发现使用MyBatis帮你省了95%的代码。MyBatis框架的目的是聚焦于SQL。使用XML比使用注解更灵活,调优也更方便。MyBatis也推荐使用XML定义SQL声明。映射器XML文件只有少量的一些顶层元素:
- cache:指定的命名空间的缓存配置
- cache-ref:从其他命名空间引用缓存配置
- resultMap:最复杂也是最强大的元素,它可以描述如何从数据库结果集中加载你的对象
- parameterMap:在MyBatis3.5.4中弃用了!
- sql:可重用的SQL块,它可以被其他SQL声明引用
- insert:一个映射的INSERT声明
- update:一个映射的UPDATE声明
- delete:一个映射的DELETE声明
- select:一个映射的SELECT声明
2.例子
项目的总体结体:
~/Desktop/MyBatisXMLDemo$ tree -L 8
.
├── GroceryDemo.iml
├── pom.xml
└── src └── main ├── java │   └── com │ └── wong │ ├── controller │ │   └── PersonController.java │ ├── MainApplication.java │ └── mybatis │ ├── bean │ │   └── Person.java │ ├── mapper │ │   └── PersonMapper.java │ └── service │ ├── PersonServiceImpl.java │ └── PersonService.java └── resources ├── config │   └── application.yml └── mybatis └── mapper └── PersonMapper.xml
- 1
- 2
- 3
- 4
- 5
- 6
- 7
- 8
- 9
- 10
- 11
- 12
- 13
- 14
- 15
- 16
- 17
- 18
- 19
- 20
- 21
- 22
- 23
- 24
- 25
- 26
- 27
2.1.pom.xml添加依赖
主要的依赖:
- springboot web的起步依赖
- mysq驱动
- mybatis框架
<?xml version="1.0" encoding="UTF-8"?>
<project xmlns="http://maven.apache.org/POM/4.0.0" xmlns:xsi="http://www.w3.org/2001/XMLSchema-instance" xsi:schemaLocation="http://maven.apache.org/POM/4.0.0 http://maven.apache.org/xsd/maven-4.0.0.xsd"> <modelVersion>4.0.0</modelVersion> <groupId>com.wong</groupId> <artifactId>xmlDemo</artifactId> <version>1.0-SNAPSHOT</version> <packaging>jar</packaging> <properties> <java.version>1.8</java.version> </properties> <parent> <groupId>org.springframework.boot</groupId> <artifactId>spring-boot-starter-parent</artifactId> <version>2.2.6.RELEASE</version> <relativePath/> </parent> <dependencies> <!--springboot开发web项目的起步依赖--> <dependency> <groupId>org.springframework.boot</groupId> <artifactId>spring-boot-starter-web</artifactId> <!-- 去掉内嵌tomcat --> <exclusions> <exclusion> <groupId>org.springframework.boot</groupId> <artifactId>spring-boot-starter-tomcat</artifactId> </exclusion> </exclusions> </dependency> <!--mysql的jdbc驱动--> <dependency> <groupId>mysql</groupId> <artifactId>mysql-connector-java</artifactId> <scope>runtime</scope> </dependency> <!--MyBatis整合到springboot项目--> <dependency> <groupId>org.mybatis.spring.boot</groupId> <artifactId>mybatis-spring-boot-starter</artifactId> <version>2.1.1</version> </dependency> <!--日志框架--> <dependency> <groupId>org.springframework.boot</groupId> <artifactId>spring-boot-starter-logging</artifactId> </dependency> <!--jetty容器--> <dependency> <groupId>org.springframework.boot</groupId> <artifactId>spring-boot-starter-jetty</artifactId> </dependency> <dependency> <groupId>org.springframework.boot</groupId> <artifactId>spring-boot-configuration-processor</artifactId> <optional>true</optional> </dependency> </dependencies> <build> <finalName>Demo</finalName> <plugins> <!--maven插件--> <plugin> <groupId>org.springframework.boot</groupId> <artifactId>spring-boot-maven-plugin</artifactId> </plugin> </plugins> </build>
</project>
- 1
- 2
- 3
- 4
- 5
- 6
- 7
- 8
- 9
- 10
- 11
- 12
- 13
- 14
- 15
- 16
- 17
- 18
- 19
- 20
- 21
- 22
- 23
- 24
- 25
- 26
- 27
- 28
- 29
- 30
- 31
- 32
- 33
- 34
- 35
- 36
- 37
- 38
- 39
- 40
- 41
- 42
- 43
- 44
- 45
- 46
- 47
- 48
- 49
- 50
- 51
- 52
- 53
- 54
- 55
- 56
- 57
- 58
- 59
- 60
- 61
- 62
- 63
- 64
- 65
- 66
- 67
- 68
- 69
- 70
- 71
- 72
- 73
- 74
2.2.application.yml配置数据库及MyBatis
spring:
  datasource: # 数据源基本配置 url: jdbc:mysql://127.0.0.1:3306/MyDB username: root password: 1qaz@4321 driver-class-name: com.mysql.jdbc.Driver # 数据源其他配置 initialSize: 5 minIdle: 5 maxActive: 20 maxWait: 60000 timeBetweenEvictionRunsMillis: 60000 minEvictableIdleTimeMillis: 30000 validationQuery: SELECT 1 FROM DUAL testWhileIdle: true testOnBorrow: false testOnReturn: false poolPreparedStatements: true # 配置监控统计的filters,去掉后监控界面sql无法统计,wall用于防火墙 filters: stat,wall,slf4j maxPoolPreparedStatementPerConnectionSize: 20 useGlobalDataSourceStat: true connectionProperties: druid.stat.mergeSql=true;druid.stat.slowSqlMillis=500
mybatis:
  # 指定映射器的xml文件的位置
  mapper-locations: classpath:mybatis/mapper/*.xml
- 1
- 2
- 3
- 4
- 5
- 6
- 7
- 8
- 9
- 10
- 11
- 12
- 13
- 14
- 15
- 16
- 17
- 18
- 19
- 20
- 21
- 22
- 23
- 24
- 25
- 26
- 27
2.3.创建实体类Person
package com.wong.mybatis.bean;

public class Person{ private int id; private String name; private int age; public int getAge() { return age; } public void setAge(int age) { this.age = age; } public String getName() { return name; } public void setName(String name) { this.name = name; } public int getId() { return id; } public void setId(int id) { this.id = id; } @Override public String toString() { return "Person{id:"+this.id+",name:"+this.name+",age:"+this.age+"}"; }
}
- 1
- 2
- 3
- 4
- 5
- 6
- 7
- 8
- 9
- 10
- 11
- 12
- 13
- 14
- 15
- 16
- 17
- 18
- 19
- 20
- 21
- 22
- 23
- 24
- 25
- 26
- 27
- 28
- 29
- 30
- 31
- 32
- 33
- 34
- 35
- 36
2.4.创建映射器
package com.wong.mybatis.mapper;


import com.wong.mybatis.bean.Person;

import java.util.List;

public interface PersonMapper { // 增加 int insert(Person person); // 删除 int deleteByPrimaryKey(Integer id); // 修改 int updateByPrimaryKey(Person person); // 查询 Person selectByPrimaryKey(Integer id); // 方法名就是 xml中的id List<Person> selectAllPerson();

}
/**
 * 下面被注释的部分是使用注解完成映射的
 */
//@Mapper
//public interface PersonMapper {
// // 增加
// @Insert("insert into person(id,name,age) values(#{id},#{name},#{age})")
// int insert(Person person);
// // 删除
// @Delete("delete from person where id = #{id}")
// int deleteByPrimaryKey(Integer id);
// // 修改
// @Update("update person set name = #{name},age = #{age} where id = #{id}")
// int updateByPrimaryKey(Person person);
// // 查询
// @Select("select id,name,age from person where id=#{id}")
// Person selectByPrimaryKey(Integer id);
// @Select("select id,name,age from person")
// List<Person> selectAllPerson();
//}
- 1
- 2
- 3
- 4
- 5
- 6
- 7
- 8
- 9
- 10
- 11
- 12
- 13
- 14
- 15
- 16
- 17
- 18
- 19
- 20
- 21
- 22
- 23
- 24
- 25
- 26
- 27
- 28
- 29
- 30
- 31
- 32
- 33
- 34
- 35
- 36
- 37
- 38
- 39
- 40
- 41
- 42
- 43
- 44
- 45
2.5.创建与映射器对应的SQL的xml文件
因为我们在application.yml指定了SQL映射的xml文件的位置是classpath:mybatis/mapper/*.xml因此我在项目的resources目录下创建目录mybatis/mapper,并在其中添加映射器对应的SQL映射文件PersonMapper.xml:
一般来说,为了方便代码的阅读与管理,我们都会将SQL的映射文件的命名与映射器类的名称保持一致。事实上,你可以定义任意名字。这对绑定过程影响不大,因为它最终是根据mapper标签里的命名空间namespace来进行绑定的。
<?xml version="1.0" encoding="UTF-8" ?>
<!DOCTYPE mapper PUBLIC "-//mybatis.org//DTD Mapper 3.0//EN" "http://mybatis.org/dtd/mybatis-3-mapper.dtd">
<mapper namespace="com.wong.mybatis.mapper.PersonMapper"> <insert id="insert"> insert into person(id,name,age) values(#{id},#{name},#{age}) </insert> <delete id="deleteByPrimaryKey"> delete from person where id = #{id} </delete> <update id="update"> update person set name = #{name}, age = #{age} where id = #{id} </update> <select id="selectByPrimaryKey" resultType="com.wong.mybatis.bean.Person"> select * from person where id = #{id} </select> <select id="selectAllPerson" resultType="com.wong.mybatis.bean.Person"> select * from person </select>
</mapper>
- 1
- 2
- 3
- 4
- 5
- 6
- 7
- 8
- 9
- 10
- 11
- 12
- 13
- 14
- 15
- 16
- 17
- 18
- 19
- 20
- 21
- 22
- 23
- 24
- 25
2.6.在启动类添加映射器扫描注解
如果使用注解进行sql与接口绑定的,那么只需要在mapper映射器上使用@Mapper注解就可以进行绑定,但是现在映射器类与SQL的定义都在不同的文件里,因此需要通过某种途径将两者绑定起来。解决方式:
1.application.yml里指定了SQL映射文件的路径
2.在SpringBoot启动类里添加@MapperScan注解,当应用启动时,就会根据这些信息进行扫描并进行绑定。
package com.wong;

import org.mybatis.spring.annotation.MapperScan;
import org.springframework.boot.SpringApplication;
import org.springframework.boot.autoconfigure.SpringBootApplication;


@SpringBootApplication
@MapperScan("com.wong.mybatis.mapper") // 映射器类的包路径
public class MainApplication { public static void main(String[] args) { SpringApplication.run(MainApplication.class, args); }

}
- 1
- 2
- 3
- 4
- 5
- 6
- 7
- 8
- 9
- 10
- 11
- 12
- 13
- 14
- 15
- 16
2.7.创建服务类
服务类是专门用来完成复杂业务的地方。
2.7.1.定义服务类接口
package com.wong.mybatis.service;

import com.wong.mybatis.bean.Person;

import java.util.List;

public interface PersonService { // 增加 int insertPerson(Person person); // 删除 int deletePersonById(Integer id); // 修改 int updatePersonById(Person person); // 查询 Person selectPersonById(Integer id); List<Person> selectAllPerson();
}
- 1
- 2
- 3
- 4
- 5
- 6
- 7
- 8
- 9
- 10
- 11
- 12
- 13
- 14
- 15
- 16
- 17
- 18
2.7.2.服务类接口的实现
要使用@Service注解,让Spring初始化它,并将其放入Spring容器中。
package com.wong.mybatis.service;


import com.wong.mybatis.bean.Person;
import com.wong.mybatis.mapper.PersonMapper;
import org.springframework.beans.factory.annotation.Autowired;
import org.springframework.stereotype.Service;

import java.util.List;

@Service
public class PersonServiceImpl implements PersonService{ @Autowired private PersonMapper personMapper; @Override public int insertPerson(Person person) { return personMapper.insert(person); } @Override public int deletePersonById(Integer id) { return personMapper.deleteByPrimaryKey(id); } @Override public int updatePersonById(Person person) { return personMapper.updateByPrimaryKey(person); } @Override public Person selectPersonById(Integer id) { return personMapper.selectByPrimaryKey(id); } @Override public List<Person> selectAllPerson() { return personMapper.selectAllPerson(); }
}
- 1
- 2
- 3
- 4
- 5
- 6
- 7
- 8
- 9
- 10
- 11
- 12
- 13
- 14
- 15
- 16
- 17
- 18
- 19
- 20
- 21
- 22
- 23
- 24
- 25
- 26
- 27
- 28
- 29
- 30
- 31
- 32
- 33
- 34
- 35
- 36
- 37
- 38
- 39
- 40
- 41
2.8.创建controller
在controller里通过服务类调用数据库。使用注解@Autowired,将spring容器中的PersonService实例,注入本地变量personService,进行业务调用。
package com.wong.controller;
import com.wong.mybatis.bean.Person;
import com.wong.mybatis.service.PersonService;
import org.springframework.beans.factory.annotation.Autowired;
import org.springframework.web.bind.annotation.RequestMapping;
import org.springframework.web.bind.annotation.RestController;
import java.util.List;
@RestController
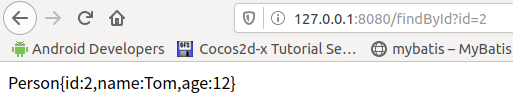
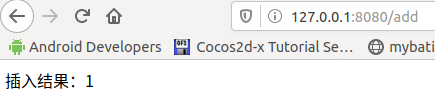
public class PersonController { // 将spring容器中的PersonService实例,注入本地变量personService @Autowired private PersonService personService; // add @RequestMapping(value = "/add") public String addStudents(){ Person student = new Person(); student.setName("Tom"); student.setAge(12); int rs = personService.insertPerson(student); return "插入结果:"+rs; } // select @RequestMapping(value = "/findAll") public String findAllStudents(){ List<Person> students = personService.selectAllPerson(); students.stream().forEach(System.out::println); return students.toString()+""; } @RequestMapping(value = "findById") public String find(Integer id){// 参数名为id Person person = personService.selectPersonById(id); return person.toString(); }
}
- 1
- 2
- 3
- 4
- 5
- 6
- 7
- 8
- 9
- 10
- 11
- 12
- 13
- 14
- 15
- 16
- 17
- 18
- 19
- 20
- 21
- 22
- 23
- 24
- 25
- 26
- 27
- 28
- 29
- 30
- 31
- 32
- 33
- 34
- 35
- 36
- 37
- 38
- 39
- 40
- 41
3.测试
3.1.运行项目
~/Desktop/MyBatisXMLDemo$ mvn clean spring-boot:run
- 1
3.2.测试结果

文章来源: blog.csdn.net,作者:WongKyunban,版权归原作者所有,如需转载,请联系作者。
原文链接:blog.csdn.net/weixin_40763897/article/details/106069932

- 点赞
- 收藏
- 关注作者
评论(0)