spark streaming 整合 flume两种方式 push 和 pull
【摘要】 一、push 方式 :spark streaming 整合 flume 配置开发
cd $FLUME_HOME
cd conf
编写 flume配置文件, vim flume_push_streaming.conf
simple-agent.sources = netcat-sourcesimple-agent.sinks = avro-sinksi...
一、push 方式 :spark streaming 整合 flume 配置开发
cd $FLUME_HOME
cd conf
编写 flume配置文件, vim flume_push_streaming.conf
-
simple-agent.sources = netcat-source
-
simple-agent.sinks = avro-sink
-
simple-agent.channels = memory-channel
-
-
simple-agent.sources.netcat-source.type = netcat
-
simple-agent.sources.netcat-source.bind = hadoop000
-
simple-agent.sources.netcat-source.port = 44444
-
-
-
-
simple-agent.sinks.avro-sink.type = avro
-
simple-agent.sinks.avro-sink.hostname = hadoop000
-
simple-agent.sinks.avro-sink.port = 41414
-
-
-
simple-agent.channels.memory-channel.type = memory
-
simple-agent.channels.memory-channel.capacity = 1000
-
simple-agent.channels.memory-channel.transactionCapacity = 100
-
-
simple-agent.sources.netcat-source.channels = memory-channel
-
simple-agent.sinks.avro-sink.channel = memory-channel
项目 中 添加 依赖
-
<!--添加spark streaming 整合 flume 依赖-->
-
<dependency>
-
<groupId>org.apache.spark</groupId>
-
<artifactId>spark-streaming-flume_2.11</artifactId>
-
<version>2.2.0</version>
-
</dependency>
编写 spark streaming 整合 flume 的代码,使用 FlumeUtils
-
object FlumePushWordCount {
-
-
def main(args: Array[String]): Unit = {
-
if(args.length != 2){
-
System.exit(1)
-
}
-
-
val Array(hostname,port) =args
-
val sparkConf = new SparkConf().setMaster("local[2]").setAppName("FlumePushWordCount")
-
val ssc = new StreamingContext(sparkConf,Seconds(5))
-
val flumeStream = FlumeUtils.createStream(ssc,hostname,port.toInt)
-
flumeStream.map(x=>new String(x.event.getBody.array())).flatMap(_.split(" ")).map((_,1)).reduceByKey(_+_).print()
-
ssc.start()
-
ssc.awaitTermination()
-
}
启动 flume
-
flume-ng agent --name simple-agent \
-
--conf $FLUME_HOME/conf \
-
--conf-file $FLUME_HOME/conf/flume_push_streaming.conf \
-
-Dflume.root.logger=INFO,console
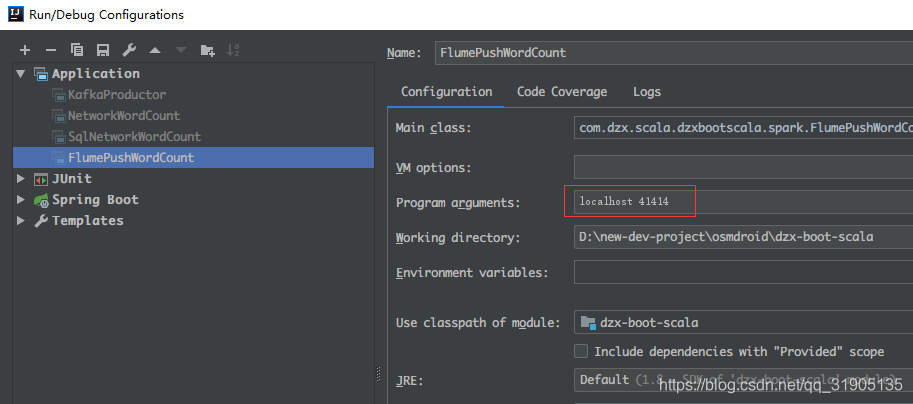
使用idea 运行代码,并传入两个参数 hostname 和 port

执行 nc -lk 44444
输入任意字母单词 按回车键,看到控制台上输出单词频次统计结果 ,说明运行成功。
将代码 打包并提交到 服务器上运行:
-
object FlumePushWordCount {
-
-
def main(args: Array[String]): Unit = {
-
if(args.length != 2){
-
System.exit(1)
-
}
-
-
val Array(hostname,port) =args
-
//注释掉master 和 appName,因为这两个在服务器上运行时是使用spark-submit 命令指定的
-
//.setMaster("local[2]").setAppName("FlumePushWordCount")
-
val sparkConf = new SparkConf()
-
val ssc = new StreamingContext(sparkConf,Seconds(5))
-
val flumeStream = FlumeUtils.createStream(ssc,hostname,port.toInt)
-
flumeStream.map(x=>new String(x.event.getBody.array())).flatMap(_.split(" ")).map((_,1)).reduceByKey(_+_).print()
-
ssc.start()
-
ssc.awaitTermination()
-
}
执行 mvn clean package -DskipTests 将代码打包
执行以下命令,(--packages 导入依赖的spark-streaming-flume_2.11.jar)即可运行应用程序。
-
spark-submit --class com. dzx.scala.dzxbootscala.spark.FlumePushWordCount
-
--master local[2] --packages org.apache.spark:spark-streaming-flume_2.11:2.2.0
-
/home/hadoop/lib/sparktrain-1.0.jar hadoop000 41414
二、pull方式 :spark streaming 整合 flume 配置开发(推荐这种更稳定,容错,安全)
添加依赖
-
<dependency>
-
<groupId>org.apache.spark</groupId>
-
<artifactId>spark-streaming-flume-sink_2.11</artifactId>
-
<version>2.2.0</version>
-
</dependency>
-
-
-
<dependency>
-
<groupId>org.apache.commons</groupId>
-
<artifactId>commons-lang3</artifactId>
-
<version>3.5</version>
-
</dependency>
编写 flume 配置文件 flume_pull_streaming.conf
-
simple-agent.sources = netcat-source
-
simple-agent.sinks = spark-sink
-
simple-agent.channels = memory-channel
-
-
simple-agent.sources.netcat-source.type = netcat
-
simple-agent.sources.netcat-source.bind = hadoop000
-
simple-agent.sources.netcat-source.port = 44444
-
-
-
-
simple-agent.sinks.spark-sink.type = org.apache.spark.streaming.flume.sink.SparkSink
-
simple-agent.sinks.spark-sink.hostname = hadoop000
-
simple-agent.sinks.spark-sink.port = 41414
-
-
-
simple-agent.channels.memory-channel.type = memory
-
simple-agent.channels.memory-channel.capacity = 1000
-
simple-agent.channels.memory-channel.transactionCapacity = 100
-
-
simple-agent.sources.netcat-source.channels = memory-channel
-
simple-agent.sinks.spark-sink.channel = memory-channel
编写 应用程序代码
-
object FlumePullWordCount {
-
-
def main(args: Array[String]): Unit = {
-
if(args.length != 2){
-
System.exit(1)
-
}
-
val Array(hostname,port) =args
-
val sparkConf = new SparkConf().setMaster("local[2]").setAppName("FlumePullWordCount")
-
val ssc = new StreamingContext(sparkConf,Seconds(5))
-
//只有这一个地方和 push 的方法不同,其他代码完全相同
-
val flumeStream = FlumeUtils.createPollingStream(ssc,hostname,port.toInt)
-
flumeStream.map(x=>new String(x.event.getBody.array())).flatMap(_.split(" ")).map((_,1)).reduceByKey(_+_).print()
-
ssc.start()
-
ssc.awaitTermination()
-
}
先启动 flume
-
flume-ng agent --name simple-agent \
-
--conf $FLUME_HOME/conf \
-
--conf-file $FLUME_HOME/conf/flume_pull_streaming.conf \
-
-Dflume.root.logger=INFO,console
在idea 运行 应用程序同方式一,或者 打包到服务器上面 运行命令如下:
-
spark-submit --class com. dzx.scala.dzxbootscala.spark.FlumePullWordCount
-
--master local[2] --packages org.apache.spark:spark-streaming-flume_2.11:2.2.0
-
/home/hadoop/lib/sparktrain-1.0.jar hadoop000 41414
文章来源: blog.csdn.net,作者:血煞风雨城2018,版权归原作者所有,如需转载,请联系作者。
原文链接:blog.csdn.net/qq_31905135/article/details/85693902
【版权声明】本文为华为云社区用户转载文章,如果您发现本社区中有涉嫌抄袭的内容,欢迎发送邮件进行举报,并提供相关证据,一经查实,本社区将立刻删除涉嫌侵权内容,举报邮箱:
cloudbbs@huaweicloud.com
- 点赞
- 收藏
- 关注作者


评论(0)