Android RecyclerView GridLayoutManager 布局中每个Item组都带一个标题
Demo
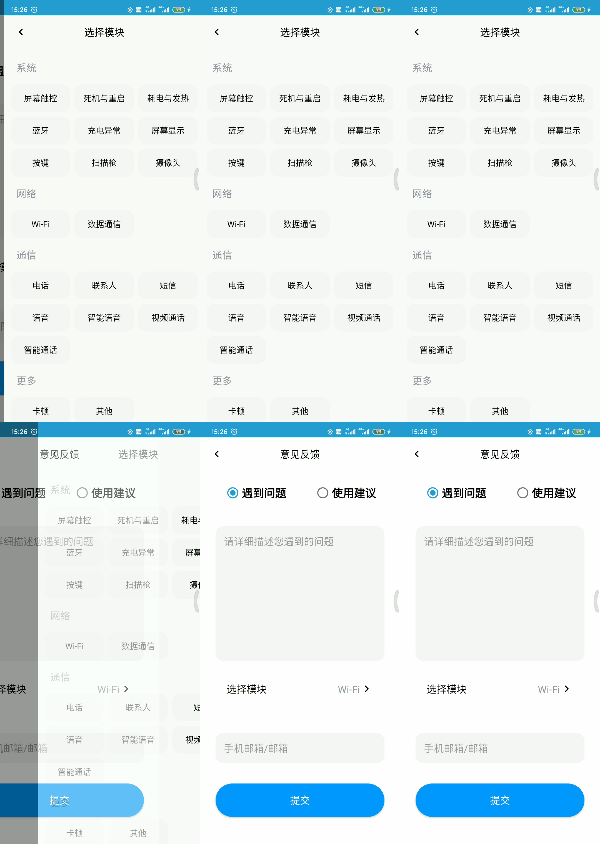
今天写了个demo,是关于意见反馈的页面的,当中使用到了RecyclerView和GridLayoutManager:demo
效果图:

详细情况,请大家下载demo查看。这里我想特别分享两点:
1、如何实现每行列数不一样或多列的视图。
2、如何实现网络布局中item之间的间距是均等的。
如何实现把网格布局差异化显示
要求 RecyclerView GridLayoutManager 布局中每个Item组都带一个标题。那么我们就需要定义两种视图:标题视图和item视图。由于在初始化GridLayoutManager时,会指定好要分多少列,如下面定义了6列:
GridLayoutManager gridLayoutManager = new GridLayoutManager(this, 6,GridLayoutManager.VERTICAL,false);
- 1
所以我们的解决思路可以这样子:
1、定义两种类型视图,在每个数据项上都带上自己要用来显示的视图类型,如:
/*标题*/ public final static int TITLE_ITEM = 0; /*item*/ public final static int GALLERY_ITEM = 1;
- 1
- 2
- 3
- 4
2、给RecyclerView设置一个列数为6的GridLayoutManager,然后再动态地为不同部位的item分别设置SpanSize为6(铺满)、3(1/2)、2(1/3)就行了。如果是标题视图的,就将6列合成一列,用于显示标题。因为我们定义了6列,每行只显示3个item时,那么就将2列合成一列,刚好能合成3列。这个工作可以由GridLayoutManager.SpanSizeLookup来完成:
gridLayoutManager.setSpanSizeLookup(new GridLayoutManager.SpanSizeLookup() { @Override public int getSpanSize(int position) { switch (adapter.getItemViewType(position)) { /*标题*/ case ModuleSelectionAdapter.TITLE_ITEM: return 6; /*item*/ case ModuleSelectionAdapter.GALLERY_ITEM: return 2; default: return 5; } } });
- 1
- 2
- 3
- 4
- 5
- 6
- 7
- 8
- 9
- 10
- 11
- 12
- 13
- 14
- 15
为了让GridLayoutManager.SpanSizeLookup对象知道是什么视图类型,我们还要在adapter里定义好getItemViewType()方法,如本例的:
@Override public int getItemViewType(int position) { switch (list.get(position).getShowType()) { case TITLE_ITEM: return TITLE_ITEM; case GALLERY_ITEM: return GALLERY_ITEM; } return -1; }
- 1
- 2
- 3
- 4
- 5
- 6
- 7
- 8
- 9
- 10
以上就是实现GridLayoutManager的列差异化显示的核心代码。具体代码,请参考demo。
如何实现网络布局中item之间的间距是均等的
之所以会有这个问题的出现是因为当我们设置了一个item的左、上、右、下四个方位的间距后,就会出现item与item之间的间距是我们设置的两倍,而边缘item与父布局(此处是RecyclerView,因为RecyclerView包含item)的边距则不会出现重复,所以体现出的矛盾就是item与item的间距与那些边缘item与父布局之间的边距不和谐的矛盾。因为我们的item是水平方向放三个的,那么我们假想一下,如果我们希望item与item之间都相隔8dp,那么只要每个item只出一半间距4dp,就可以实现了。这解决了内部的问题,那么边缘的问题呢?其实我们可以通过设置RecyclerView与父布局(此处是包含RecyclerView的布局)的间距来间接完成,我们来看看具体的步骤:
1、设置RecyclerView的内边距android:padding="@dimen/space",并指定android:clipToPadding=false。
<androidx.recyclerview.widget.RecyclerView android:id="@+id/rv_module" android:layout_width="0dp" android:layout_height="0dp" android:clipToPadding="false" android:padding="@dimen/space" app:layout_constraintStart_toStartOf="parent" app:layout_constraintTop_toBottomOf="@+id/cl_ger_title" app:layout_constraintEnd_toEndOf="parent" app:layout_constraintBottom_toBottomOf="parent"/>
- 1
- 2
- 3
- 4
- 5
- 6
- 7
- 8
- 9
- 10
2、添加ItemOffsetDecoration到RecyclerView, 偏移值应该是要添加为item之间空间的实际值的一半。
(1)继承RecyclerView.ItemDecoration写一个它的子类ItemOffsetDecoration
public class ItemOffsetDecoration extends RecyclerView.ItemDecoration { private int mItemOffset; /** * * @param itemOffset item与item之间的间距 */ public ItemOffsetDecoration(int itemOffset) { mItemOffset = itemOffset; } @Override public void getItemOffsets(Rect outRect, View view, RecyclerView parent, RecyclerView.State state) { super.getItemOffsets(outRect, view, parent, state); outRect.set(mItemOffset, mItemOffset, mItemOffset, mItemOffset); }
}
- 1
- 2
- 3
- 4
- 5
- 6
- 7
- 8
- 9
- 10
- 11
- 12
- 13
- 14
- 15
- 16
- 17
- 18
- 19
- 20
(2)在RecyclerView应用
float space = getResources().getDimension(R.dimen.space);
/*偏移值应该是要添加为item之间空间的实际值的一半*/
mRVModule.addItemDecoration(new ItemOffsetDecoration((int) space/2));
- 1
- 2
- 3
要达到这种效果有很多方法,以上这种处理方式其实也挺好,实现起来简单有效。
谢谢阅读。
文章来源: blog.csdn.net,作者:WongKyunban,版权归原作者所有,如需转载,请联系作者。
原文链接:blog.csdn.net/weixin_40763897/article/details/103990503
- 点赞
- 收藏
- 关注作者


评论(0)