Hive项目实战系列(2) | 分析前准备(创建表与插入数据)
【摘要】 此次博主为大家带来的是Hive项目实战系列的第二部分。
目录
一 启动hive二. 创建表2.1 拿到原始数据(日志数据| ori表 )2.2 把数据导入到hive中进行处理(创建两张orc表)2.3 向ORC表插入数据
一 启动hive
.1 启动hiveserver2服务
[bigdata@hadoop002 hive]$ bin/...
此次博主为大家带来的是Hive项目实战系列的第二部分。
一 启动hive
- .1 启动hiveserver2服务
[bigdata@hadoop002 hive]$ bin/hiveserver2
- 1
- 2 启动beeline
[bigdata@hadoop002 hive]$ bin/beeline
Beeline version 1.2.1 by Apache Hive
beeline>
- 1
- 2
- 3
- 3 连接hiveserver2
beeline> !connect jdbc:hive2://hadoop002:10000(回车)
Connecting to jdbc:hive2://hadoop002:10000
Enter username for jdbc:hive2://hadoop002:10000: bigdata(回车)
Enter password for jdbc:hive2://hadoop002:10000: (直接回车)
Connected to: Apache Hive (version 1.2.1)
Driver: Hive JDBC (version 1.2.1)
Transaction isolation: TRANSACTION_REPEATABLE_READ

0: jdbc:hive2://hadoop002:10000> create database guli;
0: jdbc:hive2://hadoop002:10000> use guli;
0: jdbc:hive2://hadoop002:10000> show tables;
+-----------+--+
| tab_name  |
+-----------+--+
+-----------+--+
No rows selected (0.036 seconds)
- 1
- 2
- 3
- 4
- 5
- 6
- 7
- 8
- 9
- 10
- 11
- 12
- 13
- 14
- 15
- 16
- 17
二. 创建表
2.1 拿到原始数据(日志数据| ori表 )
- 1. 创建user_text
create external table user_text(
uploader string,
videos int,
friends int)
row format delimited fields terminated by '\t'
collection items terminated by '&'
location '/guli/user';

// 查看前五行
0: jdbc:hive2://hadoop002:10000> select * from user_text limit 5;
- 1
- 2
- 3
- 4
- 5
- 6
- 7
- 8
- 9
- 10

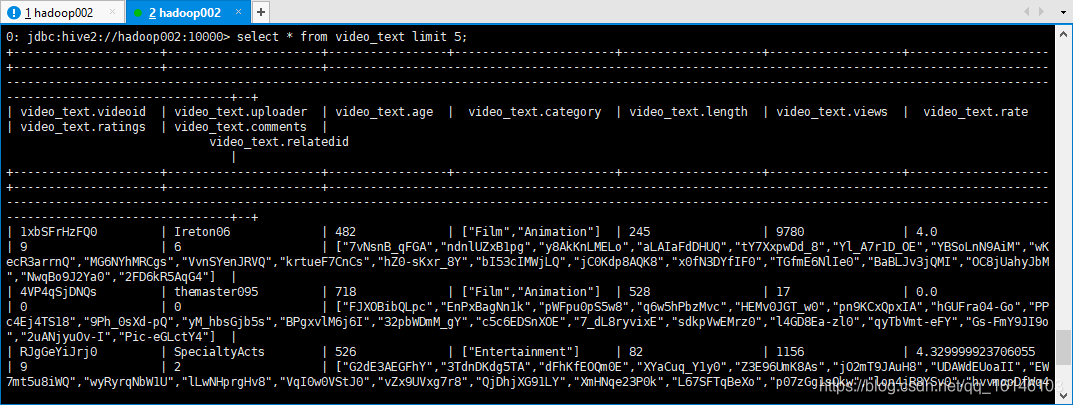
- 2. 创建video_text
// video表
create external table video_text( videoId string, uploader string, age int, category array<string>, length int, views int, rate float, ratings int, comments int, relatedId array<string>
)
row format delimited fields terminated by '\t'
collection items terminated by '&'
location '/guli/video_etc';

// 查询
select * from video_text limit 5;
- 1
- 2
- 3
- 4
- 5
- 6
- 7
- 8
- 9
- 10
- 11
- 12
- 13
- 14
- 15
- 16
- 17
- 18
- 19

类型我们大致可以看到就行。
2.2 把数据导入到hive中进行处理(创建两张orc表)
- 1. 创建video_orc:
create table video_orc( videoId string, uploader string, age int, category array<string>, length int, views int, rate float, ratings int, comments int, relatedId array<string>
)
row format delimited fields terminated by '\t'
collection items terminated by '&'
stored as orc;
- 1
- 2
- 3
- 4
- 5
- 6
- 7
- 8
- 9
- 10
- 11
- 12
- 13
- 14
- 15
如果创建的是表为如下的这种

就需要输入如下的命令修改,并出现下图标记处的类型就行了:
0: jdbc:hive2://hadoop002:10000> alter table video_orc set tblproperties("EXTERNAL"="FALSE")
0: jdbc:hive2://hadoop002:10000> desc formatted video_orc;
- 1
- 2

- 2. 创建user_orc
create table user_orc(
uploader string,
videos int,
friends int)
row format delimited fields terminated by '\t'
collection items terminated by '&'
stored as orc;
- 1
- 2
- 3
- 4
- 5
- 6
- 7
2.3 向ORC表插入数据
- 1. 向user_orc插入数据
0: jdbc:hive2://hadoop002:10000> insert into user_orc select * from user_text;
- 1
- 2

结果在:

- 2. 向video_orc插入数据
0: jdbc:hive2://hadoop002:10000> insert into video_orc select * from video_text;
- 1

- 3. 测试是否成功
0: jdbc:hive2://hadoop002:10000> select * from user_orc limit 5;
0: jdbc:hive2://hadoop002:10000> select * from video_orc limit 5;
- 1
- 2

好了,到这里,我们就把分析前的数据准备好了。

看 完 就 赞 , 养 成 习 惯 ! ! ! \color{#FF0000}{看完就赞,养成习惯!!!} 看完就赞,养成习惯!!!^ _ ^ ❤️ ❤️ ❤️
码字不易,大家的支持就是我坚持下去的动力。点赞后不要忘了关注我哦!
文章来源: buwenbuhuo.blog.csdn.net,作者:不温卜火,版权归原作者所有,如需转载,请联系作者。
原文链接:buwenbuhuo.blog.csdn.net/article/details/105879962
【版权声明】本文为华为云社区用户转载文章,如果您发现本社区中有涉嫌抄袭的内容,欢迎发送邮件进行举报,并提供相关证据,一经查实,本社区将立刻删除涉嫌侵权内容,举报邮箱:
cloudbbs@huaweicloud.com
- 点赞
- 收藏
- 关注作者


评论(0)