Flume快速入门系列(5) | 负载均衡和故障转移
此篇博文讲的是Flume的负载均衡和故障转移。
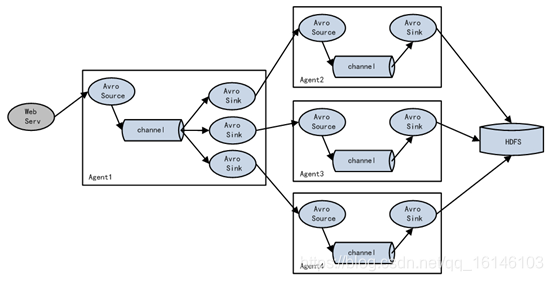
单Source、Channel多Sink(负载均衡)如下图所示。

1. 需求
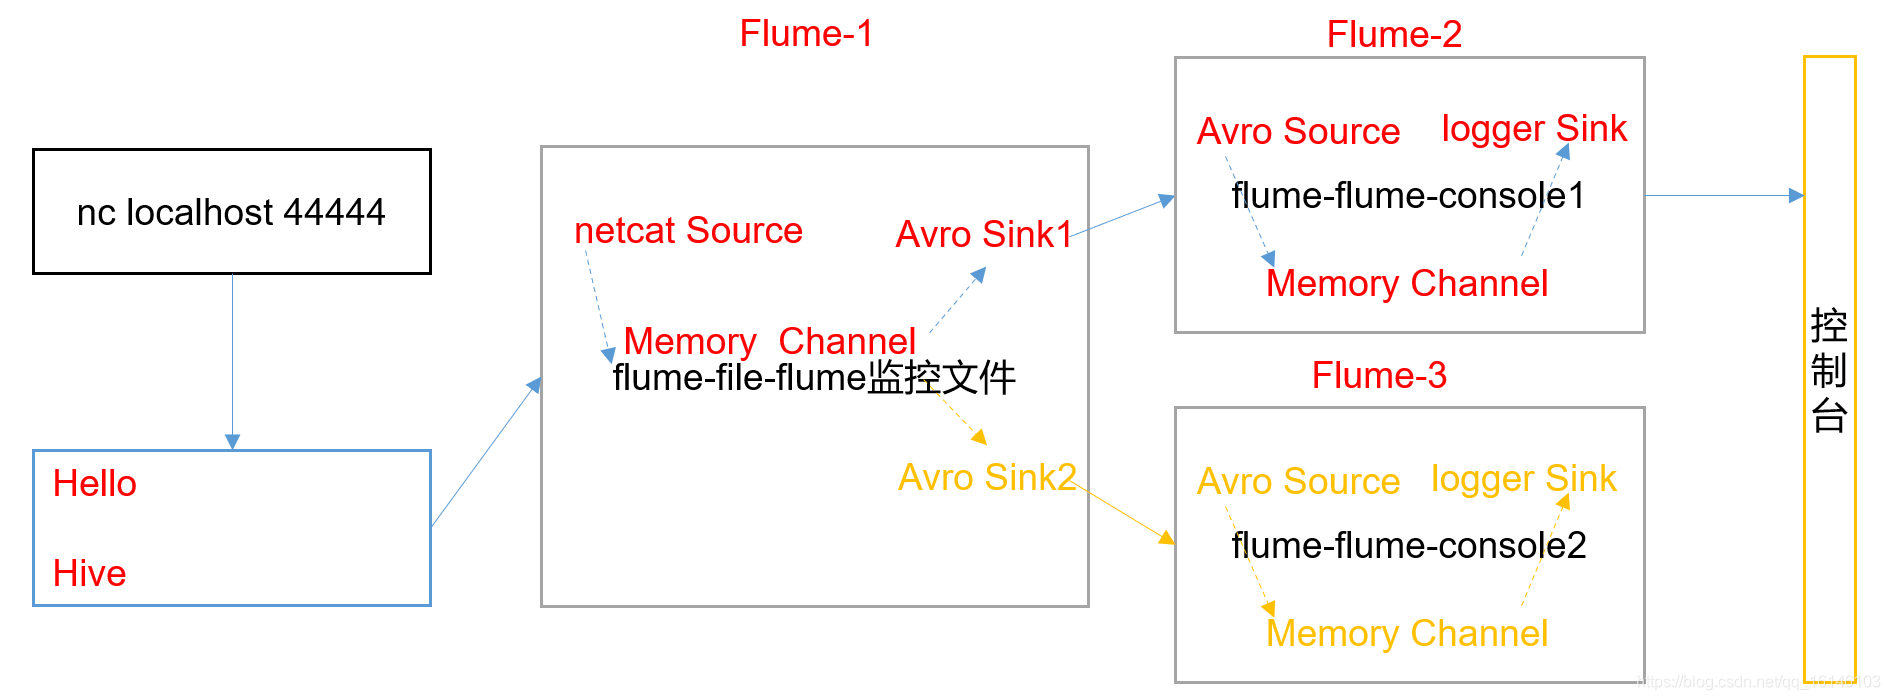
使用Flume-1监控文件变动,Flume-1将变动内容传递给Flume-2,Flume-2负责存储到控制台。同时Flume-1将变动内容传递给Flume-3,Flume-3也负责存储到控制台。
2. 需求分析


3. 实现步骤
1. 准备工作
- 在/opt/module/flume/job目录下创建group2文件夹
[bigdata@hadoop002 job]$ mkdir group2
[bigdata@hadoop002 job]$ cd group2
- 1
- 2
- 3
2. 创建flume-netcat-flume.conf
配置1个netcat source和1个channel、1个sink group(2个sink),分别输送给flume-flume-console1和flume-flume-console2。
- 1. 创建配置文件并打开
[bigdata@hadoop002 group2]$ vim flume-netcat-flume.conf
- 1
- 2
- 2. 添加如下内容
# Name the components on this agent
a1.sources = r1
a1.channels = c1
a1.sinkgroups = g1
a1.sinks = k1 k2

# Describe/configure the source
a1.sources.r1.type = netcat
a1.sources.r1.bind = localhost
a1.sources.r1.port = 44444

a1.sinkgroups.g1.processor.type = load_balance
a1.sinkgroups.g1.processor.backoff = true
a1.sinkgroups.g1.processor.selector = round_robin
a1.sinkgroups.g1.processor.selector.maxTimeOut=10000

# Describe the sink
a1.sinks.k1.type = avro
a1.sinks.k1.hostname = hadoop002
a1.sinks.k1.port = 4141

a1.sinks.k2.type = avro
a1.sinks.k2.hostname = hadoop002
a1.sinks.k2.port = 4142

# Describe the channel
a1.channels.c1.type = memory
a1.channels.c1.capacity = 1000
a1.channels.c1.transactionCapacity = 100

# Bind the source and sink to the channel
a1.sources.r1.channels = c1
a1.sinkgroups.g1.sinks = k1 k2
a1.sinks.k1.channel = c1
a1.sinks.k2.channel = c1
- 1
- 2
- 3
- 4
- 5
- 6
- 7
- 8
- 9
- 10
- 11
- 12
- 13
- 14
- 15
- 16
- 17
- 18
- 19
- 20
- 21
- 22
- 23
- 24
- 25
- 26
- 27
- 28
- 29
- 30
- 31
- 32
- 33
- 34
- 35
- 36
注:Avro是由Hadoop创始人Doug Cutting创建的一种语言无关的数据序列化和RPC框架。
注:RPC(Remote Procedure Call)—远程过程调用,它是一种通过网络从远程计算机程序上请求服务,而不需要了解底层网络技术的协议。
3. 创建flume-flume-console1.conf
配置上级Flume输出的Source,输出是到本地控制台。
- 1. 创建配置文件并打开
[bigdata@hadoop002 group2]$ vim flume-flume-console1.conf
- 1
- 2
- 2. 添加如下内容
# Name the components on this agent
a2.sources = r1
a2.sinks = k1
a2.channels = c1

# Describe/configure the source
a2.sources.r1.type = avro
a2.sources.r1.bind = hadoop002
a2.sources.r1.port = 4141

# Describe the sink
a2.sinks.k1.type = logger

# Describe the channel
a2.channels.c1.type = memory
a2.channels.c1.capacity = 1000
a2.channels.c1.transactionCapacity = 100

# Bind the source and sink to the channel
a2.sources.r1.channels = c1
a2.sinks.k1.channel = c1
- 1
- 2
- 3
- 4
- 5
- 6
- 7
- 8
- 9
- 10
- 11
- 12
- 13
- 14
- 15
- 16
- 17
- 18
- 19
- 20
- 21
- 22
4. 创建flume-flume-console2.conf
配置上级Flume输出的Source,输出是到本地控制台。
- 1. 创建配置文件并打开
[bigdata@hadoop002 group2]$ vim flume-flume-console2.conf
- 1
- 2
- 2. 添加如下内容
# Name the components on this agent
a3.sources = r1
a3.sinks = k1
a3.channels = c2

# Describe/configure the source
a3.sources.r1.type = avro
a3.sources.r1.bind = hadoop002
a3.sources.r1.port = 4142

# Describe the sink
a3.sinks.k1.type = logger

# Describe the channel
a3.channels.c2.type = memory
a3.channels.c2.capacity = 1000
a3.channels.c2.transactionCapacity = 100

# Bind the source and sink to the channel
a3.sources.r1.channels = c2
a3.sinks.k1.channel = c2
- 1
- 2
- 3
- 4
- 5
- 6
- 7
- 8
- 9
- 10
- 11
- 12
- 13
- 14
- 15
- 16
- 17
- 18
- 19
- 20
- 21
- 22
5. 执行配置文件
分别开启对应配置文件:flume-flume-console2,flume-flume-console1,flume-netcat-flume。
[bigdata@hadoop002 flume]$ bin/flume-ng agent --conf conf/ --name a3 --conf-file job/group2/flume-flume-console2.conf -Dflume.root.logger=INFO,console
[bigdata@hadoop002 flume]$ bin/flume-ng agent --conf conf/ --name a2 --conf-file job/group2/flume-flume-console1.conf -Dflume.root.logger=INFO,console
[bigdata@hadoop002 flume]$ bin/flume-ng agent --conf conf/ --name a1 --conf-file job/group2/flume-netcat-flume.conf
- 1
- 2
- 3
- 4
6. 使用netcat工具向本机的44444端口发送内容
$ nc localhost 44444
- 1
7. 查看Flume2及Flume3的控制台打印日志

我们可以看到,控制台出现的的回应是按照间隔来的,一段时间内输入的内容会在同一个控制台输出。
本次的分享就到这里了,

看 完 就 赞 , 养 成 习 惯 ! ! ! \color{#FF0000}{看完就赞,养成习惯!!!} 看完就赞,养成习惯!!!^ _ ^ ❤️ ❤️ ❤️
码字不易,大家的支持就是我坚持下去的动力。点赞后不要忘了关注我哦!
文章来源: buwenbuhuo.blog.csdn.net,作者:不温卜火,版权归原作者所有,如需转载,请联系作者。
原文链接:buwenbuhuo.blog.csdn.net/article/details/105923936
- 点赞
- 收藏
- 关注作者


评论(0)