SpringCloud系列之服务容错保护Netflix Hystrix

1. 什么是雪崩效应?
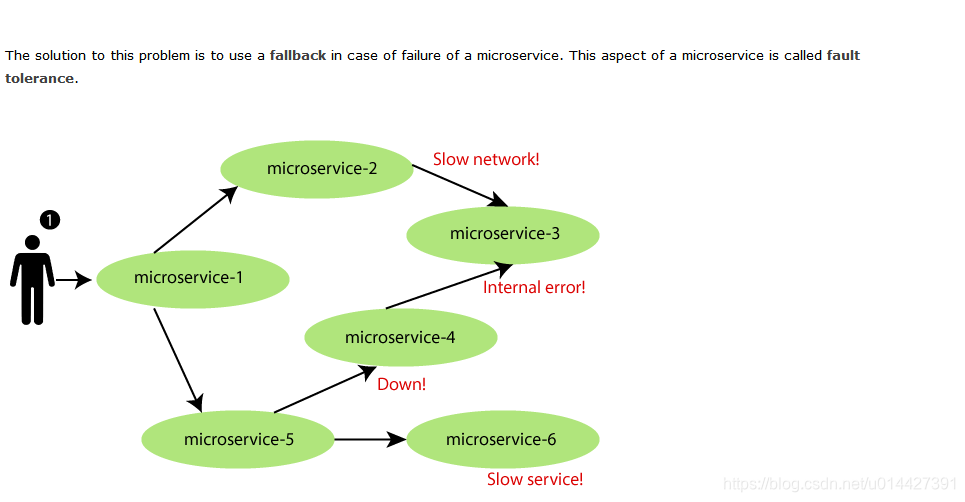
微服务环境,各服务之间是经常相互依赖的,如果某个不可用,很容易引起连锁效应,造成整个系统的不可用,这种现象称为服务雪崩效应。
如图,引用国外网站的图例:https://www.javatpoint.com/fault-tolerance-with-hystrix#,如图系统各种服务相互调用,一旦一个服务出现问题,假如系统没有熔断器,很容易影响其它模块使用
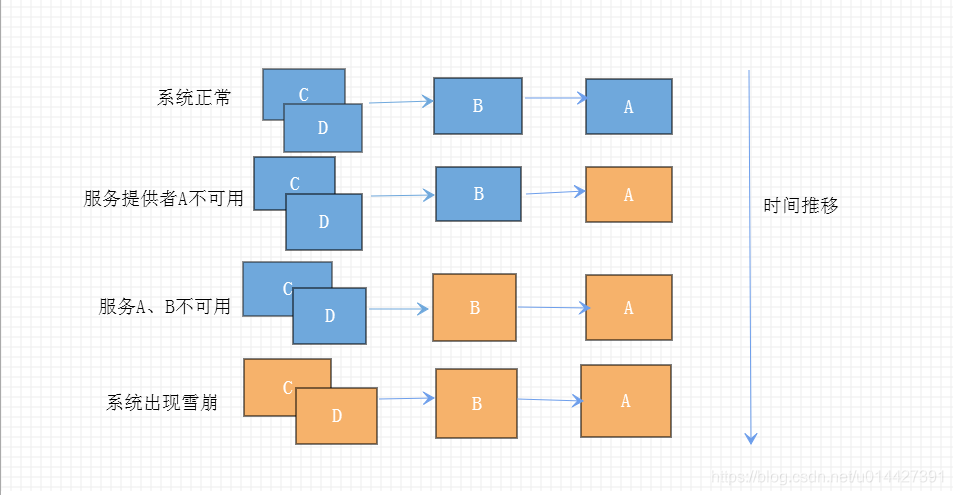
可用自己画图表示这种情况,如图:A作为服务提供者,B为A的服务消费者,C和D是B的服务消费者。A不可用引起了B的不可用,像滚雪球一样放大到C和D时,雪崩效应就形成了。当然也不一定是服务提供者出现问题,也有可能是消费者出现问题
从两个方面来分析服务雪崩产生的原因:
- 服务提供者
服务提供者出现问题,一般都是影响调用的服务消费者,然后造成连锁反应 - 服务消费者
服务消费者方面,主要表现在同步调用等待结果导致资源紧张,ps:还有一种特殊情况是,服务既是服务提供者,又是服务消费者
2. 什么是熔断器模式
熔断器(CircuitBreaker),英文是CircuitBreaker,软件设计中的熔断器模式实现,思路是用一个函数调用在断路器保护对象,对故障监控。失败达到一定阈值后,断路器工作,接口调用返回一个错误,以达到保护系统,预防线程资源被大量占用,造成系统雪崩的情况
引用https://martinfowler.com/bliki/CircuitBreaker.html的图例,如图给出了一个简单的软件中的熔断器模式设计方案:
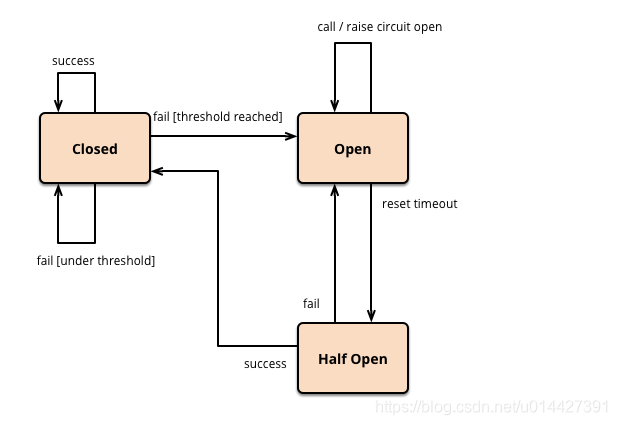
服务的健康状况 = 请求失败数 / 请求总数
ps:熔断器的开关状态转换是通过当前服务健康状况和设定阈值比较决定的
- 服务健康状况低于设定的阈值时,熔断器开关是关闭的,如果当前服务健康状况大于设置阈值,开关打开
- 熔断器的开关打开后,所有请求都会被拦截,过一段时间后,开关状态变为半开(half open)
- 熔断器半开(half open)状态是允许一个请求通过的,当该请求调用成功时, 熔断器恢复到关闭状态.,若该请求失败, 熔断器继续保持打开状态
3. 什么是Netflix Hystrix?
Hystrix 是由 Netflix 发布的针对微服务分布式系统的熔断保护中间件,是一种很好地预防服务雪崩的中间件,其实比较像电路中的保险丝,一旦某个服务不可用,导致暂用了线程资源等情况发生时,熔断器开启,不允许其它服务继续调用,导致系统雪崩
引用官网Wiki的解释:
In a distributed environment, inevitably some of the many service dependencies will fail. Hystrix is a library that helps you control the interactions between these distributed services by adding latency tolerance and fault tolerance logic. Hystrix does this by isolating points of access between the services, stopping cascading failures across them, and providing fallback options, all of which improve your system’s overall resiliency.
中文翻译:在分布式环境中,不可避免的一些很多服务依赖关系将会失败。Hystrix是一个库,可以帮助你控制这些分布式服务之间的交互通过添加延迟宽容和容错逻辑。Hystrix通过孤立点之间的访问服务,停止在级联故障,并提供后备选项,所有这些改善您的系统的整体弹性。
4、Hystrix的工作原理
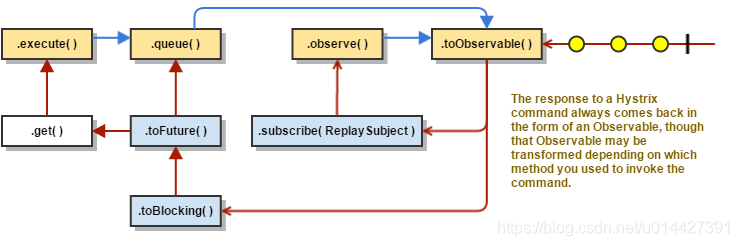
引用官网wiki的图片,简单介绍Hystrix的工作原理,点此查看大图

Hystrix的工作过程:
- 构造一个HystrixCommand或HystrixObservableCommand对象
- 执行命令
- 响应是否已缓存?
- 电路开路了吗?
- 线程池队列/信号量是否已满?
- HystrixObservableCommand.construct() 或者 HystrixCommand.run()
- 计算电路健康
- 获取后备
- 返回成功的回应
- 1、构造一个HystrixCommand或HystrixObservableCommand对象
构建一个 HystrixCommand 或者 HystrixObservableCommand 对象,将请求包装到 Command 对象中
- 2、执行命令
Hystrix执行命令有如下4种方法:
ps:前两种仅适用于简单HystrixCommand对象,不适用于HystrixObservableCommand
- execute() :阻止,然后返回从依赖项接收的单个响应(或在发生错误的情况下引发异常)
- queue():返回一个Future,您可以从中获得依赖项的单个响应
- observe():订阅,该Observable代表表示从依赖项返回的响应,并返回Observable复制的。
- toObservable():返回一个Observable,当您订阅它时,将执行Hystrix命令并发出其响应
K value   = command.execute();
Future<K> fValue  = command.queue();
Observable<K> ohValue = command.observe(); //hot observable
Observable<K> ocValue = command.toObservable(); //cold observable
- 1
- 2
- 3
- 4
-
3、响应是否已缓存?
判断当前请求是否有缓存,如果在缓存中就直接返回缓存的内容。详情可以参考官方比较详细介绍:https://github.com/Netflix/Hystrix/wiki/How-it-Works#RequestCaching -
4、电路开路了吗?
判断断路器是否处于打开的状态,如果是打开状态,那么 Hystrix 就不再会去执行命令,直接跳到第 8 步,获取 fallback 方法,执行 fallback 逻辑。如果断路器没有打开,那么继续执行 -
5、线程池队列/信号量是否已满?
Hystrix的隔离模式有两种:- 线程池队列模式
- 信号量模式
如果是线程池隔离模式,会判断线程池队列的容量,如果是信号量隔离模式,会判断信号量的值,如果线程池和信号量都已经满了,那么同样请求不会再执行,会直接跳到第 8 步(fallback过程),如果未满那么继续执行
-
6、HystrixObservableCommand.construct() 或者 HystrixCommand.run()
在这里,Hystrix通过如下方法调用对依赖项的请求,有两种方法,其中一种执行:- HystrixCommand.run():返回一个响应或者抛出一个异常
- HystrixObservableCommand.construct():返回一个可观测的,发出响应(s)或发送一个onError通知
-
7、计算电路健康
Hystrix向断路器报告成功,失败,拒绝和超时,断路器保持滚动的一组计算统计信息,它使用这些统计信息来确定电路何时应“跳闸”,在该时间点它会将随后的所有请求短路,直到经过恢复期为止,在此之后,在首先检查某些运行状况检查之后,情况正常,电路会再次闭合 -
8、获取后备
所谓的获取后备,其实就是系统发生异常时,执行后备函数,也就是fallback操作,Hystrix尝试在命令执行失败时恢复到您的后备状态:当construct()或引发异常run()(6.),由于电路断开而使命令短路(4.),命令的线程池和队列或信号量为最大容量(5.),或者命令已超过其超时长度。 -
9、返回成功的响应
如果Hystrix命令成功执行,它将以的形式将一个或多个响应返回给调用方Observable,官方图例说明:

5、Hystrix的设计原则
ok,接着归纳一下Hystrix的主要设计原则,或者特征,参考官方的wiki,我们可以看到Hystrix的一些主要特征
- 封装请求
Hystrix封装请求由 HystrixCommand 或者 HystrixObservableCommand 类实现,将请求包装到 Command 对象中,接着执行,主要4种方法
K value   = command.execute();
Future<K> fValue  = command.queue();
Observable<K> ohValue = command.observe(); //hot observable
Observable<K> ocValue = command.toObservable(); //cold observable
- 1
- 2
- 3
- 4
- 资源隔离
资源隔离减少风险的方式被称为:Bulkheads(舱壁隔离模式)
引用https://segmentfault.com/a/1190000005988895的图例:

在Hystrix软件设计中也是基于这种设计理念,舱壁隔离模式。Hystrix的隔离模式有两种: 线程池队列模式、信号量模式
-
熔断器模式
Hystrix采用了熔断器模式,相当于电路中的保险丝,系统出现紧急问题,立刻禁止所有请求,已达到保护系统的作用
-
命令模式
Hystrix使用命令模式(继承HystrixCommand类)来实现具体的服务调用逻辑(run方法), 并在命令模式中添加了服务调用失败后的fallback逻辑,这是命令模式的很好应用 -
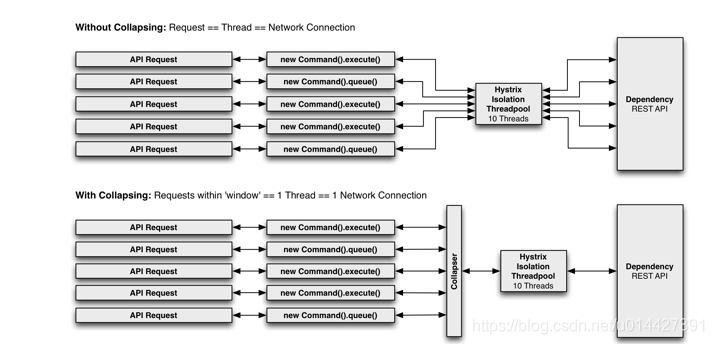
要求折叠
通过实现HystrixCollapser类,实现这种场景,可以将多个请求折叠到单个后端依赖项调用
引用官网图片,下图显示了两种情况下的线程和网络连接数:首先是没有连接,然后是请求折叠
- 请求缓存
HystrixCommand和HystrixObservableCommand实现可以定义一个缓存键然后请求中用于de-dupe调用上下文concurrent-aware的方式
6、Netflix Hystrix例子实践
Hystrix常被应用于微服务项目中,feign、ribbon等中间件都有默认集成,本例子基于spring cloud进行实践
环境准备:
- JDK 1.8
- SpringBoot2.2.3
- SpringCloud(Hoxton.SR6)
- Maven 3.2+
- 开发工具
- IntelliJ IDEA
- smartGit
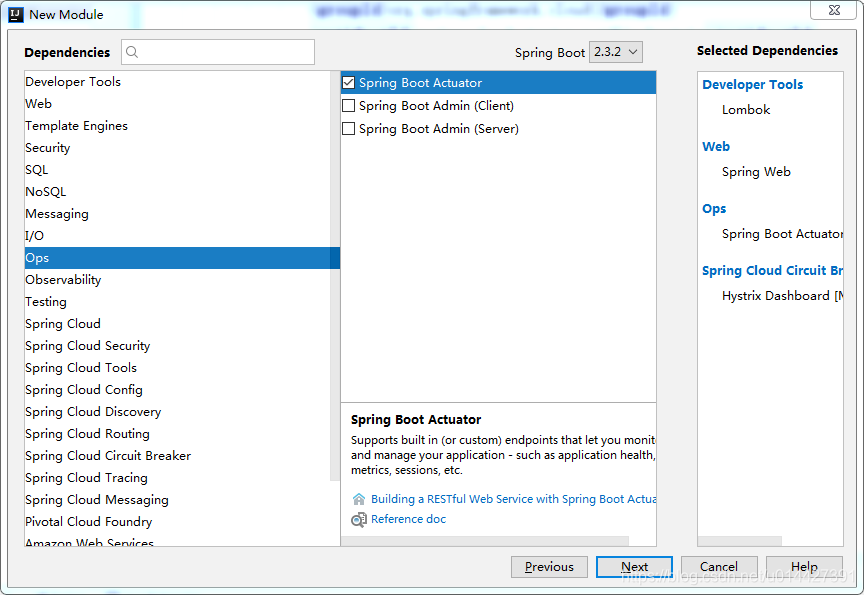
创建一个SpringBoot Initialize项目,详情可以参考我之前博客:SpringBoot系列之快速创建项目教程
可以引入Eureka Discovery Client
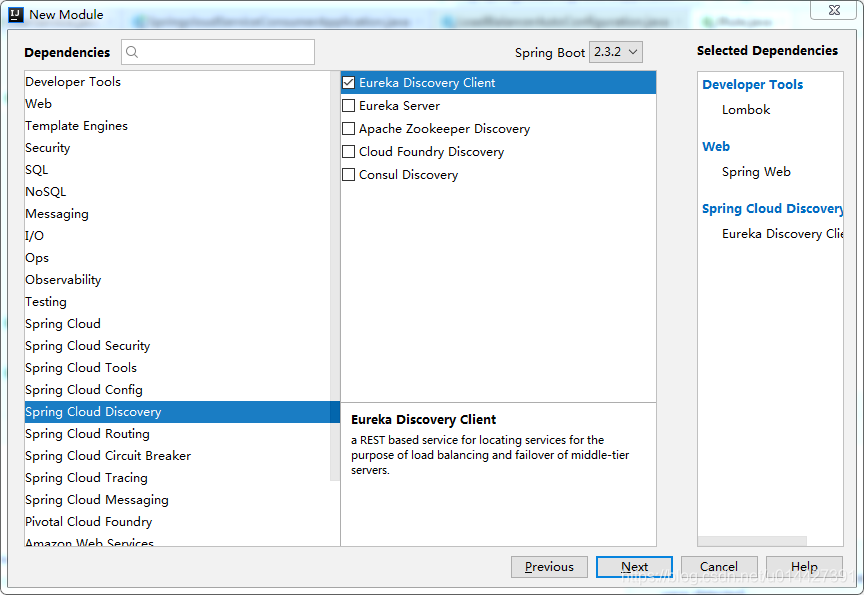
Eureka Discovery Client默认集成spring-cloud-netflix-hystrix
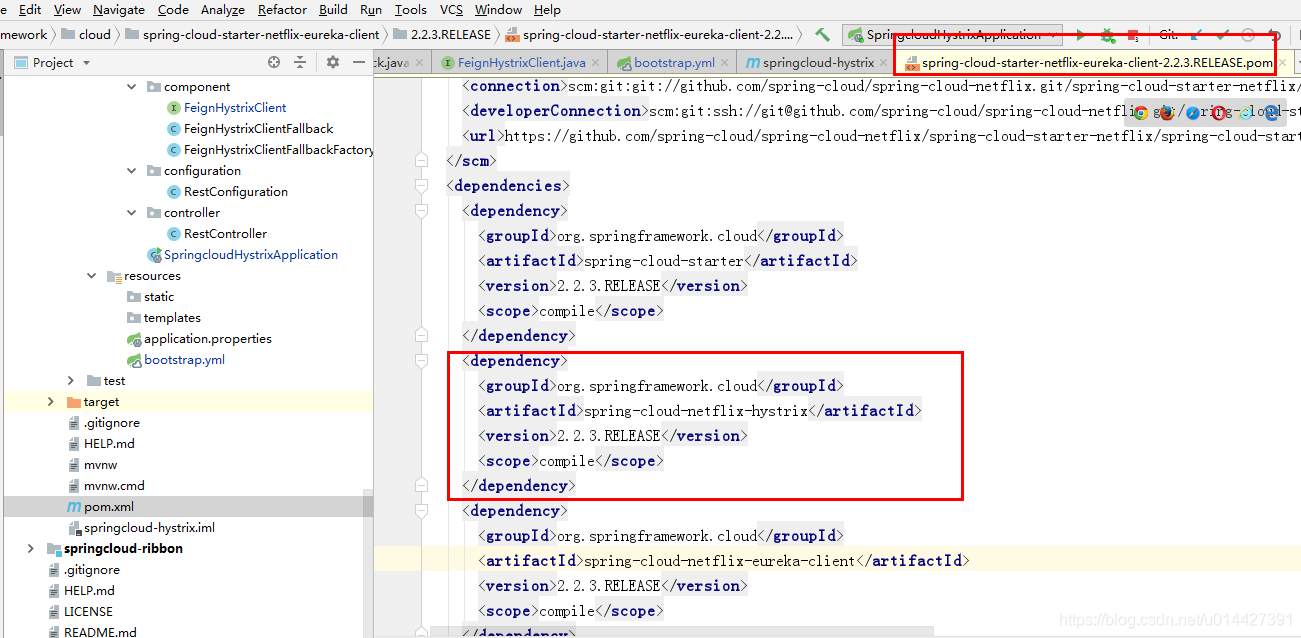
不加上Eureka Discovery Client的情况,需要自己单独添加Hystrix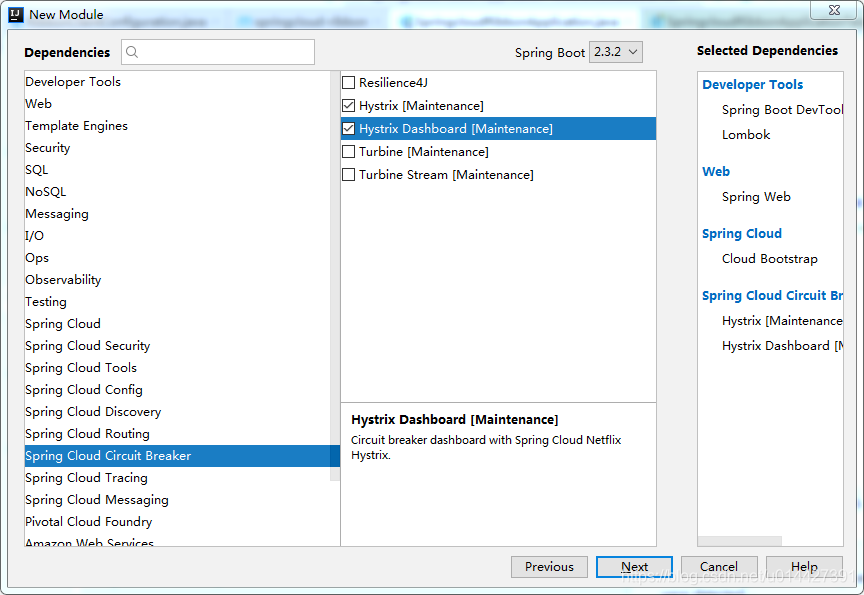
Hoxton.SR6版本不支持@HystrixCommand?所以需要自己加上配置:
<dependency> <groupId>com.netflix.hystrix</groupId> <artifactId>hystrix-javanica</artifactId> <version>RELEASE</version> </dependency>
- 1
- 2
- 3
- 4
- 5
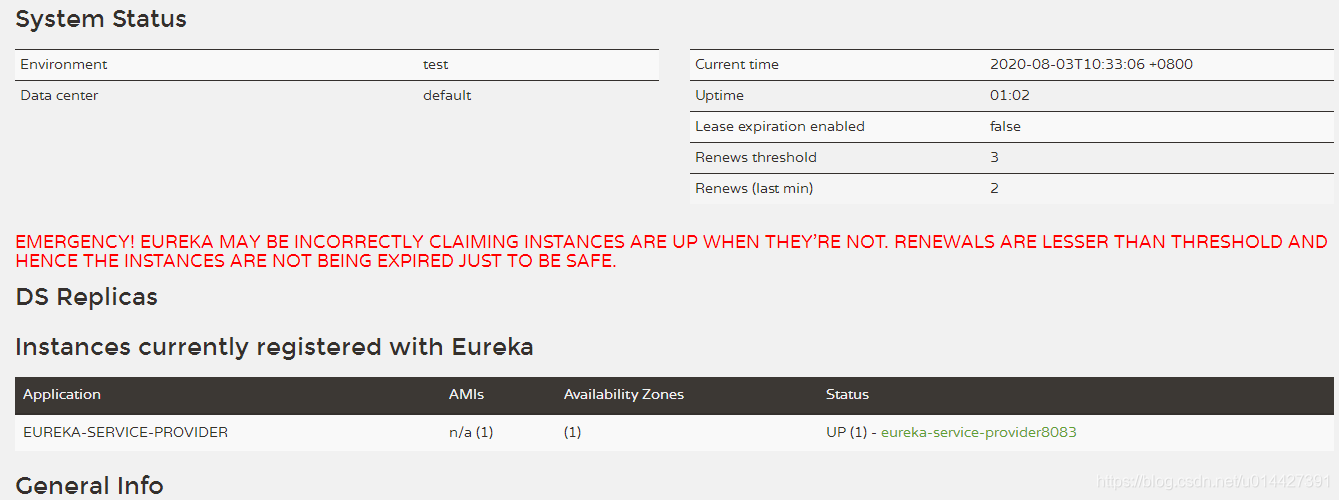
本博客的是基于spring-cloud-starter-netflix-eureka-client进行试验,试验前要运行eureka服务端,eureka服务提供者,代码请参考上一章博客
加上@EnableCircuitBreaker支持服务降级
package com.example.springcloud.hystrix;

import org.springframework.boot.SpringApplication;
import org.springframework.boot.autoconfigure.SpringBootApplication;
import org.springframework.cloud.client.circuitbreaker.EnableCircuitBreaker;
import org.springframework.cloud.netflix.eureka.EnableEurekaClient;
import org.springframework.web.bind.annotation.RestController;

@SpringBootApplication
@EnableCircuitBreaker
@EnableEurekaClient
public class SpringcloudHystrixApplication { public static void main(String[] args) { SpringApplication.run(SpringcloudHystrixApplication.class, args); }

}
- 1
- 2
- 3
- 4
- 5
- 6
- 7
- 8
- 9
- 10
- 11
- 12
- 13
- 14
- 15
- 16
- 17
- 18
- 19
新建bootstrap.yml,yaml配置:
server:
  port: 8082
  # 必须指定application name
spring:
  application: name: ribbon-hystrix-service-consumer
eureka:
  client: service-url: defaultZone: http://localhost:8761/eureka/ healthcheck: enabled: false # 支持服务发现 fetch-registry: true # 不支持服务注册 register-with-eureka: false
  instance: status-page-url-path: http://localhost:8761/actuator/info health-check-url-path: http://localhost:8761/actuator/health prefer-ip-address: false instance-id: ribbon-hystrix-service-consumer8082 metadata-map: cluster: ribbon
- 1
- 2
- 3
- 4
- 5
- 6
- 7
- 8
- 9
- 10
- 11
- 12
- 13
- 14
- 15
- 16
- 17
- 18
- 19
- 20
- 21
- 22
- 23
@LoadBalanced支持负载均衡:
package com.example.springcloud.hystrix.configuration;

import com.netflix.ribbon.proxy.annotation.Hystrix;
import org.springframework.cloud.client.loadbalancer.LoadBalanced;
import org.springframework.context.annotation.Bean;
import org.springframework.context.annotation.Configuration;
import org.springframework.web.client.RestTemplate;

/**
 * <pre>
 *  RestConfiguration
 * </pre>
 *
 * <pre>
 * @author mazq
 * 修改记录
 * 修改后版本: 修改人:  修改日期: 2020/07/31 09:43  修改内容:
 * </pre>
 */
@Configuration
public class RestConfiguration { @Bean @LoadBalanced public RestTemplate restTemplate() { return new RestTemplate(); }
}
- 1
- 2
- 3
- 4
- 5
- 6
- 7
- 8
- 9
- 10
- 11
- 12
- 13
- 14
- 15
- 16
- 17
- 18
- 19
- 20
- 21
- 22
- 23
- 24
- 25
- 26
- 27
- 28
User.java:
package com.example.springcloud.hystrix.bean;

import com.fasterxml.jackson.annotation.JsonIgnoreProperties;
import lombok.Data;

import java.io.Serializable;

/**
 * <pre>
 *  User
 * </pre>
 *
 * <pre>
 * @author mazq
 * 修改记录
 * 修改后版本: 修改人:  修改日期: 2020/07/27 17:38  修改内容:
 * </pre>
 */
@JsonIgnoreProperties(ignoreUnknown = true)
@Data
public class User implements Serializable { private String name; private String blog; @Override public String toString() { return "User{" + "name='" + name + '\'' + ", blog='" + blog + '\'' + '}'; }
}
- 1
- 2
- 3
- 4
- 5
- 6
- 7
- 8
- 9
- 10
- 11
- 12
- 13
- 14
- 15
- 16
- 17
- 18
- 19
- 20
- 21
- 22
- 23
- 24
- 25
- 26
- 27
- 28
- 29
- 30
- 31
- 32
- 33
@HystrixCommand(fallbackMethod = "userApiFallback")指定异常后的回调方法
package com.example.springcloud.hystrix.controller;
import com.example.springcloud.hystrix.bean.User;
import com.netflix.hystrix.contrib.javanica.annotation.HystrixCommand;
import lombok.extern.slf4j.Slf4j;
import org.springframework.beans.factory.annotation.Autowired;
import org.springframework.web.bind.annotation.GetMapping;
import org.springframework.web.bind.annotation.PathVariable;
import org.springframework.web.client.RestTemplate;
/**
* <pre>
* RestController
* </pre>
*
* <pre>
* @author mazq
* 修改记录
* 修改后版本: 修改人: 修改日期: 2020/08/01 16:59 修改内容:
* </pre>
*/
@org.springframework.web.bind.annotation.RestController
@Slf4j
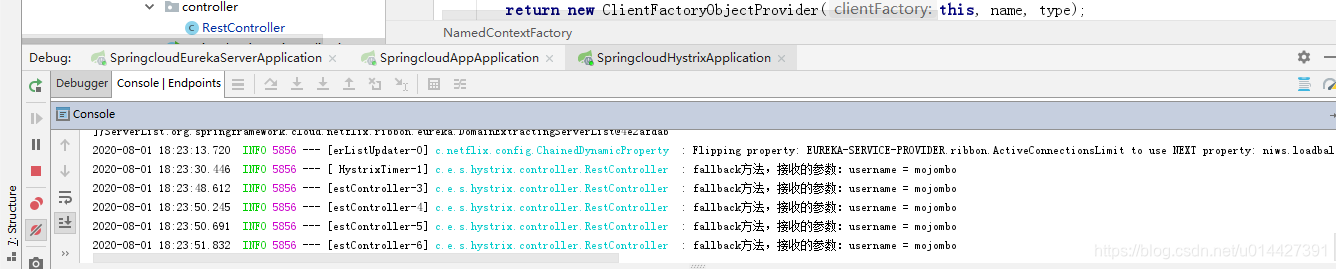
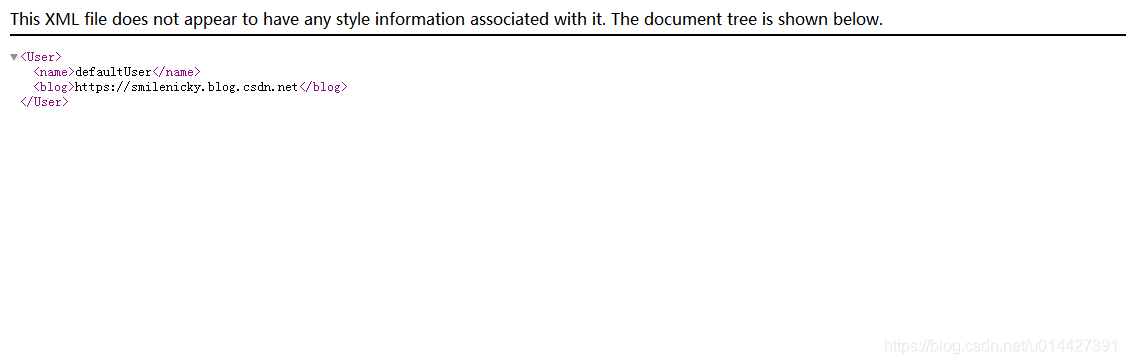
public class RestController { @Autowired RestTemplate restTemplate; /** * @HystrixCommand注解指定异常时调用的方法 * @Author mazq * @Date 2020/08/01 18:17 * @Param [username] * @return */ @GetMapping("/findUser/{username}") @HystrixCommand(fallbackMethod = "userApiFallback") public User index(@PathVariable("username")String username){ return restTemplate.getForObject("http://EUREKA-SERVICE-PROVIDER/api/users/"+username,User.class); } public User userApiFallback(String username) { log.info("fallback方法,接收的参数:username = {}",username); User user = new User(); user.setName("defaultUser"); user.setBlog("https://smilenicky.blog.csdn.net"); return user; }
}
- 1
- 2
- 3
- 4
- 5
- 6
- 7
- 8
- 9
- 10
- 11
- 12
- 13
- 14
- 15
- 16
- 17
- 18
- 19
- 20
- 21
- 22
- 23
- 24
- 25
- 26
- 27
- 28
- 29
- 30
- 31
- 32
- 33
- 34
- 35
- 36
- 37
- 38
- 39
- 40
- 41
- 42
- 43
- 44
- 45
- 46
- 47
- 48
- 49
- 50
7、Feign项目使用Hystrix
pom配置:
<dependency> <groupId>org.springframework.cloud</groupId> <artifactId>spring-cloud-starter-openfeign</artifactId> </dependency>
- 1
- 2
- 3
- 4
openfeign中间件是默认集成Hystrix的,所以主要fallback参数指定具体实现类既可
package com.example.springcloud.hystrix.component;

import com.example.springcloud.hystrix.bean.User;
import org.springframework.cloud.openfeign.FeignClient;
import org.springframework.web.bind.annotation.PathVariable;
import org.springframework.web.bind.annotation.RequestMapping;
import org.springframework.web.bind.annotation.RequestMethod;

@FeignClient(name = "eureka-service-provider", fallback = FeignHystrixClientFallback.class)
public interface FeignHystrixClient { @RequestMapping(value = "/api/users/{username}",method = RequestMethod.GET) User findGithubUser(@PathVariable("username") String username);
}
- 1
- 2
- 3
- 4
- 5
- 6
- 7
- 8
- 9
- 10
- 11
- 12
- 13
实现FeignHystrixClient 接口
package com.example.springcloud.hystrix.component;

import com.example.springcloud.hystrix.bean.User;
import lombok.extern.slf4j.Slf4j;
import org.springframework.stereotype.Component;

/**
 * <pre>
 *  FeignHystrixClientFallback
 * </pre>
 *
 * <pre>
 * @author mazq
 * 修改记录
 * 修改后版本: 修改人:  修改日期: 2020/08/03 09:58  修改内容:
 * </pre>
 */
@Slf4j
@Component
public class FeignHystrixClientFallback implements FeignHystrixClient { @Override public User findGithubUser(String username) { log.info("fallback方法,接收的参数:username = {}",username); User user = new User(); user.setName("defaultUser"); user.setBlog("https://smilenicky.blog.csdn.net"); return user; }
}
- 1
- 2
- 3
- 4
- 5
- 6
- 7
- 8
- 9
- 10
- 11
- 12
- 13
- 14
- 15
- 16
- 17
- 18
- 19
- 20
- 21
- 22
- 23
- 24
- 25
- 26
- 27
- 28
- 29
- 30
- 31
8、Hystrix dashboard监控
Hystrix dashboard提供了对微服务模块进行监控的功能
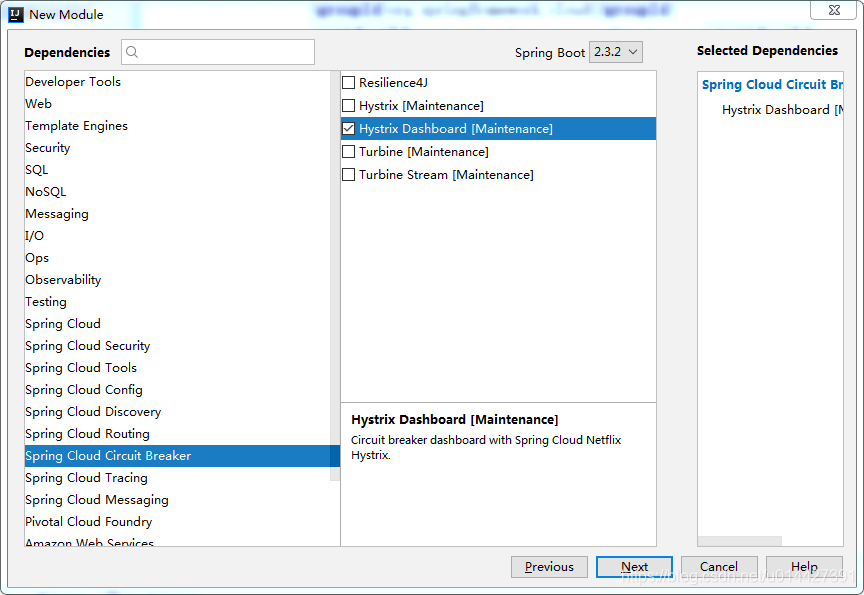
maven配置
  <dependency> <groupId>org.springframework.cloud</groupId> <artifactId>spring-cloud-netflix-hystrix-dashboard</artifactId>
  </dependency>
  <dependency> <groupId>org.springframework.boot</groupId> <artifactId>spring-boot-starter-actuator</artifactId> </dependency>
- 1
- 2
- 3
- 4
- 5
- 6
- 7
- 8
@EnableHystrixDashboard加在Application类上,开启Hystrix dashboard监控
允许后,访问,http://localhost:8082/hystrix,格式为http://localhost:port/hystrix
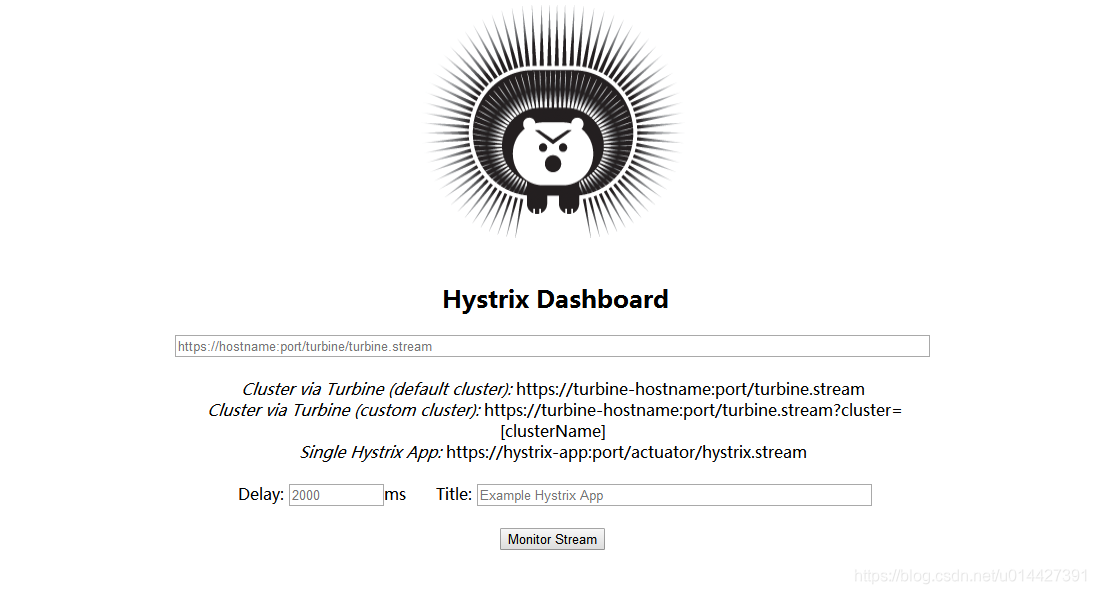
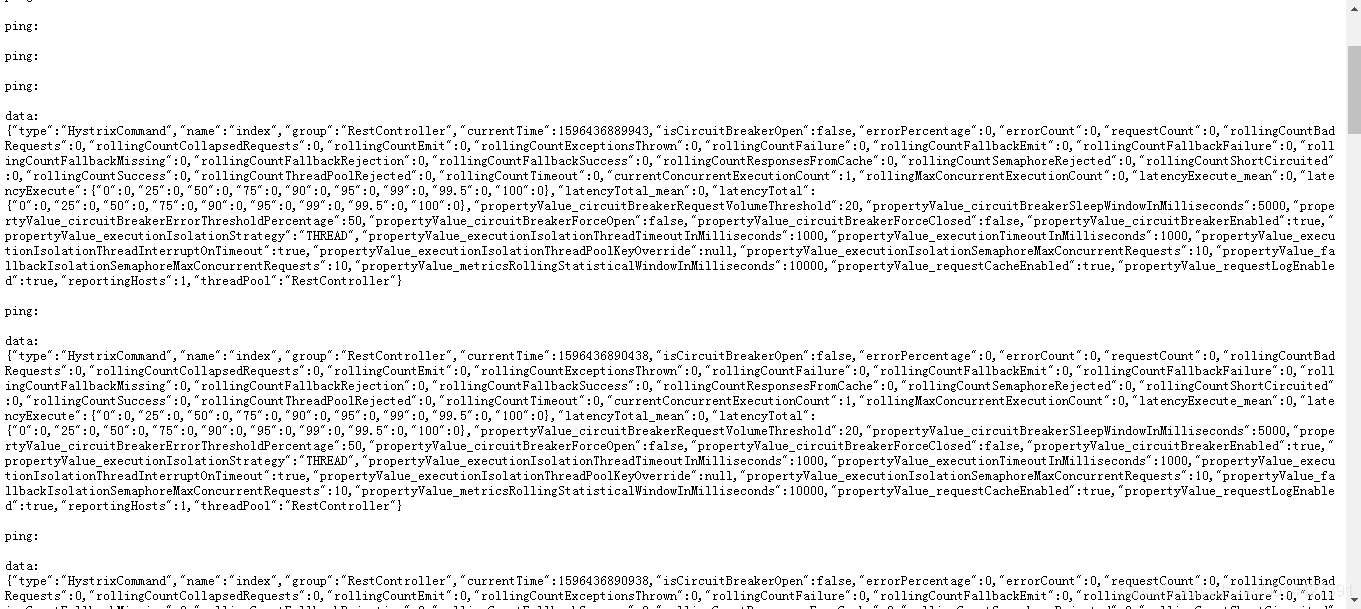
spring-boot-starter-actuator其实就已经有提供监控的,链接http://localhost:8082/actuator/hystrix.stream,Hystrix dashboard其实是对这些数据进行界面可视化监控,所以项目要先集成spring-boot-starter-actuator
ps:spring-boot-starter-actuator 2.2.3版本要加上actuator前端,才能访问,网上很多教程都是基于之前版本,不需要加上,而本博客基于2.2.3 SpringBoot 版本
ok,接着发现2.2.3版本的bug,f12调试,发现前端报错,导致Hystrix dashboard监控页面一直loading
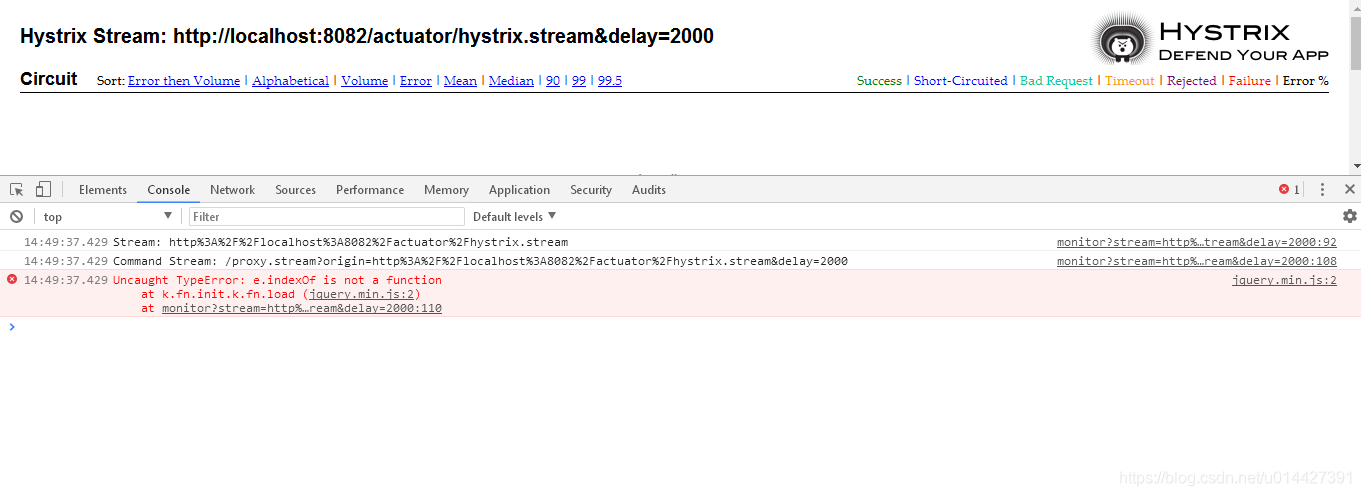
找到github issue:https://github.com/MadeInChina/spring-cloud-netflix/commit/afc1d989767d0a21524b865dafeebc37d4c78e04,处理方法是反编译jar,找到如图文件,修改,然后再放回jar
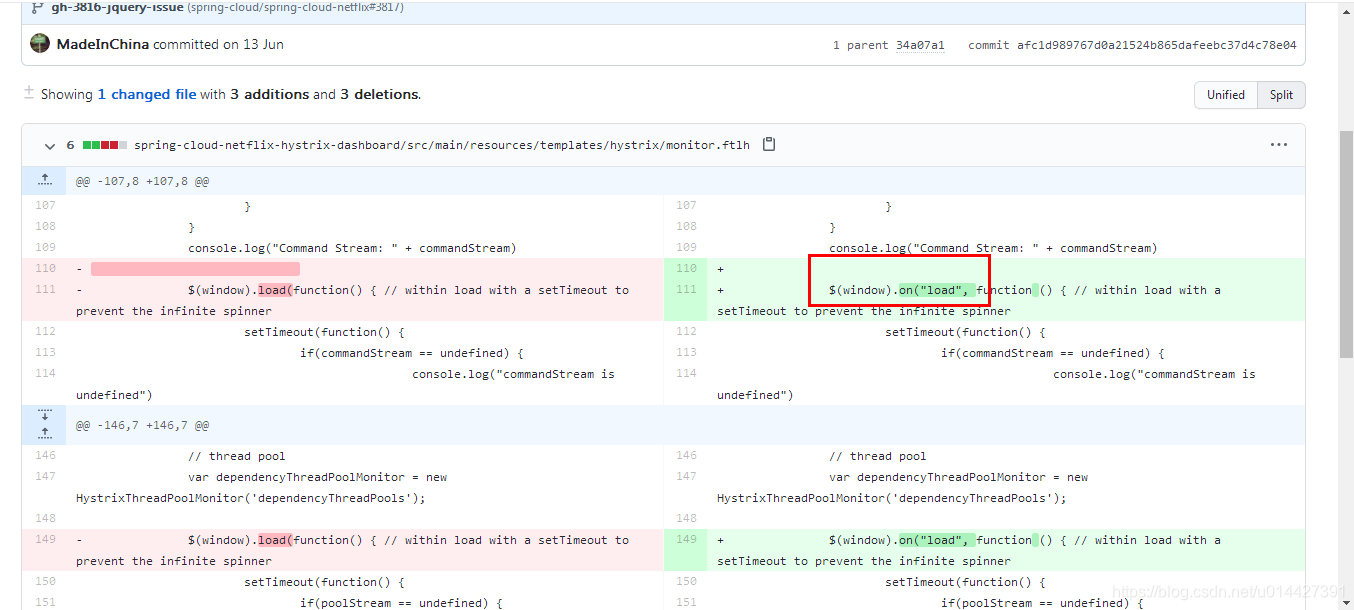
这种比较麻烦,或许可以回退一下版本,用回2.2.2版本,maven配置:
<dependency> <groupId>org.springframework.cloud</groupId> <artifactId>spring-cloud-starter-netflix-hystrix-dashboard</artifactId> <exclusions> <exclusion> <groupId>org.springframework.cloud</groupId> <artifactId>spring-cloud-netflix-hystrix-dashboard</artifactId> </exclusion> </exclusions> </dependency> <dependency> <groupId>org.springframework.cloud</groupId> <artifactId>spring-cloud-netflix-hystrix-dashboard</artifactId> <version>2.2.2.RELEASE</version> </dependency>
- 1
- 2
- 3
- 4
- 5
- 6
- 7
- 8
- 9
- 10
- 11
- 12
- 13
- 14
- 15
jquery版本换成2.1.1

ok,还要加上如下配置
package com.example.springcloud.hystrix.configuration;

import com.netflix.hystrix.contrib.metrics.eventstream.HystrixMetricsStreamServlet;
import org.springframework.boot.web.servlet.ServletRegistrationBean;
import org.springframework.context.annotation.Bean;
import org.springframework.context.annotation.Configuration;

/**
 * <pre>
 *
 * </pre>
 *
 * <pre>
 * @author mazq
 * 修改记录
 * 修改后版本: 修改人:  修改日期: 2020/08/04 16:19  修改内容:
 * </pre>
 */
@Configuration
public class WebConfiguration { @Bean public ServletRegistrationBean getServlet() { HystrixMetricsStreamServlet streamServlet = new HystrixMetricsStreamServlet(); ServletRegistrationBean registrationBean = new ServletRegistrationBean(streamServlet); registrationBean.setLoadOnStartup(1); registrationBean.addUrlMappings("/actuator/hystrix.stream"); registrationBean.setName("HystrixMetricsStreamServlet"); return registrationBean; }
}
- 1
- 2
- 3
- 4
- 5
- 6
- 7
- 8
- 9
- 10
- 11
- 12
- 13
- 14
- 15
- 16
- 17
- 18
- 19
- 20
- 21
- 22
- 23
- 24
- 25
- 26
- 27
- 28
- 29
- 30
- 31
- 32
ok,处理好bug,页面输入http://localhost:8082/actuator/hystrix.stream,我们监控8082这种微服务模块的情况,接口调用都正常

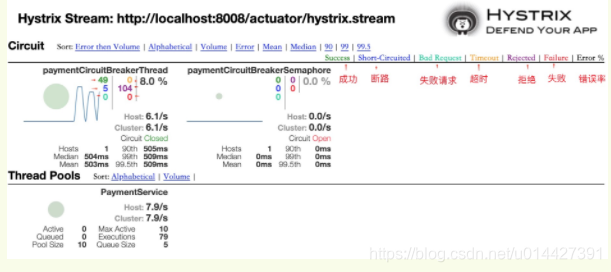
ps:页面输入http://localhost:8082/actuator/hystrix.stream,delay,title可以不填,Hystrix还支持turbine进行集群监控,后续有时间可以写博客补充
附录:
ok,本博客参考官方教程进行实践,仅仅作为入门的学习参考资料,详情可以参考Spring Cloud官方文档:https://docs.spring.io/spring-cloud-netflix/docs/2.2.x-SNAPSHOT/reference/html/#circuit-breaker-spring-cloud-circuit-breaker-with-hystrix,Hystrix官网:https://github.com/Netflix/Hystrix/wiki/How-it-Works
代码例子下载:code download
优质学习资料参考:
-
熔断器 Hystrix 的原理与使用:https://segmentfault.com/a/1190000005988895
-
martinfowler.com对熔断器的介绍:https://martinfowler.com/bliki/CircuitBreaker.html
-
方志鹏大佬系列Spring Cloud博客:https://www.fangzhipeng.com/spring-cloud.html
-
使用Spring Cloud与Docker实战微服务:https://eacdy.gitbooks.io/spring-cloud-book/content/
-
程序员DD大佬系列Spring Cloud博客:http://blog.didispace.com/spring-cloud-learning/
文章来源: smilenicky.blog.csdn.net,作者:smileNicky,版权归原作者所有,如需转载,请联系作者。
原文链接:smilenicky.blog.csdn.net/article/details/107819700

- 点赞
- 收藏
- 关注作者
评论(0)