SpringBoot+Thymeleaf实现国际化
概述
国际化大概分三步走:
第一步:准备国际化文件
国际化文件名组成:文件名+下划线+区域语言代号+".properties",如login_zh_CN.properties
第二步:配置国际化文件位置
在application.yml配置文件中配置spring.messages.basename的值,它可以指定国际化文件的位置,默认值是messages,可以指定多个不同的国际化文件,文件名之间用逗号分隔开。
第三步:获取国际化文件中的值
根据语言环境获取值。具体详情请继续阅读本文。
1.在pom.xml中添加Thymeleaf依赖
<properties>
	<thymeleaf.version>3.0.11.RELEASE</thymeleaf.version> <thymeleaf-layout-dialect.version>2.4.1</thymeleaf-layout-dialect.version>
</properties>
<dependency> <groupId>org.springframework.boot</groupId> <artifactId>spring-boot-starter-thymeleaf</artifactId>
</dependency>
- 1
- 2
- 3
- 4
- 5
- 6
- 7
- 8
2.#{…}消息表达式
外部化文本就是从模板文件中提取的模板代码片段,它们可以分开保存。最典型的就是保存在.properties文件中。因此它们可以被轻易地用对应的其他语言文本来代替,这就是国际化的处理。外部化文本片段通常被称为“message”消息。消息都有一个key来识别它们。Thymeleaf允许我们用#{…}指定text对应的消息。
Thymeleaf的standard message resolver会根据我们提供的key帮我们从src/main/resources目录下与模板同名的.properties文件中把值取回来。
3.举例
注意:整个项目所有国际化部分的内容都添加到语言配置文件中!
注意:整个项目所有国际化部分的内容都添加到语言配置文件中!
注意:整个项目所有国际化部分的内容都添加到语言配置文件中!
3.1语言配置文件
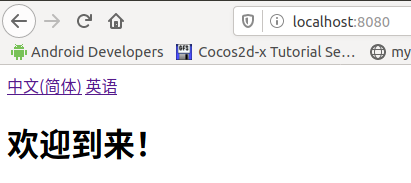
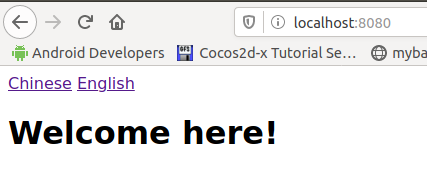
在src/main/resources目录下添加messages.properties默认语言配置文件,文件名称可以自定义。然后创建各个语言对应的配置文件,文件名= 默认配置的文件名+下划线+区域简称,如英文配置文件messages_en.properties、中文配置文件messages_zh.properties,依次类推。
messages.properties(默认)
home.title=Application title
home.language.chinese=Chinese
home.language.english=English
home.welcome=Welcome here!
- 1
- 2
- 3
- 4
messages_zh.properties(中文)
home.title=国际化示例
home.language.chinese=中文(简体)
home.language.english=英语
home.welcome=欢迎到来!
- 1
- 2
- 3
- 4
messages_en.properties(英文)
home.title=Application title
home.language.chinese=Chinese
home.language.english=English
home.welcome=Welcome here!
- 1
- 2
- 3
- 4
3.2指定国际化文件
在application.yml配置文件中指定国际化文件:
spring:
  messages: basename: messages
- 1
- 2
- 3
spring.messages.basename的默认值是messages,可以指定多个不同的国际化文件,文件名之间用逗号分隔开。本例的国际化文件是messages,所以上面的配置完全可以不写。除了messages国际化文件外,如果你还有其他的国际化文件,如home.properties、home_en.properties、home_zh.properties、detail.properties、detail_en.properties、detail_zh.properties。spring.messages.basename应该这样配置:
spring:
  messages: basename: messages,home,detail
- 1
- 2
- 3
如果这些国际文件都放在src/resources/i18n目录下(目录名可以随意取),配置就该这样写:
spring:
  messages: basename: i18n.messages,i18n.home,i18n.detail
- 1
- 2
- 3
如果不加上目录的路径,那么springboot将会直接在src/ resources目录下寻找这些文件。
3.3添加模板
Spring Boot默认存放页面模板的路径在src/main/resources/templates或者src/main/view/templates,Thymeleaf默认的页面文件后缀是.html。
home.html(模板)
<!DOCTYPE html>
<html xmlns:th="https://www.thymeleaf.org">
<head> <meta charset="UTF-8"> <title th:text="#{home.title}">Insert title here</title>
</head>
<body>
<div> <a data-th-href="@{/locale(lang=zh_CN)}" th:text="#{home.language.chinese}">中文</a> <a data-th-href="@{/locale(lang=en_US)}" th:text="#{home.language.english}">英语</a>
</div> <h1 data-th-text="#{home.welcome}">Fluid jumbotron</h1>
</body>
</html>
- 1
- 2
- 3
- 4
- 5
- 6
- 7
- 8
- 9
- 10
- 11
- 12
- 13
- 14
模板中通过#{…}消息表达式获取.properties文件中的消息。
3.4配置类
配置区域信息解析器实现程序国际化。当拦截到请求中有lang参数,就会触发语言切换。
package com.wong.config;

import org.springframework.context.annotation.Bean;
import org.springframework.context.annotation.Configuration;
import org.springframework.web.servlet.LocaleResolver;
import org.springframework.web.servlet.config.annotation.InterceptorRegistry;
import org.springframework.web.servlet.config.annotation.WebMvcConfigurer;
import org.springframework.web.servlet.i18n.LocaleChangeInterceptor;
import org.springframework.web.servlet.i18n.SessionLocaleResolver;
import java.util.Locale;

@Configuration// 当系统启动时,就会来配置WebConfig
public class WebConfig implements WebMvcConfigurer { @Bean//为了让区域信息解析器生效,将区域信息解析器注册在容器中,配置加入到SpringBoot的容器中 public LocaleResolver localeResolver(){ /** * 通过定义区域信息解析器实现程序国际化 */ SessionLocaleResolver localeResolver = new SessionLocaleResolver(); // 设置默认语言为中文即使用_zh.properties的文件 localeResolver.setDefaultLocale(new Locale("zh","CN")); return localeResolver; } @Bean public LocaleChangeInterceptor localeChangeInterceptor(){ LocaleChangeInterceptor localeChangeInterceptor = new LocaleChangeInterceptor(); // 设置参数,只要拦截到有lang参数的就会触发语言切换 localeChangeInterceptor.setParamName("lang"); return localeChangeInterceptor; } @Override public void addInterceptors(InterceptorRegistry registry) { // 拦截请求,注册区域信息拦截器 registry.addInterceptor(localeChangeInterceptor()); }

	@Override public void addViewControllers(ViewControllerRegistry registry) { // 添加视图控制器,做简单地跳转 registry.addViewController("/").setViewName("index"); }
}
- 1
- 2
- 3
- 4
- 5
- 6
- 7
- 8
- 9
- 10
- 11
- 12
- 13
- 14
- 15
- 16
- 17
- 18
- 19
- 20
- 21
- 22
- 23
- 24
- 25
- 26
- 27
- 28
- 29
- 30
- 31
- 32
- 33
- 34
- 35
- 36
- 37
- 38
- 39
- 40
- 41
- 42
- 43
- 44
- 45
- 46
3.5控制器代码
首页控制器HomeController.java:
可以通过http://ip:port/index、http://ip:port/home、http://ip:port/三种方式来访问home.html模板。
package com.wong.controller;

import org.springframework.beans.factory.annotation.Autowired;
import org.springframework.context.MessageSource;
import org.springframework.stereotype.Controller;
import org.springframework.ui.Model;
import org.springframework.web.bind.annotation.RequestMapping;
import org.springframework.web.bind.annotation.RequestMethod;

import java.util.Locale;

@Controller
public class HomeController{ @Autowired private MessageSource messageSource; @RequestMapping(value = {"/index","/home","/"},method = RequestMethod.GET) public String getHomePage(Model model, Locale locale) { return "home"; }
}
- 1
- 2
- 3
- 4
- 5
- 6
- 7
- 8
- 9
- 10
- 11
- 12
- 13
- 14
- 15
- 16
- 17
- 18
- 19
- 20
- 21
- 22
语言域控制器控制语言切换的LocaleController.java:
语言切换时,进行转发,触发语言切换。事实上,我们的上面配置类注册了一个拦截器,只要拦截到有lang参数的就会触发语言切换。LocaleController.java其实也只是这样的作用而已。
package com.wong.controller;

import org.springframework.stereotype.Controller;
import org.springframework.web.bind.annotation.GetMapping;
import org.springframework.web.bind.annotation.RestController;

import javax.servlet.http.HttpServletRequest;

@Controller
public class LocaleController { @GetMapping("/locale") public String localeHandler(HttpServletRequest request){ String lastUrl = request.getHeader("referer"); // 向界面返回这个字符串 return "redirect:"+lastUrl; }
}
- 1
- 2
- 3
- 4
- 5
- 6
- 7
- 8
- 9
- 10
- 11
- 12
- 13
- 14
- 15
- 16
- 17
- 18
4.运行项目
~/Desktop/WInternationalization$ mvn clean spring-boot:run
- 1


Demo欢迎下载学习。

文章来源: blog.csdn.net,作者:WongKyunban,版权归原作者所有,如需转载,请联系作者。
原文链接:blog.csdn.net/weixin_40763897/article/details/105671892
- 点赞
- 收藏
- 关注作者


评论(0)