杨校老师课堂之分布式数据库HBase的部署和基本操作
【摘要】 部署分布式数据库——HBase学习背景:以下采用伪分布式方式搭建HBase故而采用内置的Zookeeper协调处理,不再搭建外置ZooKeeper,因此会存在单点故障问题,若需要解决这个情况,可采用Zookeeper部署一个HA(高可用)的Habse集群解决。(1) 安装JDK、Hadoop,这里采用的JDK1.8,Hadoop2.7.4,CentOS7.6本次部署测试的ip地址设为:19...
部署分布式数据库——HBase
学习背景:
以下采用伪分布式方式搭建HBase
故而采用内置的Zookeeper协调处理,不再搭建外置ZooKeeper,因此会存在单点故障问题,若需要解决这个情况,可采用Zookeeper部署一个HA(高可用)的Habse集群解决。
(1) 安装JDK、Hadoop,这里采用的JDK1.8,Hadoop2.7.4,CentOS7.6
本次部署测试的ip地址设为:
192.168.6.166
运行Hadoop环境,测试是否正常通过,启动命令: start-dfs.sh
(2)下载HBase安装包。官网地址:https://archive.apache.org/dist/hbase 相关大数据框架下载整理
(3) 安装
- 3.1 上传并完成解压HBase安装包
[root@hadoop1 ~]# tar -zxvf hbase-1.2.1-bin.tar.gz
(4) 准备配置文件
- 4.1 拷贝配置文件
[root@hadoop1 ~]# cp /usr/local/hadoop/hadoop-2.7.4/etc//hadoop/{hdfs-site.xml,core-site.xml} /usr/local/hbase/hbase-1.2.1/conf/
# 加入jdk的安装路径到JAVA_HOME
[root@hadoop1 ~]# vim hbase-env.sh
- 4.3 设置
HBase的环境变量
[root@hadoop1 ~]# vim /etc/profile
#HBase environment variable
export HBASE_HOME=/usr/local/hbase/hbase-1.2.1
export PATH=$PATH:$HBASE_HOME/bin:

#更新配置文件profile生效
[root@hadoop1 ~]# source /etc/profile
# 查看hbase的版本
[root@hadoop1 ~]# hbase version
运行HBase数据库
[root@hadoop1 conf]# start-hbase.sh
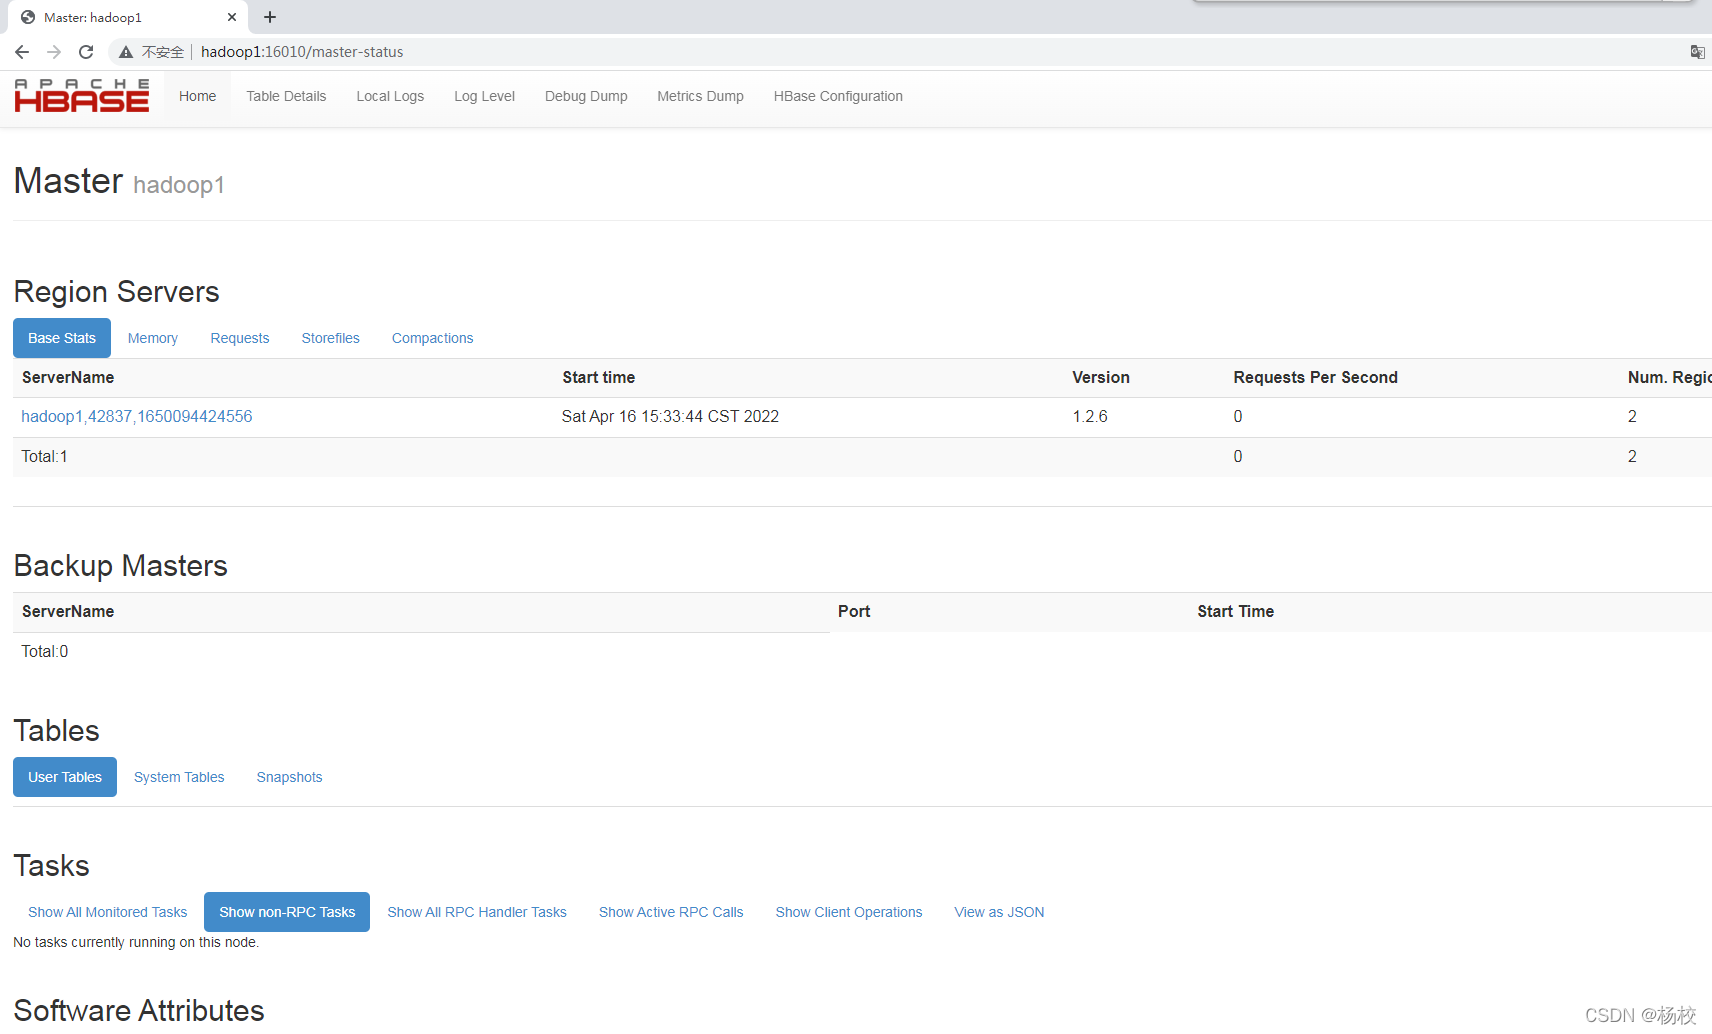
运行成功后,已通过浏览器访问:http://hadoop1:16010/master-status

注意:
可以通过修改hosts来实现访问主机名进入web界面
具体路径:
C:\Windows\System32\drivers\etc\hosts
在hosts文件内的最后一行加入:
192.168.6.166 hadoop1
HBase的基本操作
方式一:HBase的Shell操作
#启动交互界面
[root@hadoop1 ~]# hbase shell
# 创建表
hbase(main):001:0> create 'student','info'
0 row(s) in 3.1630 seconds

=> Hbase::Table - student
# 查询表
hbase(main):002:0> list
TABLE
student
1 row(s) in 0.5240 seconds

=> ["student"]
- 插入数据
# 插入数据
hbase(main):003:0> put 'student','1001','info:name','zhangsan'
0 row(s) in 3.0910 seconds

hbase(main):004:0> put 'student','1001','info:age','19'
0 row(s) in 0.1290 seconds

hbase(main):005:0> put 'student','1001','info:gender','male'
0 row(s) in 0.2760 seconds

hbase(main):006:0> put 'student','1002','info:name','lisi'
0 row(s) in 0.0090 seconds

hbase(main):007:0> put 'student','1002','info:age','21'
0 row(s) in 0.0800 seconds

hbase(main):008:0> put 'student','1002','info:gender','female'
0 row(s) in 0.0150 seconds
- 扫描数据
hbase(main):009:0> scan 'student'
 ROW                    COLUMN+CELL
 1001                   column=info:age, timestamp=1650086163620, value=19
 1001                   column=info:gender, timestamp=1650086205652, value=male
 1001                   column=info:name, timestamp=1650085979553, value=zhangsan
 1002                   column=info:age, timestamp=1650086249277, value=21
 1002                   column=info:gender, timestamp=1650086265874, value=female
 1002                   column=info:name, timestamp=1650086227559, value=lisi
2 row(s) in 0.1450 seconds
- 查看表结构
hbase(main):010:0> describe 'student'
Table student is ENABLED
student
COLUMN FAMILIES DESCRIPTION
{NAME => 'info', BLOOMFILTER => 'ROW', VERSIONS => '1', IN_MEMORY => 'false', KEEP_DELETED_CELLS => 'FALSE', DATA_BLOCK_ENCODING => 'NONE', TTL => 'FOREVER',
 COMPRESSION => 'NONE', MIN_VERSIONS => '0', BLOCKCACHE => 'true', BLOCKSIZE => '65536', REPLICATION_SCOPE => '0'}
1 row(s) in 0.2190 seconds
- 更新语句
hbase(main):011:0> put 'student','1002','info:age','22'
0 row(s) in 0.1000 seconds

# 修改后查询验证是否修改成功
hbase(main):016:0> scan 'student'
 ROW                      COLUMN+CELL
 1001                     column=info:age, timestamp=1650086163620, value=19
 1001                     column=info:gender, timestamp=1650086205652, value=male
 1001                     column=info:name, timestamp=1650085979553, value=zhangsan
 1002                     column=info:age, timestamp=1650086635741, value=22
 1002                     column=info:gender, timestamp=1650086265874, value=female
 1002                     column=info:name, timestamp=1650086227559, value=lisi
2 row(s) in 0.0330 seconds
- 获取指定字段的操作
hbase(main):002:0> get 'student','1001'
 COLUMN                                  CELL
 info:age                                timestamp=1650086163620, value=19
 info:gender                             timestamp=1650086205652, value=male
 info:name                               timestamp=1650085979553, value=zhangsan
3 row(s) in 0.0420 seconds
- 删除语句
hbase(main):008:0> delete 'student','1002','info:gender'
0 row(s) in 0.0900 seconds

# 删除后查询验证是否修改成功
hbase(main):009:0> scan 'student'
 ROW                         COLUMN+CELL
 1001                        column=info:age, timestamp=1650086163620, value=19
 1001                        column=info:gender, timestamp=1650086205652, value=male
 1001                        column=info:name, timestamp=1650085979553, value=zhangsan
 1002                        column=info:age, timestamp=1650086635741, value=22
 1002                        column=info:name, timestamp=1650086227559, value=lisi
2 row(s) in 0.0530 seconds
方式二: 利用Java API操作HBase
- 1.创建Maven项目
<?xml version="1.0" encoding="UTF-8"?>
<project xmlns="http://maven.apache.org/POM/4.0.0"
         xmlns:xsi="http://www.w3.org/2001/XMLSchema-instance"
         xsi:schemaLocation="http://maven.apache.org/POM/4.0.0 http://maven.apache.org/xsd/maven-4.0.0.xsd">
    <modelVersion>4.0.0</modelVersion>

    <groupId>cn.javabs</groupId>
    <artifactId>JAVA_HBASE</artifactId>
    <version>1.0-SNAPSHOT</version>

    <dependencies>
        <dependency>
            <groupId>org.apache.hbase</groupId>
            <artifactId>hbase-common</artifactId>
            <version>1.2.6</version>
        </dependency>

        <dependency>
            <groupId>org.apache.hbase</groupId>
            <artifactId>hbase-client</artifactId>
            <version>1.2.6</version>
        </dependency>
    </dependencies>


</project>
-
导入坐标,并完成类的创建

-
编写代码
package cn.javabs;

import org.apache.hadoop.conf.Configuration;
import org.apache.hadoop.hbase.*;
import org.apache.hadoop.hbase.client.*;
import org.apache.hadoop.hbase.util.Bytes;
import org.junit.Before;
import org.junit.Test;

import java.io.IOException;
import java.util.List;


public class HBaseTest {

    Configuration conf  = null;
    Connection conn = null;
    @Before
    public void  init() throws IOException {
        // 1. 获取配置对象conf
        conf  = HBaseConfiguration.create();
        // 2. 通过配置对象conf 设置hbase的入口
//        conf.set("hbase.rootdir","hdfs://hadoop1:9000/hbase");
        conf.set("hbase.zookeeper.quorum","hadoop1:2181");/*采用内置的zookeeper*/
        //  3. 获取连接,利用连接工厂进行创建连接,借助配置对象conf
        conn = ConnectionFactory.createConnection(conf);
    }

    /**
     * 创建表
     * @throws IOException
     */
    @Test
    public void  createTable() throws IOException {
      // 1. 通过conn获取表的管理对象
        Admin admin = conn.getAdmin();
        long beginTime = System.currentTimeMillis();
        // 2. 创建表的描述符对象,并且完成指定的表名:t_user
        HTableDescriptor tableDescriptor = new HTableDescriptor(TableName.valueOf("teacher".getBytes()));
        // 3. 创建列族、并赋值为info
        HColumnDescriptor hcd = new HColumnDescriptor("data");
        // 将列族添加到 表描述符对象
        tableDescriptor.addFamily(hcd);
        // 利用表管理器对象 来创建表
        admin.createTable(tableDescriptor);
        long endime = System.currentTimeMillis();
        System.out.println("创建完成,结束了!" +( endime -  beginTime) + "毫秒");

        // 关闭资源
        admin.close();
        conn.close();
    }

    /**
     * 指定查询
     * @throws IOException
     */
    @Test
    public void  getData() throws IOException{
        Table table = conn.getTable(TableName.valueOf("student"));
        // 1. 创建get对象是 查询参数的对象  用于指定要查询的哪一行
        Get get = new Get("1002".getBytes());
        // 2. 返回查询结果的数据
        Result result = table.get(get);
        // 3. 获取结果中所有的cell
        List<Cell> cellList = result.listCells();
        // 4. 循环遍历 所以的cell
        for(Cell c : cellList){
            // 5. 获取打印行健
            System.out.println("行:" + Bytes.toString(CellUtil.cloneRow(c)));
            // 6. 获取打印列族
            System.out.println("列族:" + Bytes.toString(CellUtil.cloneFamily(c)));
            // 7. 获取打印值
            System.out.println("值:" + Bytes.toString(CellUtil.cloneValue(c)));
        }
        // 8. 关闭资源
        table.close();
        conn.close();


    }
}
【版权声明】本文为华为云社区用户原创内容,未经允许不得转载,如需转载请自行联系原作者进行授权。如果您发现本社区中有涉嫌抄袭的内容,欢迎发送邮件进行举报,并提供相关证据,一经查实,本社区将立刻删除涉嫌侵权内容,举报邮箱:
cloudbbs@huaweicloud.com
- 点赞
- 收藏
- 关注作者


评论(0)