SpringCloud-04 Feign学习笔记
@TOC
一、什么是Feign?
Feign是声明式Web Service客户端,它让微服务之间的调用变得更简单,类似controller调用service。SpringCloud集成了Ribbon和Eureka,可以使用Feigin提供负载均衡的http客户端。Feign是通过接口和注释来实现负载均衡的。
二、Feign能干什么
(摘抄自狂神说JAVA)
Feign能干什么?
Feign旨在使编写Java Http客户端变得更容易
前面在使用Ribbon + RestTemplate时,利用RestTemplate对Http请求的封装处理,形成了一套模板化的调用方法。但是在实际开发中,由于对服务依赖的调用可能不止一处,往往一个接口会被多处调用,所以通常都会针对每个微服务自行封装一个客户端类来包装这些依赖服务的调用。所以,Feign在此基础上做了进一步的封装,由他来帮助我们定义和实现依赖服务接口的定义,在Feign的实现下,我们只需要创建一个接口并使用注解的方式来配置它 (类似以前Dao接口上标注Mapper注解,现在是一个微服务接口上面标注一个Feign注解),即可完成对服务提供方的接口绑定,简化了使用Spring Cloud Ribbon 时,自动封装服务调用客户端的开发量。
Feign默认集成了Ribbon
利用Ribbon维护了MicroServiceCloud-Dept的服务列表信息,并且通过轮询实现了客户端的负载均衡,而与Ribbon不同的是,通过Feign只需要定义服务绑定接口且以声明式的方法,优雅而简单的实现了服务调用。
三、Feign的使用步骤
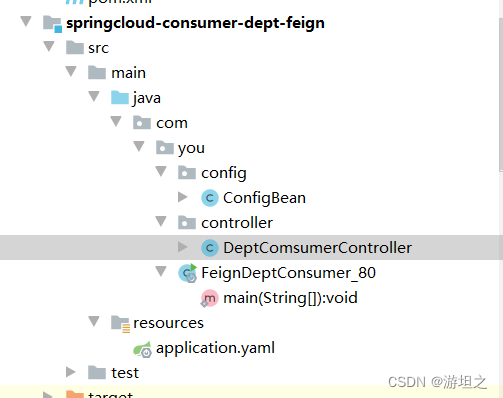
1、新建一个module

2、配置Pom.xml
<?xml version="1.0" encoding="UTF-8"?>
<project xmlns="http://maven.apache.org/POM/4.0.0"
         xmlns:xsi="http://www.w3.org/2001/XMLSchema-instance"
         xsi:schemaLocation="http://maven.apache.org/POM/4.0.0 http://maven.apache.org/xsd/maven-4.0.0.xsd">
    <parent>
        <artifactId>springcloud-demo2</artifactId>
        <groupId>com.you</groupId>
        <version>1.0-SNAPSHOT</version>
    </parent>
    <modelVersion>4.0.0</modelVersion>

    <artifactId>springcloud-eureka-7001</artifactId>
    <dependencies>
        <!-- https://mvnrepository.com/artifact/org.springframework.cloud/spring-cloud-starter-eureka-server -->
        <!--Eureka Server-->
        <dependency>
            <groupId>org.springframework.cloud</groupId>
            <artifactId>spring-cloud-starter-eureka-server</artifactId>
            <version>1.4.6.RELEASE</version>
        </dependency>
        <!--热部署-->
        <dependency>
            <groupId>org.springframework.boot</groupId>
            <artifactId>spring-boot-devtools</artifactId>
        </dependency>
    </dependencies>

</project>
3、配置applicatin.yaml
server:
  port: 801

eureka:
  client:
    register-with-eureka: false  #不向eureka注册自己
    service-url:
      defaultZone: http://localhost:7001/eureka/
ribbon:
  eureka:
    enabled: true
4、配置configBean
package com.you.config;


import org.springframework.cloud.client.loadbalancer.LoadBalanced;
import org.springframework.context.annotation.Bean;
import org.springframework.context.annotation.Configuration;
import org.springframework.web.client.RestTemplate;

@Configuration
public class ConfigBean {
    @Bean
    @LoadBalanced  //ribbon
    /*配置负载均衡实现RestTemplate*/
    /*IRule*/
    /*RoundRobinRule 轮询 */
    /*RandomRule 随机*/
    /*AvailabilityFilteringRule 优先过滤掉跳闸、访问故障的服务,对剩下的进行轮询 */
    public RestTemplate getRestTemplate() {
        return new RestTemplate();
    }

}
5、配置Controller类
package com.you.config;


import org.springframework.cloud.client.loadbalancer.LoadBalanced;
import org.springframework.context.annotation.Bean;
import org.springframework.context.annotation.Configuration;
import org.springframework.web.client.RestTemplate;

@Configuration
public class ConfigBean {
    @Bean
    @LoadBalanced  //ribbon
    /*配置负载均衡实现RestTemplate*/
    /*IRule*/
    /*RoundRobinRule 轮询 */
    /*RandomRule 随机*/
    /*AvailabilityFilteringRule 优先过滤掉跳闸、访问故障的服务,对剩下的进行轮询 */
    public RestTemplate getRestTemplate() {
        return new RestTemplate();
    }

}
6、配置启动类
package com.you;

import org.springframework.boot.SpringApplication;
import org.springframework.boot.autoconfigure.SpringBootApplication;
import org.springframework.cloud.netflix.eureka.EnableEurekaClient;
import org.springframework.cloud.netflix.ribbon.RibbonClient;
import org.springframework.cloud.openfeign.EnableFeignClients;
import org.springframework.context.annotation.ComponentScan;

@SpringBootApplication
@EnableEurekaClient
@EnableFeignClients(basePackages = {
        "com.you"})

public class FeignDeptConsumer_80 {
    public static void main(String[] args) {
        SpringApplication.run(FeignDeptConsumer_80.class,args);
    }
}
5、改动API
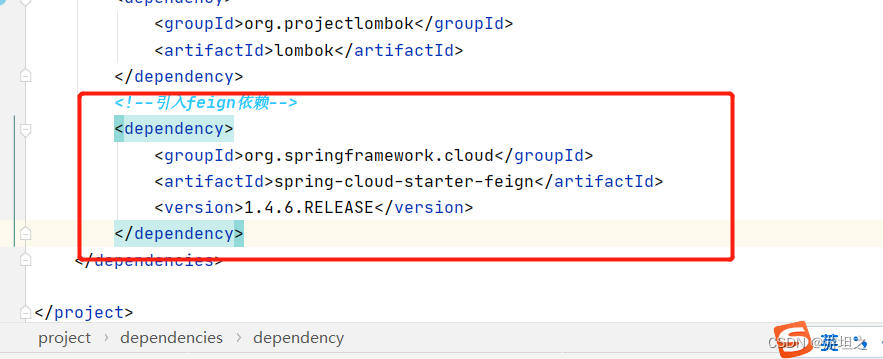
1)引入Feign依赖

 <dependency>
            <groupId>org.springframework.cloud</groupId>
            <artifactId>spring-cloud-starter-feign</artifactId>
            <version>1.4.6.RELEASE</version>
        </dependency>
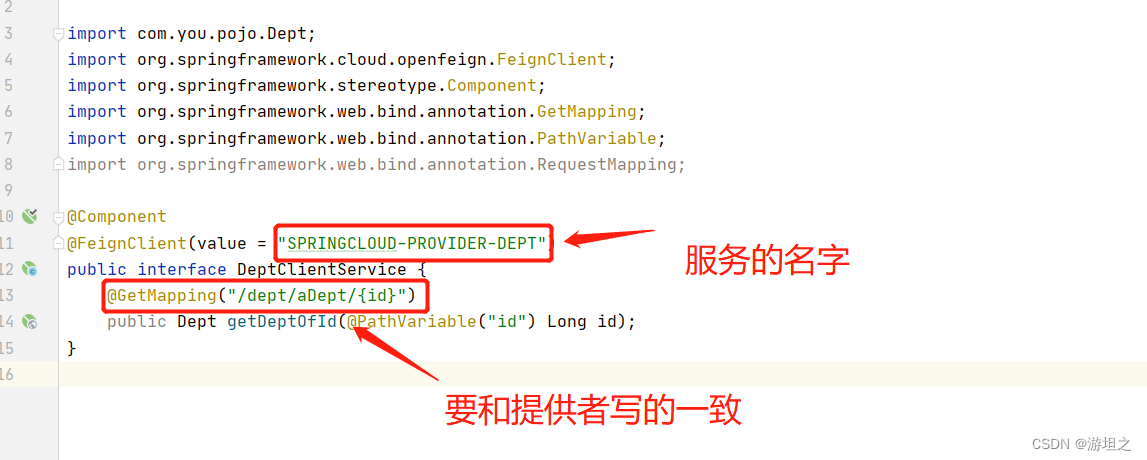
2)配置Service

package com.you.service;

import com.you.pojo.Dept;
import org.springframework.cloud.openfeign.FeignClient;
import org.springframework.stereotype.Component;
import org.springframework.web.bind.annotation.GetMapping;
import org.springframework.web.bind.annotation.PathVariable;
import org.springframework.web.bind.annotation.RequestMapping;

@Component
@FeignClient(value = "SPRINGCLOUD-PROVIDER-DEPT")
public interface DeptClientService {
    @GetMapping("/dept/aDept/{id}")
    public Dept getDeptOfId(@PathVariable("id") Long id);
}
3)注意

- 服务名字要写对
- GetMapper中的内容要和提供者一致,否则报错(找了一下午)
下面是提供者的内容

四、结果
这样即可获取到数据,而且负载平衡的默认算法,仍然是轮询!

- 点赞
- 收藏
- 关注作者


评论(0)