【Flutter 专题】69 图解基本 Stepper 步进器
【摘要】 0 基础学习 Flutter,第六十九步:学习基础 Stepper 步进器!
小菜尝试做一个积分进度和类似物流进度的小组件,优先考虑的是自定义 ListView 但还是查阅了一下资料,发现神奇的 Stepper 步进器,虽不能完全满足需求,但提供了很好的思路,小菜仅就基本的 Stepper 学习一下;
源码分析
const Stepper({
    Key key,
    @required this.steps,               // Step 列表
    this.physics,                       // 滑动动画
    this.type = StepperType.vertical,   // 方向:横向/纵向
    this.currentStep = 0,               // 当前所在 Step
    this.onStepTapped,                  // Step 点击回调
    this.onStepContinue,                // Step 继续按钮回调
    this.onStepCancel,                  // Step 取消按钮回调
    this.controlsBuilder,               // 自定义控件
})

class Step
  const Step({
    @required this.title,           // 标题
    this.subtitle,                  // 副标题
    @required this.content,         // 内容
    this.state = StepState.indexed, // 状态
    this.isActive = false,          // 是否高亮
  })
}
分析源码可知,Stepper 中存放的是 Step 列表,且 Step 数量不可变,其中包括了点击的回调等;Step 只是一个类而非 Widget 故不能单独使用;
案例尝试
Step
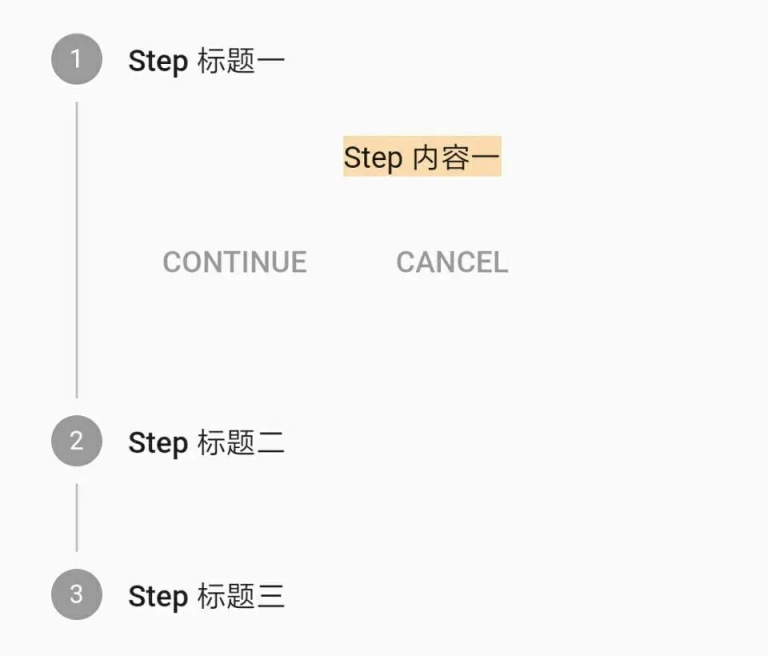
- title 为描述性标题;content 为标题与副标题之下的内容,默认包含 continue 和 cancel 按钮;两者均为 Widget 且不可为 null;
return Stepper(steps: [
  Step(title: Text('Step 标题一'), content: Container(color: Colors.orangeAccent.withOpacity(0.4), child: Text('Step 内容一'))),
  Step(title: Text('Step 标题二'), content: Container(color: Colors.blueAccent.withOpacity(0.4), child: Text('Step 内容二'))),
  Step(title: Text('Step 标题三'), content: Container(color: Colors.purple.withOpacity(0.4), child: Text('Step 内容三')))
]);

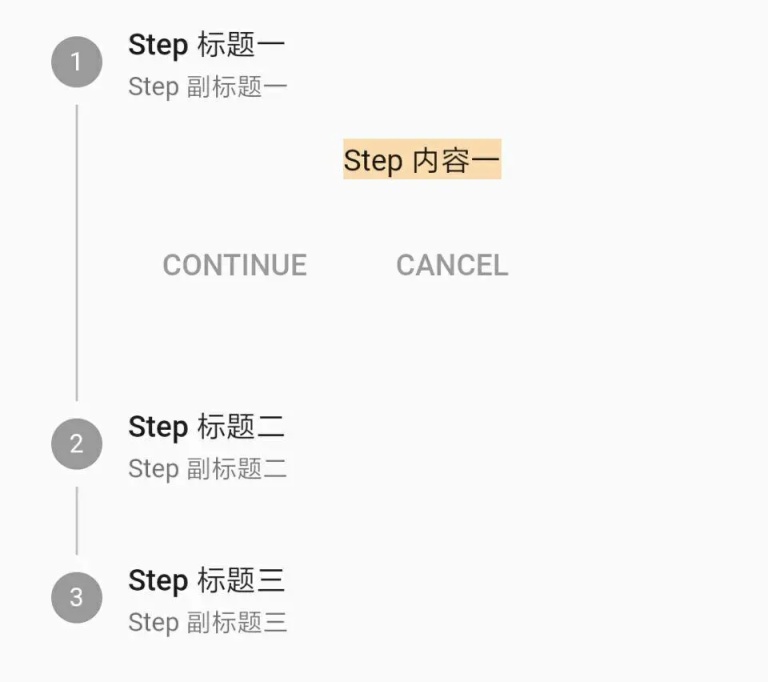
- subtitle 为副标题,在 title 之下,默认小一个字号;
return Stepper(steps: [
  Step(title: Text('Step 标题一'), subtitle: Text('Step 副标题一'),
      content: Container(color: Colors.orangeAccent.withOpacity(0.4), child: Text('Step 内容一'))),
  Step(title: Text('Step 标题二'), subtitle: Text('Step 副标题二'),
      content: Container(color: Colors.blueAccent.withOpacity(0.4), child: Text('Step 内容二'))),
  Step(title: Text('Step 标题三'), subtitle: Text('Step 副标题三'),
      content: Container(color: Colors.purple.withOpacity(0.4), child: Text('Step 内容三')))
]);

- state 为状态,Flutter 默认提供了多种状态样式;
a. indexed: 在圆中展示每个 Step 数组下标(从 1 开始);
b. editing: 编辑状态,在圆中展示铅笔图标;
c. complete: 完成状态,在圆中展示刻度图标;
d. disabled: 不可用状态,为灰色;
e. error: 错误状态,在红色三角中展示叹号图标;
return Stepper(steps: [
  Step(title: Text('Step state -> indexed'), state: StepState.indexed, content: Container()),
  Step(title: Text('Step state -> editing'), state: StepState.editing, content: Container()),
  Step(title: Text('Step state -> complete'), state: StepState.complete, content: Container()),
  Step(title: Text('Step state -> disabled'), state: StepState.disabled, content: Container()),
  Step(title: Text('Step state -> error'), state: StepState.error, content: Container())
]);

- isActive 为设置当前 Step 是否高亮,仅图标高亮,其中 error 状态默认高亮,disabled 状态图标也可高亮;
return Stepper(steps: [
  Step(isActive: true, title: Text('Step state -> indexed'), state: StepState.indexed, content: Container()),
  Step(isActive: true, title: Text('Step state -> editing'), state: StepState.editing, content: Container()),
  Step(isActive: true, title: Text('Step state -> complete'), state: StepState.complete, content: Container()),
  Step(isActive: true, title: Text('Step state -> disabled'), state: StepState.disabled, content: Container()),
  Step(isActive: true, title: Text('Step state -> error'), state: StepState.error, content: Container())
]);

Stepper
- type 包括横向 horizontal 展示与纵向 vertical 展示两类,默认是 vertical;
return Stepper(type: StepperType.horizontal,
    steps: [
      Step(title: Text('Step 标题一'), content: Container()),
      Step(title: Text('Step 标题二'), content: Container()),
      Step(title: Text('Step 标题三'), content: Container())
    ]);

- currentStep 为当前 Step,注意数组下标从 0 开始;
return Stepper(type: StepperType.horizontal, currentStep: 1,
    steps: [
      Step(title: Text('Step 标题一'), content: Container(child: Text('Step 内容一'))),
      Step(title: Text('Step 标题二'), content: Container(child: Text('Step 内容二'))),
      Step(title: Text('Step 标题三'), content: Container(child: Text('Step 内容三')))
    ]);

- onStepTapped 为 Step 点击回调,小菜尝试点击切换 Step 时获取当前 Step 高亮;
var _curStep = 0;
return Stepper(currentStep: _curStep,
    onStepTapped: (step) { setState(() {  _curStep = step; }); },
    steps: [
      Step(title: Text('Step 标题一'), content: Container(child: Text('Step 内容一')), isActive: _curStep >= 0 ? true : false),
      Step(title: Text('Step 标题二'), content: Container(child: Text('Step 内容二')), isActive: _curStep >= 1 ? true : false),
      Step(title: Text('Step 标题三'), content: Container(child: Text('Step 内容三')), isActive: _curStep >= 2 ? true : false)
    ]);

- onStepContinue 为 Step 中继续按钮点击回调;**** 为 Step 中取消按钮点击回调;小菜尝试对继续和取消点击进行 Step 切换;
return Stepper(currentStep: _curStep,
    onStepTapped: (step) { setState(() {  _curStep = step; }); },
    onStepContinue: () { setState(() { if (_curStep < 2) { _curStep++; } }); },
    onStepCancel: () { setState(() { if (_curStep > 0) { _curStep--; } }); },
    steps: [
      Step(title: Text('Step 标题一'), content: Container(child: Text('Step 内容一')), isActive: _curStep >= 0 ? true : false),
      Step(title: Text('Step 标题二'), content: Container(child: Text('Step 内容二')), isActive: _curStep >= 1 ? true : false),
      Step(title: Text('Step 标题三'), content: Container(child: Text('Step 内容三')), isActive: _curStep >= 2 ? true : false)
    ]);

- controlsBuilder 用来自定义继续和取消按钮,若不需要展示则设置空 Widget 即可;
return Stepper(currentStep: _curStep,
    onStepTapped: (step) { setState(() {  _curStep = step; }); },
    onStepContinue: () { setState(() { if (_curStep < 2) { _curStep++; } }); },
    onStepCancel: () { setState(() { if (_curStep > 0) { _curStep--; } }); },
    controlsBuilder: (BuildContext context, {VoidCallback onStepContinue, VoidCallback onStepCancel}) {
      return Row(children: <Widget>[
        Container( width: 100,
            child: Image.asset(_curStep == 0 ? 'images/icon_hzw01.jpg' : _curStep == 1 ? 'images/icon_hzw02.jpg' : 'images/icon_hzw03.jpg')),
        SizedBox(width: 30, height: 30),
        Column(children: <Widget>[
          FlatButton(color: Colors.orangeAccent.withOpacity(0.4), onPressed: onStepContinue, child: Text('下一步')),
          FlatButton(color: Colors.purple.withOpacity(0.4), onPressed: onStepCancel, child: Text('上一步'))
        ])
      ]);
    },
    steps: [
      Step(title: Text('Step 标题一'), content: Container(child: Text('Step 内容一')), isActive: _curStep >= 0 ? true : false),
      Step(title: Text('Step 标题二'), content: Container(child: Text('Step 内容二')), isActive: _curStep >= 1 ? true : false),
      Step(title: Text('Step 标题三'), content: Container(child: Text('Step 内容三')), isActive: _curStep >= 2 ? true : false)
    ]);

- physics 为滑动属性,小菜测试将 Stepper 放在 ListView 中且不能完全展示时,设置 ClampingScrollPhysics() 可连续滑动;
physics: ClampingScrollPhysics(),

Stepper 使用方便快捷,虽样式相对固定无法满足所有需求,但给我们提供了很好的自定义思路;小菜对 Stepper 研究尚浅,如有错误请多多指导!
来源: 阿策小和尚
【版权声明】本文为华为云社区用户原创内容,未经允许不得转载,如需转载请自行联系原作者进行授权。如果您发现本社区中有涉嫌抄袭的内容,欢迎发送邮件进行举报,并提供相关证据,一经查实,本社区将立刻删除涉嫌侵权内容,举报邮箱:
cloudbbs@huaweicloud.com
- 点赞
- 收藏
- 关注作者


评论(0)