走进Java接口测试之多数据源切换示例

一、前言
springboot 多数据源技术已经很成熟,网上也有很多案例,自己也按网上 Demo 动手搭建,运行后效果不是自己想要样子,在学习 spring 的时老师讲解 IOC 、AOP能做到自己想要的效果。
先搭建一个单数据源,先保证项目是可以运行的。使用springboot 很快就能搭建出来一个实例;
二、demo实现
2.1、开发环境
- IDEA 2021.10
- Maven 3.6.2
- SpringBoot 2.2.0
2.2、构建项目
新建一个 SpringBoot 工程,并引包:
<dependency>
    <groupId>org.springframework.boot</groupId>
    <artifactId>spring-boot-starter-actuator</artifactId>
</dependency>
<dependency>
    <groupId>org.springframework.boot</groupId>
    <artifactId>spring-boot-starter-web</artifactId>
</dependency>
<dependency>
    <groupId>org.springframework.boot</groupId>
    <artifactId>spring-boot-starter-test</artifactId>
    <scope>test</scope>
</dependency>
<dependency>

    <groupId>com.baomidou</groupId>
    <artifactId>mybatis-plus-boot-starter</artifactId>
    <version>3.4.3.1</version>
</dependency>
<!-- https://mvnrepository.com/artifact/mysql/mysql-connector-java -->
<dependency>
    <groupId>mysql</groupId>
    <artifactId>mysql-connector-java</artifactId>
    <version>8.0.25</version>
</dependency>
<!--引入druid数据源-->
<!-- https://mvnrepository.com/artifact/com.alibaba/druid -->
<dependency>
    <groupId>com.alibaba</groupId>
    <artifactId>druid</artifactId>
    <version>1.2.6</version>
</dependency>
<!-- https://mvnrepository.com/artifact/log4j/log4j -->
<dependency>
    <groupId>log4j</groupId>
    <artifactId>log4j</artifactId>
    <version>1.2.17</version>
</dependency>
2.3、配置数据源
数据源都是固定写法,按模版写就行。
spring:
  datasource:
    master: # 数据源1
      url: jdbc:mysql://localhost:3306/zlgc?characterEncoding=utf8&useUnicode=true&useSSL=false&serverTimezone=GMT%2B8
      username: root
      password: jd123root
      driver-class-name: com.mysql.cj.jdbc.Driver
      type: com.alibaba.druid.pool.DruidDataSource
      initialSize: 5
      minIdle: 5
      maxActive: 20
      maxWait: 60000
      timeBetweenEvictionRunsMillis: 60000
      minEvictableIdleTimeMillis: 300000
      validationQuery: SELECT 1 FROM DUAL
      testWhileIdle: true
      testOnBorrow: false
      testOnReturn: false
      poolPreparedStatements: true
      #   配置监控统计拦截的filters,去掉后监控界面sql无法统计,'wall'用于防火墙
      filters: stat,wall,log4j
      maxPoolPreparedStatementPerConnectionSize: 20
      useGlobalDataSourceStat: true
      connectionProperties: druid.stat.mergeSql=true;druid.stat.slowSqlMillis=500
2.4、编写配置文件
import com.alibaba.druid.pool.DruidDataSource;
import com.alibaba.druid.support.http.StatViewServlet;
import com.alibaba.druid.support.http.WebStatFilter;
import lombok.extern.log4j.Log4j2;
import org.springframework.boot.context.properties.ConfigurationProperties;
import org.springframework.boot.web.servlet.FilterRegistrationBean;
import org.springframework.boot.web.servlet.ServletRegistrationBean;
import org.springframework.context.annotation.Bean;
import org.springframework.context.annotation.Configuration;

import javax.sql.DataSource;

/**
 * @author 7DGroup
 * @program: javadeomotest
 * @description: 数据库启动
 * @date 2021-07-17 11:01:31
 */
@Log4j2
@Configuration
public class DbConfig {


    /**
     * 创建 master 数据源
     */
    @Bean(name = "masterDataSource")
    @ConfigurationProperties(prefix = "spring.datasource.master")
    public DataSource masterDataSource() {
        return new DruidDataSource();
    }


    @Bean
    public ServletRegistrationBean druidServlet() {
        ServletRegistrationBean servletRegistrationBean = new ServletRegistrationBean(new StatViewServlet(), "/druid/*");
        // IP白名单
        servletRegistrationBean.addInitParameter("allow", "127.0.0.1");
        // IP黑名单(共同存在时,deny优先于allow)
//        servletRegistrationBean.addInitParameter("deny", "192.168.1.100");
        //控制台管理用户
        servletRegistrationBean.addInitParameter("loginUsername", "admin");
        servletRegistrationBean.addInitParameter("loginPassword", "admin");
        //是否能够重置数据 禁用HTML页面上的“Reset All”功能
        servletRegistrationBean.addInitParameter("resetEnable", "false");
        return servletRegistrationBean;
    }


    @Bean
    public FilterRegistrationBean filterRegistrationBean() {
        FilterRegistrationBean filterRegistrationBean = new FilterRegistrationBean(new WebStatFilter());
        filterRegistrationBean.addUrlPatterns("/*");
        filterRegistrationBean.addInitParameter("exclusions", "*.js,*.gif,*.jpg,*.png,*.css,*.ico,/druid/*");
        return filterRegistrationBean;
    }

}
2.5、编写Dao层的mapper
import com.baomidou.mybatisplus.core.mapper.BaseMapper;
import com.dunshan.pojo.TestUser;
import org.apache.ibatis.annotations.Mapper;
/**
 * @author 7DGroup
 * @program: 多数据源
 * @description: 用户
 * @date 2021-07-17 12:11:50
 */
@Mapper
public interface UserMapper extends BaseMapper<TestUser> {
}
2.6、编写实体成层
import lombok.Data;

/**
 * @author 7DGroup
 * @description: 多数据源
 * @date 2021-07-17 12:08:53
 */

@Data
public class TestUser {
    private int id;
    private String name;
    private String phone;
    private String title;
    private String email;
    private String gender;
    private String dateOfBirth;
    private String deleted;
    private String sysCreateTime;
    private String sysCreateUser;
    private String sysUpdateTime;
    private String sysUpdateUser;
    private String recordVersion;
}
2.7、编写测试类
import com.alibaba.fastjson.JSON;
import com.dunshan.mapper.UserMapper;
import com.dunshan.pojo.TestUser;
import lombok.extern.log4j.Log4j2;
import org.junit.jupiter.api.Test;
import org.springframework.beans.factory.annotation.Autowired;
import org.springframework.boot.test.context.SpringBootTest;
import java.util.List;

/**
 * @author 7DGroup
 * @description: 用户测试
 * @date 2021-07-17 12:01:39
 */

@Log4j2
@SpringBootTest
public class DbTestSouc {
    @Autowired
    UserMapper userMapper;
    @Test
    public void test() {
        List<TestUser> testUsers = userMapper.selectList(null);
        System.out.println(JSON.toJSON(testUsers));
    }
}
2.8、验证结果

对于单数据源,只要写过代码的都能很快实现这个逻辑,没有什么技术含量,但是对多数据源网上也有很多教程,目前想实现的是通过添加头信息标志改变数据源,正好 AOP 编程就能帮助实现多数据源切换。
三、多数据源 demo 实现
多数据源采用 hreadLocal +AOP 编程实现,为什么要采用 threadlocal ,它提供了线程内存储变量的能力,每个线程读取的变量相互独立。
官方解释如下:
This class provides thread-local variables. These variables differ from their normal counterparts in that each thread that accesses one (via its get or set method) has its own, independently initialized copy of the variable. ThreadLocal instances are typically private static fields in classes that wish to associate state with a thread (e.g., a user ID or Transaction ID).
For example, the class below generates unique identifiers local to each thread. A thread's id is assigned the first time it invokes ThreadId.get() and remains unchanged on subsequent calls.
   import java.util.concurrent.atomic.AtomicInteger;

   public class ThreadId {
       // Atomic integer containing the next thread ID to be assigned
       private static final AtomicInteger nextId = new AtomicInteger(0);

       // Thread local variable containing each thread's ID
       private static final ThreadLocal<Integer> threadId =
           new ThreadLocal<Integer>() {
               @Override protected Integer initialValue() {
                   return nextId.getAndIncrement();
           }
       };

       // Returns the current thread's unique ID, assigning it if necessary
       public static int get() {
           return threadId.get();
       }
   }

Each thread holds an implicit reference to its copy of a thread-local variable as long as the thread is alive and the ThreadLocal instance is accessible; after a thread goes away, all of its copies of thread-local instances are subject to garbage collection (unless other references to these copies exist).
Since:
1.2
Author:
Josh Bloch and Doug Lea=
此类提供线程局部变量。这些变量不同于它们的普通对应变量,因为访问一个变量的每个线程(通过其get或set方法)都有自己的、独立初始化的变量副本。ThreadLocal实例通常是希望将状态与线程(例如,用户ID或事务ID)关联的类中的私有静态字段。例如,下面的类生成每个线程本地的唯一标识符。线程的id在它第一次调用ThreadId.get()时被分配,并且在随后的调用中保持不变。
3.1、配置数据源
在配置数据链接url的时候需要注意 url 写法,之前按网上试没有成功,后面又改为这样的链接,才配置成功。
spring:
  datasource:
    master: # 数据源1
      url: jdbc:mysql://localhost:3306/zlgc?characterEncoding=utf8&useUnicode=true&useSSL=false&serverTimezone=GMT%2B8
      username: root
      password: root
      driver-class-name: com.mysql.cj.jdbc.Driver
      type: com.alibaba.druid.pool.DruidDataSource
      initialSize: 5
      minIdle: 5
      maxActive: 20
      maxWait: 60000
      timeBetweenEvictionRunsMillis: 60000
      minEvictableIdleTimeMillis: 300000
      validationQuery: SELECT 1 FROM DUAL
      testWhileIdle: true
      testOnBorrow: false
      testOnReturn: false
      poolPreparedStatements: true
      #   配置监控统计拦截的filters,去掉后监控界面sql无法统计,'wall'用于防火墙
      filters: stat,wall,log4j
      maxPoolPreparedStatementPerConnectionSize: 20
      useGlobalDataSourceStat: true
      connectionProperties: druid.stat.mergeSql=true;druid.stat.slowSqlMillis=500
    slave: # 数据源2
      url: jdbc:mysql://localhost:3306/more_data?characterEncoding=utf8&useUnicode=true&useSSL=false&serverTimezone=GMT%2B8
      username: root
      password: root
      driver-class-name: com.mysql.cj.jdbc.Driver
      type: com.alibaba.druid.pool.DruidDataSource
      initialSize: 5
      minIdle: 5
      maxActive: 20
      maxWait: 60000
      timeBetweenEvictionRunsMillis: 60000
      minEvictableIdleTimeMillis: 300000
      validationQuery: SELECT 1 FROM DUAL
      testWhileIdle: true
      testOnBorrow: false
      testOnReturn: false
      poolPreparedStatements: true
      #   配置监控统计拦截的filters,去掉后监控界面sql无法统计,'wall'用于防火墙
      filters: stat,wall,log4j
      maxPoolPreparedStatementPerConnectionSize: 20
      useGlobalDataSourceStat: true
      connectionProperties: druid.stat.mergeSql=true;druid.stat.slowSqlMillis=500
3.2、增加pom文件
<?xml version="1.0" encoding="UTF-8"?>
<project xmlns="http://maven.apache.org/POM/4.0.0"
         xmlns:xsi="http://www.w3.org/2001/XMLSchema-instance"
         xsi:schemaLocation="http://maven.apache.org/POM/4.0.0 http://maven.apache.org/xsd/maven-4.0.0.xsd">
    <modelVersion>4.0.0</modelVersion>

    <groupId>com.dunshan</groupId>
    <artifactId>data-umber</artifactId>
    <version>1.0-SNAPSHOT</version>

    <properties>
        <maven.compiler.source>8</maven.compiler.source>
        <maven.compiler.target>8</maven.compiler.target>
    </properties>

    <parent>
        <groupId>org.springframework.boot</groupId>
        <artifactId>spring-boot-starter-parent</artifactId>
        <version>2.2.4.RELEASE</version>
        <relativePath/> <!-- lookup parent from repository -->
    </parent>

    <dependencies>
        <dependency>
            <groupId>org.springframework.boot</groupId>
            <artifactId>spring-boot-starter-actuator</artifactId>
        </dependency>
        <dependency>
            <groupId>org.springframework.boot</groupId>
            <artifactId>spring-boot-starter-web</artifactId>
        </dependency>
        <dependency>
            <groupId>org.springframework.boot</groupId>
            <artifactId>spring-boot-starter-test</artifactId>
            <scope>test</scope>
        </dependency>
        <dependency>
            <groupId>com.baomidou</groupId>
            <artifactId>mybatis-plus-boot-starter</artifactId>
            <version>3.4.3.1</version>
        </dependency>
        <!-- https://mvnrepository.com/artifact/mysql/mysql-connector-java -->
        <dependency>
            <groupId>mysql</groupId>
            <artifactId>mysql-connector-java</artifactId>
            <version>8.0.25</version>
        </dependency>
        <!--引入druid数据源-->
        <!-- https://mvnrepository.com/artifact/com.alibaba/druid -->
        <dependency>
            <groupId>com.alibaba</groupId>
            <artifactId>druid</artifactId>
            <version>1.2.6</version>
        </dependency>
        <!-- https://mvnrepository.com/artifact/log4j/log4j -->
        <dependency>
            <groupId>log4j</groupId>
            <artifactId>log4j</artifactId>
            <version>1.2.17</version>
        </dependency>
        <dependency>
            <groupId>org.projectlombok</groupId>
            <artifactId>lombok</artifactId>
            <optional>true</optional>
        </dependency>

        <dependency>
            <groupId>org.aspectj</groupId>
            <artifactId>aspectjweaver</artifactId>
            <version>1.9.2</version>
        </dependency>
        <!-- https://mvnrepository.com/artifact/com.alibaba/fastjson -->
        <dependency>
            <groupId>com.alibaba</groupId>
            <artifactId>fastjson</artifactId>
            <version>1.2.76</version>
        </dependency>
    </dependencies>

    <build>
        <plugins>
            <plugin>
                <groupId>org.springframework.boot</groupId>
                <artifactId>spring-boot-maven-plugin</artifactId>
                <version>2.2.2.RELEASE</version>
            </plugin>
        </plugins>
    </build>


</project>
3.3、修改数据源读取方式:
因为需要读取两个数据源地址,所以在写的时候增加两个配置文件读取方法,为了方便区分数据源,增加了数据源别名,参考代码如下:
import com.alibaba.druid.pool.DruidDataSource;
import com.alibaba.druid.support.http.StatViewServlet;
import com.alibaba.druid.support.http.WebStatFilter;
import lombok.extern.log4j.Log4j2;
import org.springframework.boot.context.properties.ConfigurationProperties;
import org.springframework.boot.web.servlet.FilterRegistrationBean;
import org.springframework.boot.web.servlet.ServletRegistrationBean;
import org.springframework.context.annotation.Bean;
import org.springframework.context.annotation.Configuration;
import org.springframework.context.annotation.Primary;

import javax.sql.DataSource;
import java.util.HashMap;
import java.util.Map;

/**
 * @author 7DGroup
 * @description: 数据库启动
 * @date 2021-07-17 11:01:31
 */
@Log4j2
@Configuration
public class DynamicDataSourceConfig {


    /**
     * 创建 slave 数据源
     */
    @Bean(name = "slaveDataSource")
    @ConfigurationProperties(prefix = "spring.datasource.slave")
    public DataSource slaveDataSource() {
        return new DruidDataSource();
    }


    /**
     * 创建 master 数据源
     */
    @Bean(name = "masterDataSource")
    @ConfigurationProperties(prefix = "spring.datasource.master")
    public DataSource masterDataSource() {
        return new DruidDataSource();
    }

    /**
     * 如果还有数据源,在这继续添加 DataSource Bean
     */

    @Bean
    @Primary
    public DynamicDataSource dataSource(DataSource masterDataSource, DataSource slaveDataSource) {
        Map<Object, Object> targetDataSources = new HashMap<>(2);
        targetDataSources.put(DataSourceNames.SLAVE, slaveDataSource);
        targetDataSources.put(DataSourceNames.MASTER, masterDataSource);
        // 还有数据源,在targetDataSources中继续添加
//        log.info("DataSources:" + targetDataSources);
        return new DynamicDataSource(masterDataSource, targetDataSources);
    }


    @Bean
    public ServletRegistrationBean druidServlet() {
        ServletRegistrationBean servletRegistrationBean = new ServletRegistrationBean(new StatViewServlet(), "/druid/*");
        // IP白名单
        servletRegistrationBean.addInitParameter("allow", "127.0.0.1");
        // IP黑名单(共同存在时,deny优先于allow)
//        servletRegistrationBean.addInitParameter("deny", "192.168.1.10");
        //控制台管理用户
        servletRegistrationBean.addInitParameter("loginUsername", "admin");
        servletRegistrationBean.addInitParameter("loginPassword", "admin");
        //是否能够重置数据 禁用HTML页面上的“Reset All”功能
        servletRegistrationBean.addInitParameter("resetEnable", "false");
        return servletRegistrationBean;
    }


    @Bean
    public FilterRegistrationBean filterRegistrationBean() {
        FilterRegistrationBean filterRegistrationBean = new FilterRegistrationBean(new WebStatFilter());
        filterRegistrationBean.addUrlPatterns("/*");
        filterRegistrationBean.addInitParameter("exclusions", "*.js,*.gif,*.jpg,*.png,*.css,*.ico,/druid/*");
        return filterRegistrationBean;
    }

}
3.4、增加动态切换数据方式
注意这个是关键地方,暂时使用 ThreadLocal 获取与设置对象;想了解 ThreadLocal 更多知识可以查看ThreadLocal:线程专属的变量、调用链跨线程传递 ThreadLocal 对象对比等文章。
import org.springframework.jdbc.datasource.lookup.AbstractRoutingDataSource;

import javax.sql.DataSource;
import java.util.Map;

/**
 * @author 7DGroup
 * @description: 动态数据源切换
 * @date 2021-07-17 12:35:14
 */

public class DynamicDataSource extends AbstractRoutingDataSource {

    private static final ThreadLocal<String> contextHolder = new ThreadLocal<>();

    /**
     * 配置DataSource, defaultTargetDataSource为主数据库
     */
    public DynamicDataSource(DataSource defaultTargetDataSource, Map<Object, Object> targetDataSources) {
        super.setDefaultTargetDataSource(defaultTargetDataSource);
        super.setTargetDataSources(targetDataSources);
        super.afterPropertiesSet();
    }

    @Override
    protected Object determineCurrentLookupKey() {
        return getDataSource();
    }

    public static void setDataSource(String dataSource) {
        contextHolder.set(dataSource);
    }

    public static String getDataSource() {
        return contextHolder.get();
    }

    public static void clearDataSource() {
        contextHolder.remove();
    }
}
3.5、AOP 切面处理
概念:
- 切面(Aspect) :官方的抽象定义为“一个关注点的模块化,这个关注点可能会横切多个对象”。
- 连接点(Joinpoint) :程序执行过程中的某一行为。
- 通知(Advice) :“切面”对于某个“连接点”所产生的动作。
- 切入点(Pointcut) :匹配连接点的断言,在AOP中通知和一个切入点表达式关联。
- 目标对象(Target Object) :被一个或者多个切面所通知的对象。
- AOP代理(AOP Proxy) 在Spring AOP中有两种代理方式,JDK动态代理和CGLIB代理。
具体想学习更多知识,自己去查看相关文章,来补充知识
import lombok.extern.log4j.Log4j2;
import org.aspectj.lang.JoinPoint;
import org.aspectj.lang.annotation.Aspect;
import org.aspectj.lang.annotation.Before;
import org.aspectj.lang.annotation.Pointcut;
import org.springframework.stereotype.Component;
import org.springframework.web.context.request.RequestContextHolder;
import org.springframework.web.context.request.ServletRequestAttributes;

import javax.servlet.http.HttpServletRequest;
import java.util.Arrays;

/**
 * @author 7DGroup
 * @description: 数据源AOP切面处理
 * @date 2021-07-17 14:17:49
 */

@Log4j2
@Aspect
@Component
public class DataSourceAspect {


    /**
     * 切面,获取所有请求方法信息
     */
    @Pointcut("execution(public * com.dunshan.controller..*.*(..))")
    public void controllerAspect() {
    }

    // 请求method前打印内容
    @Before(value = "controllerAspect()")
    public void methodBefore(JoinPoint joinPoint) {
        ServletRequestAttributes requestAttributes = (ServletRequestAttributes) RequestContextHolder
                .getRequestAttributes();
        HttpServletRequest request = requestAttributes.getRequest();
        String header = request.getHeader("dunshan");

        // 打印请求内容
        log.info("===============请求内容===============");
        log.info("请求地址:" + request.getRequestURL().toString());
        log.info("请求方式:" + request.getMethod());
        log.info("请求类方法:" + joinPoint.getSignature());
        log.info("请求类方法参数:" + Arrays.toString(joinPoint.getArgs()));
        log.info("请求类方法头信息:" + header);

        // 获取参数名称和值,切换数据源
        if (header != null && header.equals("7DGroup")) {
            DynamicDataSource.setDataSource(DataSourceNames.MASTER);
        } else {
            DynamicDataSource.setDataSource(DataSourceNames.SLAVE);
        }

    }
}
主要注解:
- @Aspect:声明被注解的类是一个切面 Bean。
- @Before:前置通知,指在某个连接点之前执行的通知。
- @After:后置通知,指某个连接点退出时执行的通知(不论正常返回还是异常退出)。
- @AfterReturning:返回后通知,指某连接点正常完成之后执行的通知,返回值使用returning属性接收。
- @AfterThrowing:异常通知,指方法抛出异常导致退出时执行的通知,和@AfterReturning只会有一个执行,异常使用throwing属性接收。
3.6、定义切换数据源接口
/**
 * 数据源名称
 */
public interface DataSourceNames {
    String MASTER = "master";
    String SLAVE = "slave";
}
3.7、简单访问层
import com.alibaba.fastjson.JSON;
import com.dunshan.mapper.UserMapper;
import com.dunshan.pojo.TestUser;
import com.dunshan.service.Userser;
import org.apache.ibatis.annotations.Param;
import org.springframework.beans.factory.annotation.Autowired;
import org.springframework.stereotype.Controller;
import org.springframework.web.bind.annotation.GetMapping;
import org.springframework.web.bind.annotation.RequestBody;
import org.springframework.web.bind.annotation.ResponseBody;

import javax.servlet.http.HttpServletRequest;
import javax.websocket.server.PathParam;
import java.util.HashMap;
import java.util.Map;

/**
 * @author 7DGroup
 * @description: index
 * @date 2021-07-17 10:59:51
 */
@Controller
public class IndexControl {
    @Autowired
    UserMapper userMapper;

    @Autowired
    Userser userser;

    @GetMapping("/index")
    @ResponseBody
    public Object index(TestUser user,HttpServletRequest request) {
        HashMap<Object, Object> map = new HashMap<>();
        map.put("ok", JSON.toJSON(user));
        map.put("master", "test");
        map.put("data", userMapper.selectByMap(null));

        return map;
    }
    }
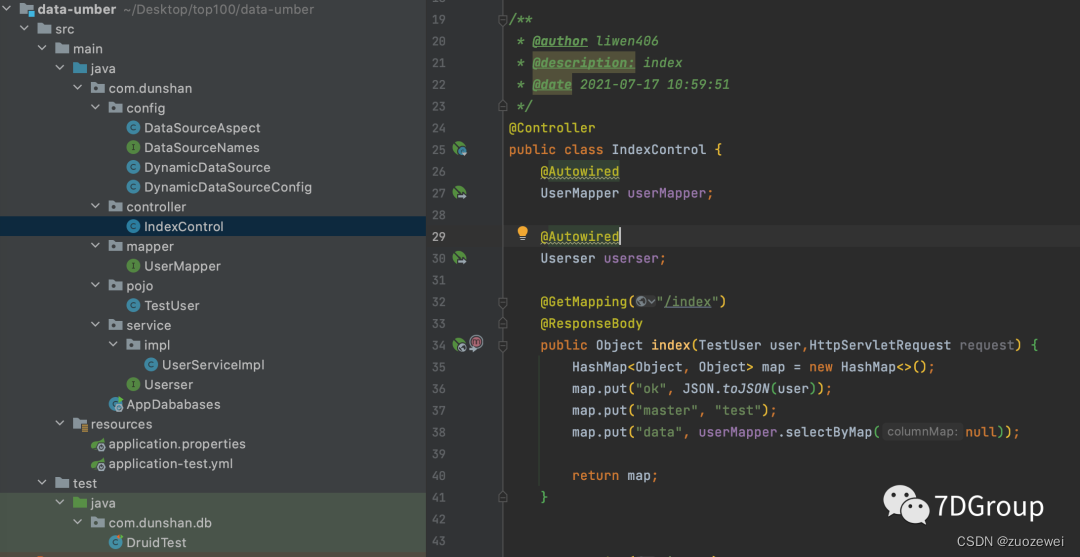
3.8、整个工程目录
3.9、运行效果:
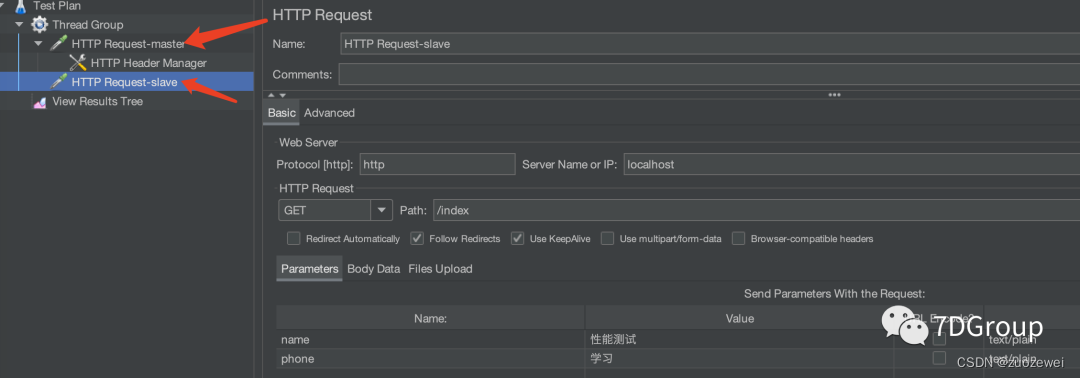
打开Jmeter新建线程组,添加两个请求一个添加头信息一个不添加头信息,最终效果如下图:
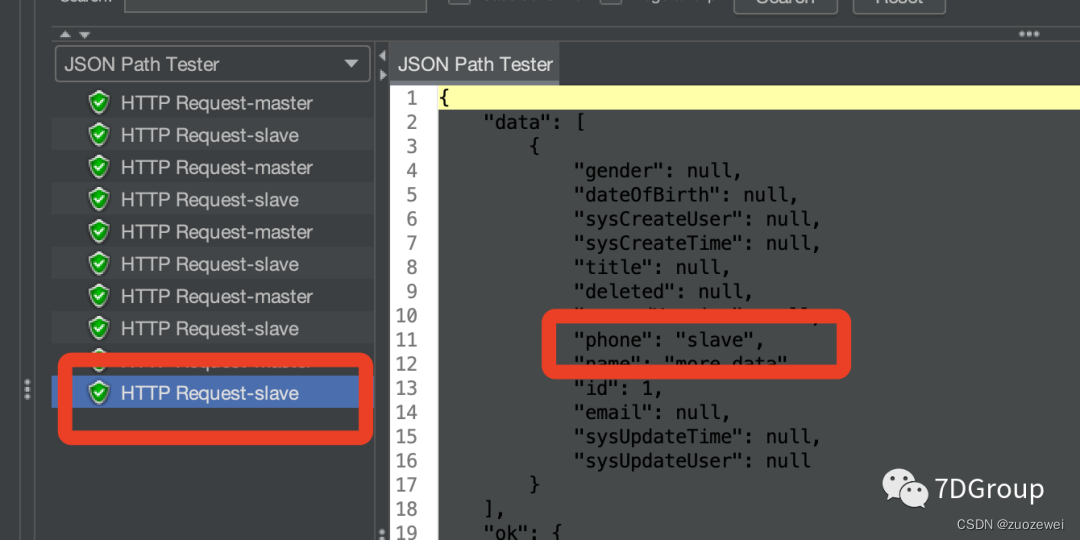
Master头信息验证如下,与自己想要结果一致

Slave不添加头信息验证如下,与自己想要结果一致
四、最后
小问题:头文件加了什么,切换数据源才正常?
- 点赞
- 收藏
- 关注作者
评论(0)